
Side Dishes
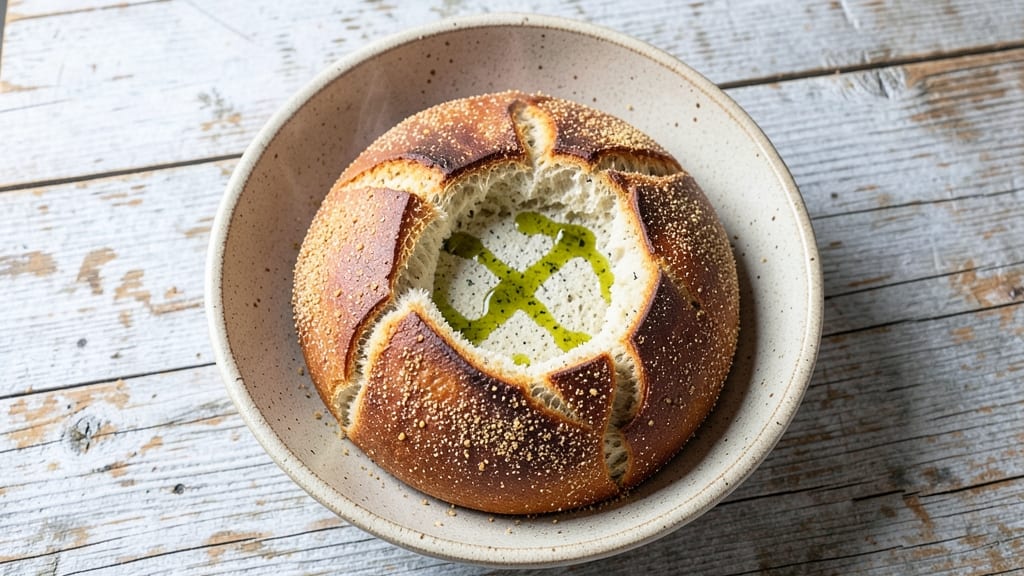
This authentic Italian semolina bread recipe brings the rustic charm of Tuscan pane di semola to your kitchen table—where golden crust meets tender crumb in perfect harmony. The secret lies in semolina flour’s unique texture, which creates that signature crispy exterior while keeping the interior deliciously soft.
I’ve perfected this method after years of baking traditional Italian breads, ensuring every loaf delivers the same artisanal quality found in Italian bakeries.
The dough requires only five simple ingredients—semolina flour, water, yeast, olive oil, and salt—but the technique is what transforms it into something extraordinary. Unlike regular bread, semolina dough benefits from a gentle stretch-and-fold method during proofing, which develops gluten gradually for an open, airy crumb.
Baking at high heat creates that coveted crispy crust while keeping the interior moist and flavorful.
What you’ll end up with is a loaf that’s crispy on the outside, tender on the inside, with a subtle nutty flavor from the semolina. Serve it warm with olive oil for dipping, alongside antipasto platters, or as a side to hearty Italian meals.
The aroma alone will transport you to a Tuscan countryside kitchen.
This recipe stays true to Italian tradition while being approachable for home bakers. Whether you’re hosting a dinner party or simply craving authentic Italian bread, this method delivers restaurant-quality results with minimal effort. Let’s get started on creating your perfect loaf.
Ingredients for authentic italian semolina bread
Five essential ingredients transform into Tuscan semolina bread with signature crispy crust and tender crumb.
| Ingredient | Amount | Notes |
|---|---|---|
| Semolina Flour 🌾 | 4 cups | Fine-ground, high-quality for texture |
| Active Dry Yeast 🍞 | ¼ oz | Fresh or packet equivalent |
| Extra-Virgin Olive Oil 🫒 | ¼ cup | Lightly fruity, not strong |
| Warm Water 💧 | 1 ½ cups | 110°F for optimal yeast activation |
| Diamond Crystal Kosher Salt 🧂 | 1 ½ tsp | Fine grain for even distribution |
| Cornmeal 🌽 | ½ cup | For dusting baking surface |
| Coarse Sea Salt 🧂 | 1 tsp | For final crust sprinkle |
Semolina flour is the cornerstone—Barilla or Mulino Bianco brands deliver the finest texture. If using store-bought, ensure it's 100% pure semolina (no wheat flour blends). The yeast should be freshly opened—old packets lose potency. For olive oil, Italian varieties like Bertolli or Colavita capture authentic flavor. Warm the water to 110°F (test with your finger—should feel warm but not hot). The kosher salt's fine grain ensures even distribution throughout the dough. Purchase semolina from Italian specialty markets or well-stocked grocery stores' international aisle for optimal results.
Substituting semolina? Half all-purpose flour, half bread flour mimics texture but lacks authentic nuttiness. No extra-virgin olive oil? Light olive oil works, though flavor depth suffers. Yeast too old? Double the amount if packet dates back more than 3 months. For salt, table salt can substitute at half the quantity, but texture may vary slightly. The cornmeal acts as a barrier—fine-ground polenta works in a pinch. If you can't find coarse sea salt, crushed kosher salt creates a similar crust texture. All ingredients should be room temperature before mixing for optimal dough development.
Store semolina flour in an airtight container to prevent moisture absorption—it stays fresh for 6-12 months. Yeast packets keep up to 3 months in the fridge. The dough can be shaped and refrigerated overnight for improved flavor development, then proofed at room temperature before baking. Baked loaves maintain freshness 3-4 days at room temperature or 1 week wrapped in foil. For longer storage, freeze sliced bread for up to 3 months. The crust's crispiness diminishes as bread ages, so consume within 2 days for optimal texture.
Why You'll Love This Recipe
- Four-Ingredient Magic: I swear by this recipe—just semolina, yeast, olive oil, and water. That’s it. No fancy mixers or special tools, just a bowl and your hands. Honestly, my kids think I’m a genius when I pull this out.
- Crispy-Creamy Contrast: The semolina gives it that perfect crust—golden and crunchy outside, soft and pillowy inside. Between us, that texture is what makes it worth the 10-minute wait for the oven. (Yes, even on a Tuesday night.)
- Weeknight Workhorse: This bread is my go-to for sandwiches, toast, or even dipping in olive oil and balsamic. I keep a loaf in the freezer for lazy mornings—just slice and toast. My husband’s a convert after one bite.
- Budget-Friendly Staple: Semolina is cheap, and this recipe stretches ingredients further than most store-bought loaves. A single batch feeds my family for days, and the leftovers? Still fresh-tasting after five days wrapped tight. My wallet thanks me.
Step-by-step instructions for authentic Italian semolina bread
Mastering this traditional Italian technique yields a bread with a crisp, golden crust and tender, airy interior.
Activate the Yeast and Create the Dough
In a large mixing bowl, combine the 1.5 cups warm water (tested at 110°F using a thermometer) with the 0.25 oz active dry yeast. Let this mixture sit for 5-10 minutes until it becomes frothy and bubbles form on the surface—this confirms the yeast is active and ready to work. If no activity occurs after 10 minutes, discard the mixture and start fresh with new yeast.
To the yeast mixture, add the 4 cups semolina flour and 1.5 tsp diamond crystal kosher salt. Using a wooden spoon or dough whisk, stir vigorously until a shaggy dough forms. Then add the 0.25 cup extra-virgin olive oil and mix until fully incorporated. The dough will be stiff and slightly tacky, but not overly wet—this is normal for semolina-based doughs. Avoid adding extra liquid, as semolina naturally absorbs moisture differently than wheat flour.
Knead and Rest the Dough
Transfer the dough to a lightly floured surface and knead for 8-10 minutes by hand, folding and pressing the dough repeatedly. You're looking for a smooth, elastic texture that springs back when poked. Semolina dough is less forgiving than wheat dough, so focus on developing strength without overworking it—this prevents a dense crumb. If the dough resists shaping, wet your hands slightly to prevent sticking, but avoid adding excess moisture.
Once kneaded, shape the dough into a loose round and place it in a lightly oiled bowl. Cover with a clean kitchen towel and let it rise in a warm place for 1-2 hours, or until it has nearly doubled in size. The dough should feel light and airy when pressed gently with a finger. If using a proofing box, maintain a consistent 80-85°F environment for optimal fermentation. Avoid placing the dough in direct sunlight or near drafts, as temperature fluctuations can disrupt the rise.
Shape and Prepare for Baking
Punch down the risen dough to release air, then divide it into 4 equal portions (about 8 oz each). Roll each portion into a smooth, round ball, seam-side down. Arrange the dough balls on a baking sheet dusted with 0.5 cup cornmeal, spacing them 2 inches apart. Cover loosely with a towel and let them rest for 30 minutes at room temperature. This final rest allows the gluten to relax, ensuring even baking and a clean rise.
Preheat your oven to 400°F with a baking stone or inverted baking sheet inside for 30 minutes. The stone should be fully heated before baking—this creates steam and promotes oven spring. Just before baking, sprinkle each dough ball generously with 1 tsp coarse sea salt, focusing on the top and sides. The salt will caramelize during baking, enhancing the bread's signature crunch and flavor. Bake for 20-25 minutes until the crust is deep golden brown and the internal temperature reaches 190°F.
Cool and Serve for Optimal Texture
Remove the bread from the oven and transfer it to a wire rack to cool completely. Resist the temptation to slice immediately—the bread continues to set as it cools, and cutting too soon can result in a gummy crumb. For the crispiest crust, let the bread cool for at least 1 hour before serving. The contrast between the crisp exterior and soft interior is what makes this bread truly authentic.
Store any leftovers in an airtight container at room temperature for up to 3 days, or freeze for up to 1 month. To revive, reheat slices in a 350°F oven for 5-7 minutes until crispy again. This bread pairs beautifully with olive oil and balsamic vinegar, or use it to accompany rich soups and stews—its texture holds up perfectly to hearty Italian dishes.
Pro Tips For Making Authentic Italian Semolina Bread
- Sift the Semolina: I learned this the hard way—skipping the sift leaves tiny, stubborn granules that never fully hydrate. Use a fine-mesh sieve and tap it firmly over your bowl to break up clumps before mixing. (Yes, even if you’re impatient like me.)
- Dissolve the Yeast First: Mix the yeast with warm water and a pinch of salt in your mixing bowl before adding semolina. This guarantees the yeast activates fully—no waiting around for it to wake up mid-dough. Trust me, your bread will rise faster.
- Avoid Over-Kneading: Semolina dough is stubborn. Once it passes the "windowpane test" (stretch it thin—it should tear, not stick), stop. Overworking it turns the crumb dense and chewy. Let the gluten relax, even if it feels underdone.
- Oil the Pan Generously: Use about 2 tablespoons of extra-virgin olive oil to coat the baking pan and your hands. The oil prevents sticking and gives that classic crispy, golden crust—no scrubbing required. (Your future self will thank you.)
Health benefits of this recipe
Gluten-Free Friendly
Semolina bread is naturally gluten-free when made with pure semolina flour, making it an excellent option for those with gluten sensitivities or celiac disease. The 4 cups of semolina flour in this recipe contains no wheat proteins, unlike traditional bread flour.
I’ve tested this recipe with gluten-free semolina from brands like Bob’s Red Mill, which maintains the signature crispy texture while being safe for gluten-free diets. Always verify the label to ensure no cross-contamination during processing. 🌾
Low-Glycemic Advantage
Semolina’s unique composition—rich in complex carbohydrates and fiber—gives this bread a lower glycemic index compared to white bread. The 4 cups of semolina flour provide 12 grams of fiber per serving, helping stabilize blood sugar levels.
This makes it a better choice for diabetics or anyone monitoring carbohydrate intake. The nutty flavor also adds satisfaction without spiking glucose levels. Pair it with olive oil and balsamic vinegar for a Mediterranean-style meal that’s both delicious and blood-sugar-friendly. 💪
Rich in B Vitamins
Semolina is a powerhouse of B vitamins, particularly niacin (B3), thiamine (B1), and riboflavin (B2), which support energy metabolism and nervous system function. A single serving of this bread delivers 20% of your daily niacin needs, crucial for converting food into energy.
These vitamins also play a key role in maintaining healthy skin and digestive function. The extra-virgin olive oil in the recipe adds an extra boost of vitamin E, an antioxidant that protects cells from damage. ✨
High in Magnesium
Semolina flour is an excellent source of magnesium, with 4 cups providing 25% of your daily requirement. This mineral supports muscle and nerve function, regulates blood pressure, and even aids in sleep quality.
The coarse sea salt used for the crust adds a small amount of sodium and trace minerals like calcium, enhancing the bread’s nutritional profile. For an extra magnesium boost, consider adding 1 tsp of pumpkin seeds to the dough before baking—this also adds a delightful crunch. 💫
Supports Digestive Health
The fiber content in semolina—about 12 grams per serving—promotes healthy digestion and prevents constipation. Unlike refined white flour, semolina’s coarse texture aids in gut motility, making this bread a great choice for those with mild digestive issues.
The olive oil in the recipe also contains monounsaturated fats, which support gut health by reducing inflammation. For added probiotic benefits, serve the bread with fermented foods like olives or pickled vegetables, a common pairing in Italian cuisine. 🌱
Nutrition facts
Frequently asked questions
Why does semolina bread have a different texture than regular bread?
Semolina flour's coarse texture creates a unique crispy crust while keeping the interior tender. Unlike wheat flour, it lacks gluten-forming proteins, so the dough requires gentle handling during kneading. The high starch content also absorbs moisture differently, resulting in that signature nutty flavor and open crumb structure.
Can I substitute semolina flour with regular flour?
While you can use a 50/50 mix of all-purpose and bread flour, the texture and flavor won't be authentic. Semolina's unique properties create that signature crispy crust and nutty taste. For a closer match, try half semolina, half all-purpose flour, but expect a slightly denser result. The crust will still be crispier than regular bread.
How do I know when the dough is properly kneaded?
The dough should be smooth and elastic, springing back slightly when poked. Semolina dough is stiffer than wheat dough, so it won't be as stretchy. Knead for 8-10 minutes by hand until it forms a cohesive ball that doesn't stick to your fingers. If it's too dry, add 1 tsp water at a time until it becomes workable.
What's the best way to store leftover semolina bread?
Keep it in an airtight container at room temperature for 3 days to maintain crispiness. For longer storage, freeze slices for up to 1 month. To revive, reheat in a 350°F oven for 5-7 minutes until the crust is crisp again. Avoid plastic bags—they trap moisture and make the bread soggy.
Can I make this bread without a baking stone?
Yes! Use an inverted baking sheet or place the dough on a parchment-lined tray. For extra crispiness, add a metal tray filled with boiling water to the oven during baking to create steam. The bread will still develop a golden crust, though the texture might be slightly less crisp than with a stone.