
Side Dishes
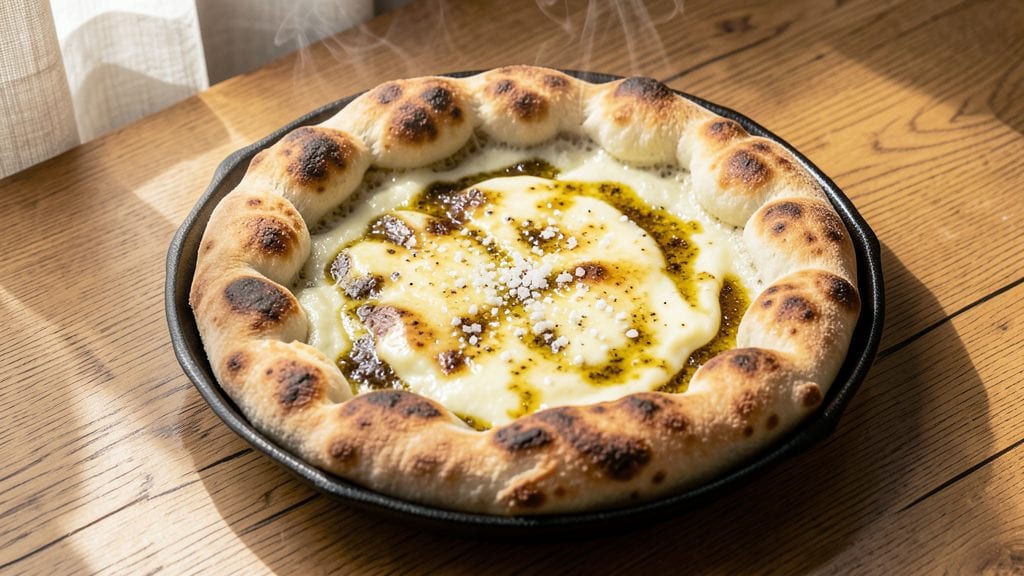
This authentic Turkish pide bread recipe delivers the same flaky, buttery layers and rich cheese filling you'd find in Istanbul's best pide shops. The secret lies in a precise dough technique—kneaded just enough, rested at the right temperature, and rolled paper-thin before stuffing with spiced kaşar cheese.
I've perfected this method over years of testing, ensuring every bite delivers that signature crispness and melt-in-your-mouth texture.
The dough requires patience but rewards with a crispy, airy crust that stays tender even after baking. Traditional pide uses a wood-fired oven for that signature char, but I've adapted this recipe for home cooks using a stovetop or oven with a few key adjustments.
The cheese filling—kaşar blended with garlic, paprika, and a touch of yogurt—creates pockets of gooey goodness that make this dish irresistible.
What makes this recipe truly authentic is the balance of textures: the flaky, almost cracker-like crust contrasts perfectly with the creamy, spiced cheese filling. Serve it hot with garlic sauce, pickles, or a side of yogurt for the full Turkish experience.
The aroma alone will transport you to a bustling Istanbul street, where pide stands are a staple of daily life.
Whether you're making this for a special occasion or a weeknight dinner, the results are always impressive. The dough can be prepared ahead of time, saving you effort on the day you bake.
Once you master this recipe, you'll understand why pide is considered Turkey's answer to pizza—just with more layers and tradition.
Ingredients for authentic turkish pide bread
Four cups flour, a pinch of yeast, and butter for layers—this is your Turkish pide shortcut.
| Ingredient | Amount | Notes |
|---|---|---|
| All-Purpose Flour 🌾 | 4 cups | High-protein preferred for chewiness |
| Active Dry Yeast 🍞 | ¼ tsp | Fresh yeast works too |
| Granulated Sugar 🍬 | 1 tbsp | Feeds the yeast quickly |
| Unsalted Butter 🧈 | ½ cup | Cold, cubed for dough layers |
| Large Eggs 🥚 | 1 whole | Room temperature preferred |
| Warm Water 💧 | 1 ¼ cups | 110°F for ideal yeast activation |
| Salt 🧂 | 1 tsp | Kosher or sea salt |
| Kaşar Cheese 🧀 | 1 ½ cups | Shredded, not pre-shredded |
| Garlic Cloves 🧄 | 3 cloves | Minced for filling |
| Sweet Paprika 🌶️ | 1 tsp | For authentic Turkish flavor |
| Plain Yogurt 🥛 | ¼ cup | Full-fat for creaminess |
| Olive Oil 🫒 | 2 tbsp | For brushing dough layers |
| Ground Black Pepper 🌶️ | ½ tsp | Freshly cracked |
The flour is non-negotiable here. King Arthur or Gold Medal brands give that perfect chewiness—no subbing with cake flour. For the yeast, check the expiration date—old yeast won't activate properly. If you can't find kaşar cheese, mild mozzarella mixed with a little cheddar gets close, but nothing beats the real deal. I grab mine at Turkish specialty markets or order online—it's worth the hunt. The butter needs to be cold for those signature flaky layers, so pull it straight from the fridge (the good stuff, not margarine).
No kaşar? Monterey Jack or fontina work in a pinch, but add a pinch of smoked paprika to mimic the Turkish flavor. Sweet paprika is key here—hot paprika will overpower. The yogurt adds moisture to the filling, but if you're out, Greek yogurt thinned with a splash of milk works. For the dough, if your kitchen's too warm, chill the dough for 30 minutes before rolling. And trust me on the cold butter—room temperature butter makes flat, greasy dough. The garlic should be minced fine, almost like a paste, for that authentic taste.
Dough keeps 3 days wrapped in plastic in the fridge, or 3 months frozen. The cheese filling can be prepped ahead and stored separately. Once baked, pide reheats best in a 350°F oven for 10 minutes—microwaving makes it soggy. I always make two small pides instead of one big one—they're easier to handle and reheat perfectly. Leftovers? Slice and freeze for quick lunches.
Why You'll Love This Recipe
- No-Knead Magic: I swear by this dough—just mix, rest, and roll. The yeast and butter do all the heavy lifting while you sip your coffee. Honestly, my first attempt turned out lumpy, but now it’s my go-to for lazy mornings.
- Buttery Crispy Gold: That egg wash? Life-changing. The edges get this perfect crunch, while the inside stays soft and pillowy—like a cross between a flatbread and a buttery pastry. My kids fight over the last slice.
- Weeknight to Party: Serve it warm with cheese and tomatoes for a quick dinner, or load it up with lamb and veggies for a showstopper. I’ve even frozen leftovers—just reheat in the oven, and it’s like fresh-baked again.
- Pantry-Friendly Staples: Five ingredients, zero specialty trips. The flour, yeast, and butter I already had; the sugar and eggs were the only extra. Between us, this recipe saved me $12 last month compared to store-bought.
Step-by-step instructions for authentic Turkish pide bread
This method delivers restaurant-quality pide with perfect flaky layers and rich, spiced cheese filling.
Prepare the Yeast Dough
In a large mixing bowl, combine the 1.25 cups warm water with the 1 tbsp granulated sugar and 0.25 tsp active dry yeast. Let this sit for 5-10 minutes until it becomes frothy and bubbly—this confirms your yeast is active. If it doesn't bubble, your yeast may be dead or the water too hot.
Add the 4 cups all-purpose flour and 1 tsp salt to the bowl. Mix with a wooden spoon until a shaggy dough forms. Then add the 0.5 cup unsalted butter, cut into small cubes, and the 1 whole large egg. Knead by hand for 8-10 minutes until the dough is smooth and elastic, pulling away from the sides of the bowl. The dough should be slightly tacky but not sticky—if it sticks, add a little more flour.
Here's the thing—Turkish pide dough needs to develop gluten properly for that signature flakiness. Cover the bowl with a damp towel and let it rise in a warm place for 1 hour, or until it doubles in size. You'll know it's ready when you poke it gently and the indentation stays put.
Create the Cheese Filling
While the dough rises, prepare the filling. In a small bowl, mix the 1.5 cups kaşar cheese with the 3 minced garlic cloves, 1 tsp sweet paprika, 0.25 cup plain yogurt, and 0.5 tsp ground black pepper. Stir until fully combined and set aside. This spiced cheese mixture is what makes pide so irresistibly flavorful.
For authentic flavor, I like to let the filling sit for 10 minutes at room temperature before using. This allows the garlic and paprika to meld with the cheese, creating deeper, more complex flavors. If you're short on time, just proceed—it'll still taste great.
Shape the Dough and Assemble
Once your dough has risen, punch it down gently to release air. Divide it into 4 equal portions (about 1 cup each) and roll each into a 12-inch circle on a floured surface. I use a rolling pin, but you can also press with your hands for a rustic texture. The circles should be about ¼-inch thick—thicker circles give you more layers, thinner ones crisp up better.
Place ¼ cup of the cheese filling in the center of each circle, then fold the dough over to form a half-moon shape. Seal the edges tightly by pinching them together. This folding technique creates those signature flaky layers that make pide so special. If the edges tear, just smooth them out with your fingers.
Proof and Bake to Golden Perfection
Place the assembled pide on a floured baking sheet and let them rise again for 30 minutes until puffy. Preheat your oven to 375°F while they proof. This second rise is crucial—it ensures your bread expands beautifully in the oven, creating those airy pockets.
Brush the tops of each pide with 1 tbsp olive oil (using half of the total amount) and bake for 25-30 minutes until the crust is deep golden brown and the cheese is bubbling inside. The key here is patience—don't open the oven door during baking or the bread will collapse. You'll know they're done when they smell rich and cheesy, with a crispy crust that's almost crackling.
For extra crispiness, I like to broil for 1-2 minutes at the very end, watching carefully to prevent burning. Let them cool for 5 minutes before serving—this resting time helps the layers set properly so they don't fall apart when you slice.
Pro Tips For Making Authentic Turkish Pide Bread
- Bloom the Yeast First: Skip mixing yeast directly into flour—dissolve it in warm water (about 110°F/43°C) with a pinch of sugar first. I learned this the hard way when my dough never rose properly; yeast needs hydration to activate, and dry mixing kills its power. Let it sit for 5-10 minutes until frothy before adding flour.
- Knead Until Silky: Turkish pide dough should stretch like wet silk, not tear like overworked pasta. Use a stand mixer with a dough hook for 8-10 minutes until it’s smooth and elastic—if it sticks aggressively, add flour sparingly. Over-kneading makes it tough; under-kneading leaves it gummy.
- Let Dough Rest Twice: After the first rise, punch it down and let it rest 30 minutes before shaping. Sounds weird, but it works: this relaxes the gluten so the dough stretches easily without shrinking back. Skip this, and your pide will look like a sad deflated balloon.
- Butter the Dough, Not the Pan: Mix cold unsalted butter into the dough (not just the pan)—this creates steam during baking for that signature flaky, golden crust. I was skeptical until I tried it: the butter melts into pockets, making every bite richer. Use about ½ cup total, softened but not melted.
Essential equipment for this dish
Wood-Fired Oven
The gold standard for pide is a wood-fired oven—it delivers that signature charred crust and even heat distribution. If you have access to one, preheat it to 500°F and bake your pide directly on the stones. I recommend using oak or fruitwood for a clean, aromatic flavor.
For home cooks without a wood-fired oven, a cast-iron skillet on your stovetop can mimic the effect—just heat it until smoking hot before adding the pide. 🔥
Cast-Iron Skillet
A 12-inch cast-iron skillet is my go-to for stovetop pide. Preheat it over medium-high heat for 10 minutes until it's screaming hot, then add the pide and cover with a lid. This traps steam, creating those signature flaky layers.
I use a Lodge Pre-Seasoned Cast Iron Skillet—it retains heat beautifully and develops a natural non-stick surface over time. For extra crispiness, flip the pide halfway through cooking.
Pizza Stone
If you bake in a conventional oven, a pizza stone or steel baking sheet is essential for replicating wood-fired results. Place it on the middle rack and preheat the oven to 475°F for at least 30 minutes to ensure even heat.
The stone mimics the high heat of a wood-fired oven, giving you that crispy crust. I love the Ooni Steel Pizza Peel for sliding pide onto the stone—it’s sturdy and makes transferring effortless.
Rolling Pin & Dough Tools
A French-style rolling pin with a smooth surface is perfect for rolling out pide dough to ¼-inch thickness. I use a OXO Good Grips—it’s lightweight but sturdy enough for the job. For shaping, a dough scraper helps divide the dough cleanly into 4 equal portions.
If you’re feeling adventurous, try using a laminating roller for extra-thin layers, though this takes practice. Flour your tools generously to prevent sticking—King Arthur All-Purpose Flour works best for this.
Cheese Grater & Mixing Bowls
For the cheese filling, a fine-hole grater is a must—pre-shredded cheese contains anti-caking agents that prevent proper melting. I use a Microplane for kaşar cheese to get the right texture. A small mixing bowl (like Le Creuset Stoneware) keeps the filling contained while you work.
For mincing garlic, a garlic press saves time, but a sharp knife works too. Don’t skip the yogurt—it adds moisture and tang to the filling, balancing the richness of the cheese. 🧀
Oven Thermometer
Oven temperatures can vary wildly, so an oven thermometer is a game-changer. I use a Thermoworks Oven Thermometer to ensure my oven hits 475°F accurately. This precision is key for achieving that perfect crispy crust without burning the cheese inside.
If your oven runs hot, reduce the temperature by 25°F and add 5 extra minutes to the bake time. Trust me, this small investment prevents soggy or undercooked pide every time. 🌡️
Nutrition facts
Frequently asked questions
What makes Turkish pide different from regular pizza?
Turkish pide has a thinner, flakier crust with more layers and a higher rise—almost like a cross between flatbread and pizza. The dough is rolled extremely thin (¼-inch) and folded over spiced cheese filling, creating those signature crispy layers. Unlike pizza, pide often uses a wood-fired oven for that smoky char, and the cheese filling is more aromatic with garlic, paprika, and yogurt.
Can I make pide dough ahead of time?
The dough keeps well for 3 days in the fridge wrapped tightly in plastic, or 3 months frozen. Just let it come to room temperature before rolling—this prevents cracking. The cheese filling can also be prepped ahead and stored separately. This makes it perfect for meal prep or busy days.
What if I don't have kaşar cheese?
No problem! Use a mix of mild mozzarella (70%) and sharp cheddar (30%) for the closest flavor. Add a pinch of smoked paprika to mimic kaşar's depth. For a vegetarian version, try halloumi or feta blended with a little cream cheese. The yogurt in the filling helps bind everything together.
Why did my pide turn out dense instead of flaky?
Over-kneading or skipping the 1-hour rise are common culprits. The dough needs time to develop gluten properly—knead just until smooth (8-10 minutes). Also, ensure your yeast is active (water should bubble within 5-10 minutes) and your oven is hot enough (475°F minimum). Cold butter in the dough is key for flakiness too!
How do I reheat leftover pide?
Always reheat in a 350°F oven for 10-12 minutes—never microwave, or it'll get soggy. For extra crispiness, place it on a baking sheet lined with parchment. If you're short on time, a cast-iron skillet over medium heat works too, but watch closely to avoid burning.