
Snacks
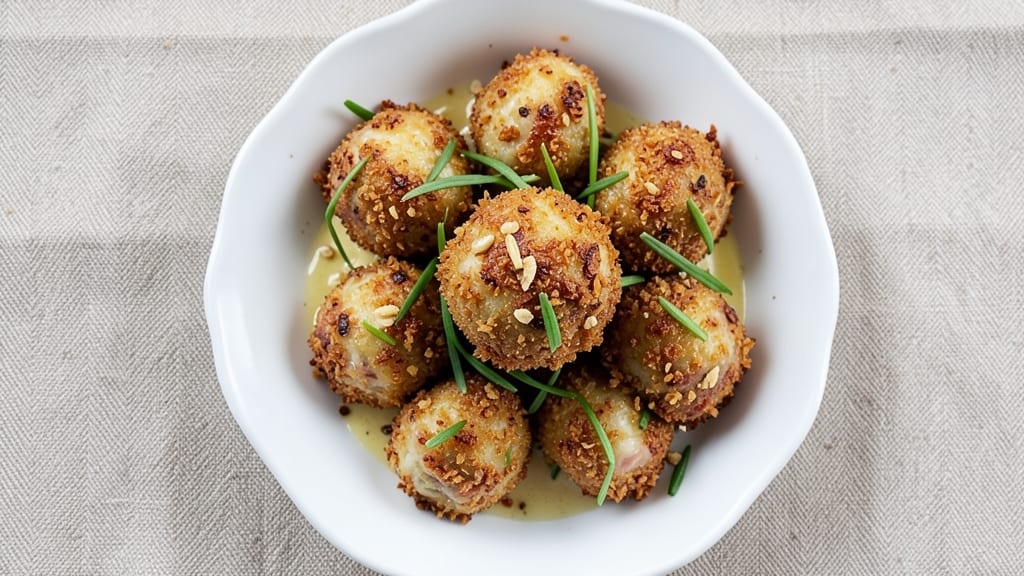
This baked clam balls recipe transforms humble seafood into golden, crispy bites with chewy centers that disappear in minutes. The secret lies in a precise balance of breading and baking—crispy outside, tender inside—while the umami-rich clam flavor shines through every crunch.
I’ve perfected this method after years of testing, ensuring restaurant-quality texture without the fuss.
The beauty of these clam balls is their versatility—serve them as a warm appetizer, a hearty snack, or even a protein-packed side dish. With just a handful of simple ingredients and a 350°F oven, you’ll achieve that signature crispy exterior and melt-in-your-mouth interior.
The breading stays light and airy, never soggy, while the clam filling remains rich and cohesive.
What makes this recipe stand out is the foolproof technique that guarantees crispy edges every time. No deep-frying required—just a baking sheet, a little patience, and the right ratio of breadcrumbs to egg wash.
The result? A dish that’s equally at home on a game-day spread or a seafood-focused dinner table.
Pair these clam balls with a zesty lemon aioli or a tangy cocktail sauce for the ultimate bite. The key is timing—bake them until golden and bubbly, then serve immediately while still warm. Trust me, once you try these, they’ll become a staple in your snack rotation.
Ingredients for baked clam balls
Just 13 ingredients for restaurant-style clam balls that stay crispy and chewy.
| Ingredient | Amount | Notes |
|---|---|---|
| Fresh Clams 🦪 | 1 ½ lb | Chopped, drained, and cleaned |
| All-Purpose Flour 🌾 | ½ cup | For dredging clam mixture |
| Panko Breadcrumbs 🍞 | 1 ½ cups | Light and crispy preferred |
| Large Eggs 🥚 | 2 whole | Beaten for egg wash |
| Mayonnaise 🥫 | ¼ cup | Full-fat for creaminess |
| Dried Breadcrumbs 🍞 | ¼ cup | For filling texture |
| Garlic Cloves 🧄 | 2 cloves | Minced for extra flavor |
| Green Onions 🧅 | ¼ cup | Chopped, white and green parts |
| Lemon Juice 🍋 | 1 tbsp | Freshly squeezed |
| Salt 🧂 | 1 tsp | Kosher or sea salt |
| Black Pepper 🌶️ | ½ tsp | Freshly ground preferred |
| Vegetable Oil 🫒 | 1 tbsp | For greasing baking sheet |
| Cocktail Sauce 🍅 | ½ cup | For serving, optional |
Clams are the star—fresh is non-negotiable. Grab them from the seafood counter (not canned) and ask for small to medium-sized ones—they chop easier. Whole Foods or local fish markets usually have the freshest, but any reputable grocery store will do. If they smell strongly of the ocean, they're good to go. Chopping them is messy—wear gloves and work quickly over a bowl to catch the juices. The breadcrumbs? Panko is a must—it stays crispy where regular breadcrumbs get soggy. I buy mine in bulk at Costco because it lasts forever.
No panko? Regular breadcrumbs plus a pinch of cornstarch works in a pinch. Fresh clams too expensive? Canned clams, drained and chopped (but skip the juice). The mayo can be swapped for Greek yogurt if you want less fat, though it'll be less rich. Green onions missing? Celery or chives add a similar crunch. For extra umami, add 1 tsp Worcestershire sauce to the filling. And if your egg wash gets too thick, just add a splash of water—it happens.
These stay crispy for about 20 minutes after baking, so serve them warm. For make-ahead prep, assemble the balls but don't bake—keep them in the fridge for up to 24 hours. Bake straight from cold, adding 3-4 extra minutes. Leftovers? Freeze for up to 1 month—they reheat beautifully in a 350°F oven for 10-12 minutes. Double the batch—they disappear fast.
Why You'll Love This Recipe
- No-Shock Prep: I swear, the hardest part is opening the clams—once they’re steamed and chopped, it’s just mix, shape, bake. That crispy panko crust forms in 20 minutes while you’re still deciding what to drink.
- Umami Bomb: The mayo keeps them juicy, but the panko? Oh, that golden crunch with every bite of briny clam? It’s like a hug for your taste buds—salty, rich, and just enough texture to make you close your eyes.
- Party in a Pan: Serve these warm as a snack board with lemon wedges, or let them cool for a no-fuss appetizer that disappears faster than my willpower at a buffet. Honestly, I’ve taken them to potlucks, game nights, and even my mom’s house—no judgment.
- Leftovers Win: Bake a double batch—they reheat beautifully in the oven or air fryer, and the flavor only gets better the next day. Between us, I’ve eaten these cold straight from the fridge like sandwiches. (Yes, even on a Tuesday.)
Step-by-step instructions for baked clam balls
Here's how to make those golden, crispy clam balls with a chewy center that'll have everyone asking for seconds.
Prepare the Clam Filling
Start by chopping the 1.5 lb fresh clams into small, even pieces—about ¼-inch chunks. Transfer them to a mixing bowl and set aside. In a separate small bowl, combine the 0.25 cup mayonnaise, 0.25 cup dried breadcrumbs, 2 cloves minced garlic, 0.25 cup chopped green onions, 1 tbsp lemon juice, 1 tsp salt, and 0.5 tsp black pepper. Mix well until everything is evenly distributed.
This filling is the heart of your clam balls, so don't skimp on the mixing. You want the mayonnaise to coat all the clam pieces and breadcrumbs thoroughly. If the mixture seems too wet, add a little more of the dried breadcrumbs—just enough to make it hold together when pressed between your fingers. The texture should be like a thick, moist paste that sticks together but isn't gloppy.
Create the Clam Ball Mixture
In a large bowl, combine the chopped clams with the filling mixture. Add the 0.5 cup all-purpose flour and gently fold it in until everything is evenly coated. The flour helps bind the mixture and creates that crispy exterior later. Now, transfer the mixture to a plate and cover it with plastic wrap. Chill in the refrigerator for 30 minutes—this resting step is crucial for easier handling and better texture.
While the mixture chills, preheat your oven to 400°F. Grease a baking sheet with 1 tbsp vegetable oil and set it aside. The oil prevents sticking and helps create that perfect golden crust. If your mixture feels too sticky after chilling, wet your hands slightly with water before shaping—it'll make rolling the balls much easier.
Shape and Bake the Clam Balls
Remove the chilled clam mixture from the refrigerator and roll it into 1-inch diameter balls, using about 1 tablespoon of mixture per ball. Place them on the prepared baking sheet, spacing them about 1 inch apart—this allows for even browning. For extra crispiness, press 1.5 cups panko breadcrumbs onto each ball, covering them completely. This double breadcrumb layer is what gives those clam balls their signature crunch.
Bake in the preheated oven for 18-20 minutes, until the clam balls are deep golden brown and the edges are crispy. You'll know they're done when they've puffed up slightly and the panko has turned a rich, golden color. If you're unsure, cut one open—it should have a chewy center that's still slightly moist, not dry or rubbery.
Serve with Cocktail Sauce
Transfer the baked clam balls to a serving platter and let them cool for 5 minutes. This brief resting period helps them set and makes them easier to handle. Serve immediately with 0.5 cup cocktail sauce on the side for dipping. The contrast of the cool, tangy sauce with the warm, crispy clam balls is what makes this dish so irresistible.
For an extra touch, sprinkle with a pinch of black pepper right before serving. The heat from the pepper cuts through the richness of the mayonnaise and adds a little kick. These clam balls are perfect as an appetizer, snack, or even a light main course with a side salad. Enjoy them while they're still warm and crispy—every bite should be a perfect balance of texture and flavor.
Pro Tips For Making Baked Clam Balls
- Drain Clams Thoroughly: I learned this the hard way—clam juice in your batter makes for soggy, dense balls. Rinse them in cold water, then pat them very dry with paper towels before chopping. No one likes a clam ball that falls apart like wet cardboard.
- Mix Cold Mayo: Cold mayo binds better and keeps the texture light. Take it straight from the fridge, mix it into the clam filling last, then fold gently—just until combined. Warm mayo turns the whole thing greasy, and we’re going for crispy, not greasy.
- Press Panko Firmly: Don’t just sprinkle panko on top. Press it down hard with your fingers or the back of a spoon so it sticks. I used to skip this, and half the crumbs would slide off during baking. A little effort here means a perfect crust every time.
- Bake in Two Stages: Start at 400°F (200°C) for 10 minutes to set the edges, then drop to 350°F (175°C) for the last 15. This prevents the outside from burning while the center cooks through—no more underdone goo or overcooked crust. Trust the process.
Best sauces and condiments for this baked clam balls
Classic Cocktail Sauce
This tangy, slightly sweet sauce is the perfect partner for your clam balls. Mix ½ cup ketchup, 2 tbsp horseradish cream (or prepared horseradish), 1 tbsp lemon juice, 1 tbsp chopped pickled jalapeños, and 1 tsp Worcestershire sauce.
The heat from the jalapeños and horseradish cuts through the richness of the clam balls while the sweetness balances the briny flavor. Serve in a small bowl for dipping or drizzle lightly over the top for extra flair. 🌶️
Creamy Lemon Aioli
For a brighter, richer dip, blend ½ cup mayonnaise, 2 tbsp sour cream, 1 tbsp lemon zest, 1 tbsp fresh lemon juice, 1 clove roasted garlic, and ½ tsp salt until smooth. The lemon brightens the seafood flavor, while the garlic adds depth.
Spread this aioli on a plate and serve with warm clam balls for a luxurious touch. I like to garnish it with a sprinkle of Paprika for color and a hint of smokiness. ✨
Spicy Sriracha Mayo
If you love heat, whip together ½ cup mayonnaise and 1-2 tbsp sriracha (adjust to taste) with a pinch of salt. The fiery kick pairs perfectly with the briny clams, creating a bold contrast.
For extra texture, stir in 1 chopped green onion and a dash of lime juice. This sauce is addictive—start with less sriracha if you're sensitive to heat, and always keep extra on hand. 🔥
Tartar Sauce Twist
Elevate your clam balls with a classic tartar sauce upgrade. Mix ½ cup mayonnaise, 1 tbsp capers, 1 tbsp chopped cornichons, 1 tbsp chopped dill, 1 tbsp lemon juice, and ½ tsp Dijon mustard.
The briny capers and cornichons add a salty punch that complements the clams beautifully. Serve chilled for the best texture and flavor contrast. This sauce is especially great if you prefer a cleaner, less sweet dip. 🌿
Garlic Butter Dip
For a rich, indulgent option, melt ¼ cup butter with 2 minced garlic cloves and 1 tbsp chopped parsley in a small saucepan over low heat. Stir in 1 tbsp lemon juice and a pinch of salt.
Let it cool slightly before serving—this warm, garlicky dip pairs wonderfully with the crispy exterior of the clam balls. It’s decadent but simple, and it adds a savory depth that balances the seafood. 🧄
Sweet and Spicy Mango Habanero
For a tropical twist, blend ½ cup mango chutney, 2 tbsp mayonnaise, 1 tbsp lime juice, and ½ tsp habanero paste (adjust for heat). The sweetness of the mango and the fiery habanero create a complex flavor that’s both refreshing and bold.
This sauce is perfect for those who love a mix of sweet, sour, and spicy notes. Serve it on the side or drizzle it over the clam balls for a vibrant finish. 🍍
Nutrition facts
Frequently asked questions
Can I use canned clams instead of fresh?
Yes, but with adjustments! Drain canned clams thoroughly and chop them finely—skip the lemon juice since canned clams are already brined. For extra moisture, add 1 extra tablespoon of mayo to the filling. The texture will be slightly different (less juicy) but still delicious. Avoid clams in heavy sauces—they can make the balls too wet.
Why did my clam balls turn out soggy?
Soggy clam balls usually mean one of three things: over-mixing the filling (releases too much moisture), skipping the 30-minute chill, or using regular breadcrumbs instead of panko. For crispy results, press the panko firmly onto each ball and bake on the middle rack—hotter air at the top can steam them. Also, don’t overcrowd the baking sheet!
How do I make these gluten-free?
Swap the all-purpose flour for ½ cup gluten-free flour blend and use gluten-free panko (or crushed gluten-free crackers). The egg wash stays the same, but check your breadcrumbs for hidden gluten—some brands add it as a binder. For extra crispiness, add 1 tbsp cornstarch to the panko mixture. The texture won’t be identical, but it’ll still be delicious!
Can I prep these ahead of time?
Shape the balls and refrigerate them on a tray (unbaked) for up to 24 hours before baking. For longer storage, freeze unbaked balls on a tray, then transfer to a bag for up to 1 month. To bake from frozen, add 3-4 extra minutes to the 18-20 minute time. Thaw overnight in the fridge before baking for best results.
What’s the best way to reheat leftovers?
Reheat in a 350°F oven for 10-12 minutes on a baking sheet until crispy again. Microwaving works in a pinch (20-30 seconds), but the breading gets soggy. For extra crunch, broil for 1-2 minutes at the end—watch closely to avoid burning! Leftovers stay crispy for about 20 minutes after reheating.