
Main Courses
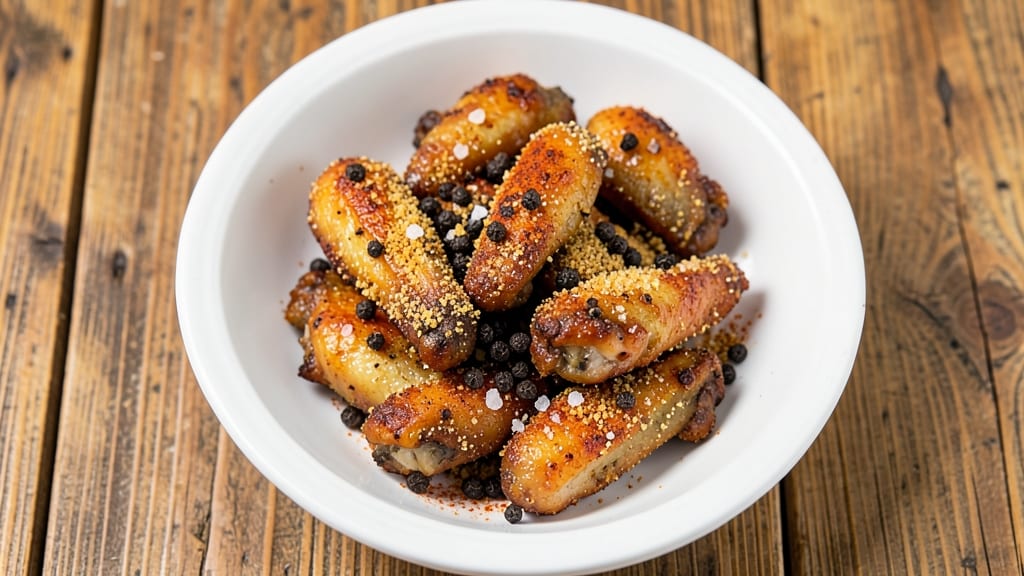
This baked salt and pepper chicken wings recipe delivers the perfect balance of crispy cornmeal crust and smoky, savory seasoning without deep-frying. After years of perfecting the technique, I’ve cracked the code for achieving that signature restaurant-style crunch in your home oven—every time.
The secret lies in a precise cornmeal coating and high-heat baking that transforms tender chicken into irresistible bites.
The process is straightforward yet professional: you’ll start with fresh wings coated in a mix of cornmeal, salt, and pepper, then bake them until golden and crispy. No messy fryers or greasy cleanup—just a simple, foolproof method that yields wings with a satisfying crunch and tender meat inside.
The smoky spices cling to the crispy exterior, creating a flavor profile that’s both bold and balanced.
By the end, you’ll have wings that are crispy on the outside, juicy on the inside, and packed with that signature salt and pepper kick. This recipe is designed for professional results, whether you’re feeding a crowd or treating yourself to a satisfying meal.
The best part? It’s easy to customize with additional spices or sauces for extra flavor.
Serve these wings with your favorite dipping sauce—ranch, blue cheese, or a tangy honey mustard—for a complete meal that’s sure to impress. Let’s get started on making wings that taste like they came straight from your favorite sports bar or restaurant.
Ingredients for baked salt and pepper chicken wings
Crispy cornmeal crust meets smoky salt and pepper—just eight simple ingredients for wings that taste like they came from your favorite sports bar.
| Ingredient | Amount | Notes |
|---|---|---|
| Chicken Wings 🍗 | 3 lb | Fresh, drumettes and flats |
| Cornmeal 🌾 | 1 cup | Fine grind for even coating |
| Kosher Salt 🧂 | ½ cup | Coarse grain preferred |
| Freshly Ground Black Pepper 🌶️ | 2 tbsp | Freshly cracked for best flavor |
| Garlic Powder 🧄 | 2 tsp | Not garlic salt |
| Smoked Paprika 🌶️ | 1 tbsp | For subtle smoky depth |
| Onion Powder 🧅 | 1 tbsp | Adds subtle sweetness |
| Olive Oil 🫒 | 2 tbsp | Light coating for crispiness |
| Large Eggs 🥚 | 2 whole | Room temperature for even coating |
| All-Purpose Flour 🌾 | ¼ cup | For extra crunch |
| Butter 🧈 | 2 tbsp | Melted, for basting |
| Honey 🍯 | 1 tbsp | Optional glaze finish |
The wings are the star, so look for fresh, never frozen—they’re usually in the meat section near the deli counter. Costco or Trader Joe's have great prices for bulk, but regular grocery stores work too. Pat them dry before coating (trust me on this), and if you can’t find drumettes and flats separately, just use whole wings and cut them yourself. The cornmeal needs to be fine grind—coarse won’t stick as well. I grab mine from the baking aisle at Walmart or Target—it’s cheaper than the organic stuff and works perfectly.
No smoked paprika? Regular paprika plus a pinch of liquid smoke gets you close. Short on cornmeal? Panko breadcrumbs work too—just add an extra tablespoon of flour to help it stick. The butter basting is non-negotiable for crispiness, but if you’re watching calories, use olive oil instead. Eggs should be room temperature—cold eggs make the coating clump. And if you’re feeling fancy, toss the finished wings in a little honey and hot sauce for a sticky glaze (worth the extra minute).
These wings reheat beautifully—just 5 minutes at 400°F to restore crispiness. Store leftovers in an airtight container for 3 days (they’ll lose crunch after that). For parties, bake them 20 minutes ahead and keep warm in a 200°F oven on a wire rack. The cornmeal coating gets soggy if stacked, so single layer only in the oven. Freeze extras for up to 2 months—just bake straight from frozen, adding 10 minutes to the time.
Why You'll Love This Recipe
- The secret’s in the double-bake: first at 400°F until golden, then a final blast at 450°F for that shatteringly crisp exterior. My kids still ask why I don’t deep-fry everything, but honestly? This tastes just as good—and way less messy.
- Five-Ingredient Magic: I swear by this combo—cornmeal clings like armor, salt and pepper caramelize into a crust, and garlic powder sneaks in that savory punch without overpowering. That’s it. No fancy marinades, no last-minute shopping runs.
- Crispy Without Frying: The secret’s in the double-bake: first at 400°F until golden, then a final blast at 450°F for that shatteringly crisp exterior. My kids still ask why I don’t deep-fry everything, but honestly? This tastes just as good—and way less messy.
- Game Day Staple: Between us, these wings are my Super Bowl MVP. They reheat perfectly for leftovers, so I make a double batch and freeze half. Toss them in a paper bag with ranch or blue cheese, and suddenly you’ve got a crowd-pleaser that costs less than takeout.
Step-by-step instructions for baked salt and pepper chicken wings
Here's how to achieve that perfect crunchy exterior with tender meat inside—every time.
Prepare the Dry Seasoning Rub
In a large bowl, combine the 1 cup cornmeal, 0.5 cup kosher salt, 2 tablespoons freshly ground black pepper, 2 teaspoons garlic powder, 1 tablespoon smoked paprika, and 1 tablespoon onion powder. Mix thoroughly until the spices are evenly distributed throughout the cornmeal. This dry blend is the foundation of that signature salt and pepper flavor profile.
I like to use my hands to break up any clumps in the cornmeal, ensuring a fine, even coating. The cornmeal creates a crispy crust while the salt and pepper deliver that bold, savory punch. Set this mixture aside while you prepare the chicken—it'll stay dry and ready for use.
Coat the Chicken Wings
Pat the 3 lb chicken wings completely dry with paper towels—this is absolutely critical for crispiness. Remove any excess fat or skin, but leave the wings whole. In a separate bowl, whisk together the 2 whole large eggs until fully combined.
Next, create a breading station by placing the dry seasoning rub in one shallow dish, the beaten eggs in another, and the 0.25 cup all-purpose flour in a third. Dip each wing first into the flour, then into the egg wash, and finally into the seasoning rub, pressing gently to adhere the coating. Place the coated wings on a wire rack set over a baking sheet—this allows air to circulate on all sides for even crisping.
Bake for Maximum Crispiness
Preheat your oven to 425°F while the wings rest for 10 minutes at room temperature. This ensures even cooking from the start. Arrange the coated wings on the prepared baking sheet, leaving 1 inch of space between each piece. Melt the 2 tablespoons butter and brush it lightly over the wings—this adds richness and helps develop that golden-brown crust.
Bake for 35-40 minutes, flipping the wings halfway through at the 20-minute mark. You'll know they're done when the coating is deep golden brown and the internal temperature reaches 165°F at the thickest part of the meat. The cornmeal crust should be crispy enough to shatter slightly when you press it gently with tongs.
Finish with Honey Glaze (Optional)
While the wings are still hot, brush them lightly with the 1 tablespoon honey for a subtle sweet contrast to the salty crust. This step is optional but adds a beautiful glaze that caramelizes slightly on the wings. If you prefer them purely savory, skip this and serve immediately.
Let the wings rest for 5 minutes before serving—this allows the juices to redistribute, keeping the meat tender. Serve with your favorite dipping sauce, like ranch or blue cheese, and enjoy the perfect balance of crispy, smoky, and savory flavors in every bite.
Pro Tips For Making Baked Salt And Pepper Chicken Wings
- Preheat Until Smoking: Your oven needs to hit 425°F (220°C) and stay there for 10-15 minutes—you should see smoke when you open the door. I used to skip this, and my wings came out unevenly cooked. That initial burst of heat locks in moisture while the cornmeal crust forms properly.
- Toss Wings in Cornmeal: Don’t just sprinkle—toss the wings in cornmeal twice for a thick, even coating. The first layer sticks to the moisture, and the second layer creates that perfect crunch. (Yes, it’s messy, but it’s worth it.)
- Salt Before Baking: Season the wings with kosher salt before adding cornmeal—this ensures the seasoning gets under that crust. I learned this the hard way when my wings tasted bland no matter how much I peppered them after baking.
- Flip Midway for Even Color: After 20 minutes, flip the wings and rotate the tray. The first side gets crispy fast, but the second side needs equal love. (Pro move: Use tongs to avoid breaking the crust.)
Dietary considerations for this recipe
Gluten-Free Adaptation
For a gluten-free version, swap the all-purpose flour with 1/4 cup gluten-free flour blend (like Bob’s Red Mill 1:1) and ensure your cornmeal is certified gluten-free. I use King Arthur gluten-free cornmeal for the best texture.
The coating will still adhere well, and the wings will maintain their crispiness. Just press the seasoning rub firmly onto the wings to compensate for any reduced stickiness. 🌾
Dairy-Free Options
Skip the butter basting and use 2 tablespoons olive oil instead for a dairy-free version. The wings will still develop a crispy crust, though they’ll be slightly less rich. For extra flavor, add 1/2 teaspoon garlic powder to the olive oil before brushing it on.
The honey glaze remains dairy-free, so you can still add that sweet finish. 🫒
Low-Carb Modifications
To make these wings keto-friendly, eliminate the flour entirely and use only the cornmeal-salt-pepper mix for coating. For extra crunch, add 1/4 cup almond flour to the seasoning blend.
The wings will still be crispy and packed with flavor, while keeping carbs minimal. Serve with a sugar-free dipping sauce like ranch made with heavy cream. 🥗
Allergen-Friendly Swaps
If you have egg allergies, replace the egg wash with 2 tablespoons melted coconut oil or olive oil mixed with 1 tablespoon water. Brush this lightly over the wings before applying the seasoning rub.
For nut allergies, ensure all spices and cornmeal are processed in a nut-free facility. I always double-check labels on smoked paprika and onion powder to avoid cross-contamination. 💡
Protein-Packed Boost
For a higher-protein version, add 1/4 cup nutritional yeast to the seasoning rub. It adds a cheesy, umami flavor while boosting protein content. You can also use 2 tablespoons ground pork rinds instead of flour for a crispier, lower-carb coating.
These swaps keep the wings flavorful and satisfying for protein-focused diets. 💪
Nutrition facts
Frequently asked questions
Why is my cornmeal coating falling off the wings?
The coating often falls off when the wings aren't completely dry before coating or if the seasoning isn't pressed firmly onto the meat. Pat the wings thoroughly with paper towels and press the cornmeal mixture gently but firmly as you coat. For extra adhesion, chill the coated wings in the fridge for 15 minutes before baking.
Can I use frozen wings instead of fresh?
Frozen wings work, but they require extra prep time. Thaw them completely in the fridge overnight, then pat them completely dry. The extra moisture from frozen wings can make the coating less crispy, so you may need to extend baking time by 5-10 minutes to ensure full crispiness.
What's the best way to reheat these wings without losing crispiness?
For best results, reheat wings in a 400°F oven for 5-7 minutes on a wire rack. The airflow prevents sogginess. Microwaving works in a pinch, but they'll lose some crunch—cover with a damp paper towel and heat for 30 seconds at 50% power. Never reheat in the air fryer as it can make the coating too hard.
How do I make these wings spicier?
Add 1 teaspoon cayenne pepper or 1 tablespoon red pepper flakes to the seasoning rub for immediate heat. For smoky spice, replace half the smoked paprika with 1 tablespoon chipotle powder. You can also toss cooked wings with hot sauce or serve with a side of spicy honey for extra kick.
Can I bake these wings in an air fryer instead?
Yes, but you'll need to adjust the technique. Lightly coat wings with oil, then apply the seasoning rub. Air fry at 400°F for 12-15 minutes, shaking the basket every 5 minutes for even cooking. The crust won't be as crispy as oven-baked, but it's still delicious. For extra crunch, broil for 2 minutes at the end.