
Desserts
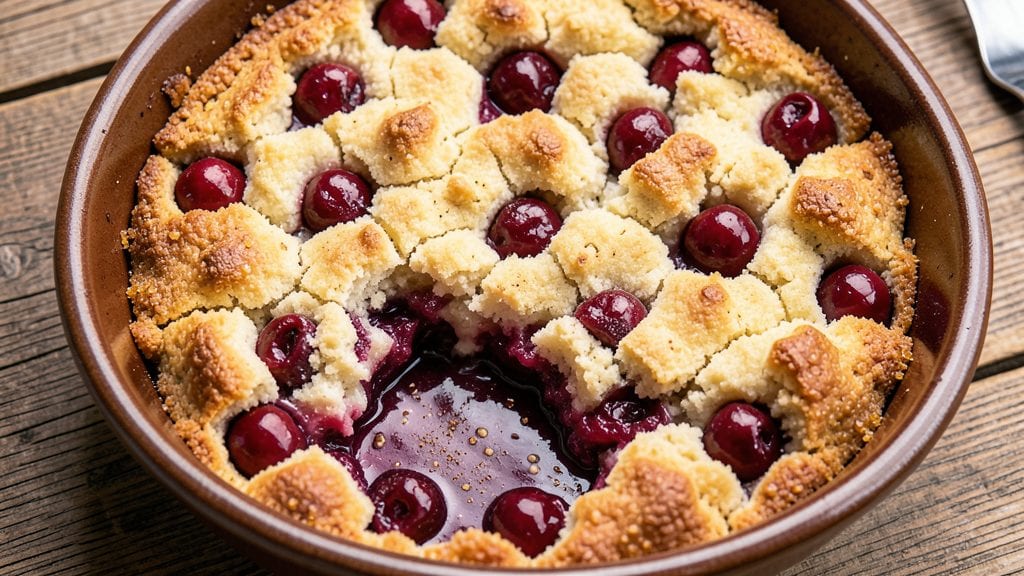
This best cherry cobbler recipe with canned cherries transforms pantry staples into a dessert that tastes like summer in every bite—no fresh fruit required.
Standing on a step stool in my grandmother’s kitchen in Sicily, I learned how a simple crust could elevate humble ingredients, and this cobbler is proof that canned cherries can deliver just as much juicy perfection.
The secret lies in balancing the tartness of the cherries with a buttery, golden crust that encases the filling like a warm hug.
The beauty of this recipe is its simplicity: just a few ingredients, 30 minutes of prep, and 45 minutes in the oven for a dessert that feels homemade but requires no last-minute fruit shopping.
The canned cherries (with juice!) create a luscious, bubbling filling that stays moist, while the crust achieves that coveted crispy yet tender texture. It’s the kind of dessert that disappears faster than you can say “second helping,” and leftovers reheat beautifully for breakfast the next morning.
What makes this cobbler truly special is the harmony of flavors—sweet, tart, and buttery—all coming together in one foolproof bake. The cherries release their juice as they cook, creating a syrupy glaze that caramelizes on top, while the crust stays flaky and inviting.
Serve it warm with a scoop of vanilla ice cream or a dollop of whipped cream, and you’ll have a dessert that rivals anything from a bakery.
Perfect for family dinners, potlucks, or satisfying a sudden craving, this cobbler proves that the best desserts often come from the simplest ingredients. Here’s how to make it—step by step—for a result that’s always juicy, golden, and irresistible.
Ingredients for best cherry cobbler recipe with canned cherries
Just 11 ingredients—plus canned cherries you already own—transform into summer's juiciest dessert.
| Ingredient | Amount | Notes |
|---|---|---|
| Canned Dark Sweet Cherries 🍒 | 2 cans | With juice, 15 oz each |
| All-Purpose Flour 🌾 | 2 cups | Sifted for light crust |
| Granulated Sugar 🍚 | 1 ½ cups | Plus 2 tbsp for filling |
| Unsalted Butter 🧈 | 1 cup | Cold, cubed for crust |
| Baking Powder 🍞 | 2 tsp | Not baking soda |
| Salt 🧂 | ½ tsp | Fine sea salt |
| Vanilla Extract 🌸 | 1 tsp | Pure, not imitation |
| Ground Cinnamon 🌿 | 1 tsp | For filling warmth |
| Lemon Juice 🍋 | 1 tbsp | Brightens cherries |
| Heavy Cream 🥛 | ½ cup | Optional for richness |
| Vanilla Ice Cream 🍦 | 1 ½ cups | For serving suggestion |
The cherries are the star, so grab the dark sweet variety—they're richer and less watery. Mueller's or Bumbleberry cans are my go-to (they're sold everywhere), but any good-quality canned cherries work. Drain them well but save the juice—it's the secret to that luscious, bubbling filling. The crust? Cold butter is non-negotiable—cut it into tiny cubes and keep it chilled until mixing. And that extra 2 tbsp sugar in the filling? Trust me, it makes all the difference when the cherries caramelize.
No dark cherries? Light sweet cherries work too—just add an extra pinch of cinnamon. Out of vanilla extract? Almond extract at half the amount gives a nice twist. The heavy cream is totally optional but takes this from good to next-level (especially if you're serving it warm). For the crust, self-rising flour plus 1/2 tsp salt works if you're in a pinch, but sifted all-purpose is best. And if you're making this ahead, the filling can sit overnight—just bring it to room temp before baking.
This cobbler reheats like a dream—just 10 minutes at 350°F makes it warm and gooey again. Keeps 3 days in the fridge (covered!) and freezes beautifully for up to 3 months (wrap tightly). I always make a double batch—half for dinner, half for breakfast the next morning with ice cream. The crust stays crispy even when reheated, and the filling? It gets even more intense in flavor. Leftovers? Microwave 30 seconds if you're in a hurry, but oven's better.
Why You'll Love This Recipe
- I’ll be real: I keep a can of cherries just for this. No pitting, no bruised fruit—just dump, stir, and bake. That buttery biscuit topping? Ready in 10 minutes of mixing.
- No Pantry Stress: I’ll be real: I keep a can of cherries just for this. No pitting, no bruised fruit—just dump, stir, and bake. That buttery biscuit topping? Ready in 10 minutes of mixing.
- Sweet-Savory Balance: The cherries are already juicy and sweet, but the warm cinnamon and brown sugar in the filling? It’s like summer in a bowl—no overpowering tartness, just pure, easy comfort. (Yes, even on a Tuesday night.)
- Leftovers for Days: This cobbler’s magic is in the reheat. Slice it up, pop it in the oven for 5 minutes, and it’s like fresh-baked again. My kids beg for it at lunch—proof it’s a win beyond dessert.
Step-by-step instructions for cherry cobbler with canned cherries
Here's how to create that perfect balance of juicy filling and buttery crust everyone loves.
Prepare the Juicy Cherry Filling
Drain the 2 cans of canned dark sweet cherries, reserving the juice. In a medium bowl, combine the drained cherries with the reserved juice, 2 tablespoons of the 1.5 cups granulated sugar, the 1 teaspoon vanilla extract, 1 teaspoon ground cinnamon, and 1 tablespoon lemon juice. Stir gently to combine—you want the cherries to stay whole and plump, not broken apart.
This is where the magic happens. The lemon juice brightens the cherries while the cinnamon adds warmth, and that extra sugar helps balance the tartness of the canned fruit. Let the mixture sit for 10 minutes while you prepare the crust—this gives the flavors time to meld together beautifully.
Create the Perfect Buttery Crust
In a large mixing bowl, combine the 2 cups all-purpose flour, 2 teaspoons baking powder, and 0.5 teaspoon salt. Whisk together until evenly distributed—no lumps allowed. Cut in the 1 cup cold unsalted butter using a pastry cutter or your fingers until the mixture resembles coarse crumbs with pea-sized butter pieces throughout.
Here's the thing—cold butter is crucial. It creates those flaky layers that make this cobbler truly special. If your butter starts to melt, chill the mixture for 10 minutes before proceeding. Once you've achieved that perfect crumbly texture, stir in the remaining 1.3 cups granulated sugar and the 0.5 cup heavy cream until just combined.
Assemble and Bake the Cobbler
Preheat your oven to 375°F. Grease a 9x13-inch baking dish and spread the cherry filling evenly across the bottom. Drop spoonfuls of the crust mixture over the cherries, leaving some gaps for the filling to bubble up during baking. The crust doesn't need to be perfectly even—just distribute it fairly across the top.
Bake for 40-45 minutes until the crust is golden brown and the filling is bubbling vigorously around the edges. The center should still have a slight jiggle when you shake the pan gently—this indicates the filling is perfectly set but still juicy inside. If the crust browns too quickly, tent with foil to prevent over-browning while the filling finishes.
Serve Warm with Ice Cream
Remove the cobbler from the oven and let it cool for 10 minutes before serving. This resting period allows the filling to set slightly while maintaining that perfect juicy texture. The warm cobbler will be at its peak—hot enough to melt the ice cream just slightly when combined.
Serve each portion with 0.25 cup of the 1.5 cups vanilla ice cream. The contrast of warm cobbler and cold ice cream creates an experience that's simply unbeatable. The ice cream cuts through the richness of the crust while complementing the sweet-tart cherry filling perfectly. Enjoy immediately while everything is at its best!
Pro Tips For Making Best Cherry Cobbler Recipe With Canned Cherries
- Drain Cherries Thoroughly: I learned this the hard way—skipping this step turns your cobbler into a soggy mess. Use a colander and press the cherries gently with a spoon to remove all the syrup, or your biscuit topping will turn into a gluey disaster. (Yes, even if you’re impatient like me.)
- Cut Cold Butter in Cubes: Don’t melt that butter first—cut it into ½-inch cubes and keep it cold. This ensures flaky layers in the topping instead of a dense, greasy slab. I used to rush this, and the texture suffered every time.
- Preheat Pan Before Baking: A hot pan (425°F) guarantees a golden-brown topping right away. Cold pans slow the reaction, and you’ll end up with a pale, doughy mess. Slide the dish in immediately after mixing—no waiting.
- Add a Pinch of Salt: The recipe might not say it, but unsalted butter and canned cherries need balancing. A ¼ teaspoon of salt in the topping makes the flavors sing. I was skeptical until I tried it—now I never skip it.
Make-ahead tips for leftovers
Prep Ahead Filling
The cherry filling can be made up to 24 hours in advance—this is where the flavors really develop. I like to prepare mine the night before and let it sit in the fridge overnight.
The cherries absorb the spices and juices, creating a deeper, more complex flavor. Just make sure to bring the filling to room temperature before baking to ensure even cooking. 🌱
Crust Prep Shortcut
For the crust, mix all the dry ingredients and cold butter together, then cover with plastic wrap and refrigerate for up to 24 hours. This allows the butter to fully chill, making it easier to handle and ensuring those perfect flaky layers.
I often prep this the night before and let it sit on the counter while I finish other dinner tasks—it’s a game-changer for busy weeknights. ⏰
Assemble the Day Of
Keep the crust and filling separate until you're ready to bake. Assemble the cobbler in the baking dish and let it sit at room temperature for 30 minutes before popping it in the oven.
This helps the filling warm up slightly and prevents any temperature shock when it hits the hot oven. Trust me, this small step makes a big difference in texture. 💡
Freezer-Friendly Cobbler
This cobbler freezes beautifully—both the assembled dish and the crust separately. For the full cobbler, bake it as directed, let it cool completely, then wrap it tightly in plastic wrap followed by aluminum foil. It’ll keep in the freezer for up to 3 months.
To reheat, thaw overnight in the fridge and warm in the oven at 350°F for 20 minutes. The crust stays crispy, and the filling remains juicy. 🧊
Make-Ahead Serving Suggestions
If you're prepping for a gathering, bake the cobbler a day ahead and store it at room temperature (covered) for up to 4 hours. Reheat in the oven for 10 minutes before serving.
For a crowd, assemble the crust and filling in a large baking dish, then refrigerate until ready to bake. This way, you can bake it straight from the fridge—just add 5-10 minutes to the cooking time. 👨👩👧👦
Breakfast Cobbler Hack
Here’s a trick I learned from my Nonna: leftover cobbler makes the best breakfast the next morning. Warm slices in the oven for 5 minutes and top with a scoop of vanilla ice cream or a dollop of whipped cream.
The contrast of warm cobbler and cold ice cream is pure magic—especially when you’re in a rush but still want something special. 🍳
Nutrition facts
Frequently asked questions
Can I use light sweet cherries instead of dark sweet?
Yes, light sweet cherries work perfectly! They're slightly less intense in flavor, so add an extra ½ teaspoon of cinnamon to enhance their taste. The texture will be just as juicy—just remember to drain them thoroughly to avoid a watery filling.
How do I prevent the crust from getting soggy?
The key is baking time and temperature. Remove the cobbler from the oven when the crust is golden but the center still has a slight jiggle (40-45 minutes at 375°F). If it browns too fast, tent with foil. For extra insurance, chill the assembled cobbler for 15 minutes before baking to help the crust set.
Can I make this cobbler in a smaller dish?
For a 9x9-inch dish, reduce the filling by 25% and halve the crust ingredients. The baking time stays the same (40-45 minutes), but check for doneness at 35 minutes since smaller pans cook faster. Perfect for individual servings or smaller gatherings.
What's the best way to reheat leftovers?
Oven reheating preserves the best texture: cover with foil and warm at 350°F for 10-15 minutes. For quick fixes, microwave 20-30 seconds (covered) but expect the crust to soften slightly. The filling stays juicy either way—just avoid overcooking!
Can I substitute the heavy cream in the crust?
Yes! Use ½ cup milk or even melted butter (same amount) for the crust. The texture will be slightly less tender, but still delicious. For richness, try ¼ cup sour cream—it adds a subtle tang that pairs beautifully with the cherries.