
Desserts
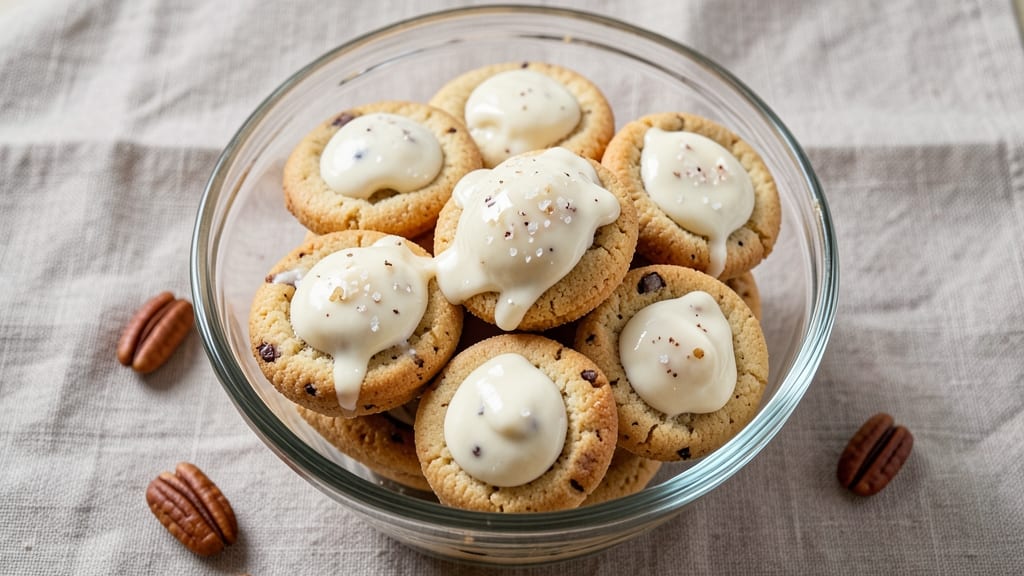
Betty Crocker Cookie Cups deliver the perfect balance of crispy cookie cups and gooey, chewy centers—no baking required. This classic dessert transforms simple ingredients into a crowd-pleasing treat that’s ready in under an hour.
The secret lies in the cookie dough cups, which create a sturdy shell for the creamy filling, whether you prefer chocolate or vanilla.
The method is straightforward but precise: mix the cookie dough, press it into mini muffin cups, and bake until golden. Once cooled, fill each cup with your favorite creamy mixture—vanilla pudding, cream cheese frosting, or even fruit compote.
The contrast between the crispy exterior and soft interior makes every bite irresistible.
What sets these apart is their versatility. You can customize the filling to suit any occasion, from a simple vanilla pudding for everyday treats to rich chocolate ganache for special gatherings. The no-bake filling step ensures minimal effort, while the baked cookie cups add texture and structure.
Perfect for potlucks, dessert parties, or a quick sweet treat, these cookie cups are a foolproof way to impress without spending hours in the kitchen. Let’s get started with this timeless recipe that’s been a favorite for generations.
Ingredients for betty crocker cookie cups
Simple pantry staples transform into crispy, chewy cookie cups with gooey centers.
| Ingredient | Amount | Notes |
|---|---|---|
| All-Purpose Flour 🌾 | 2 cups | Sifted for light texture |
| Unsalted Butter 🧈 | 1 cup | Cold, cubed for dough |
| Granulated Sugar 🍚 | 1 ½ cups | White sugar preferred |
| Packed Brown Sugar 🍚 | ½ cup | Lightly packed |
| Large Eggs 🥚 | 2 whole | Room temperature |
| Vanilla Extract 🍯 | 1 tbsp | Pure extract preferred |
| Baking Soda 🧂 | ½ tsp | For lift and crispiness |
| Salt 🧂 | ½ tsp | Fine sea salt |
| Mini Muffin Cups 🍰 | 24 whole | Non-stick preferred |
| Instant Vanilla Pudding Mix 🍦 | 1 box | 4-serving size |
| Whole Milk 🥛 | 1 ½ cups | Cold for pudding |
| Chocolate Chips 🍫 | ½ cup | Semi-sweet preferred |
The butter and sugars are the foundation—use cold butter for flaky layers, but don’t overwork the dough. King Arthur flour or your trusted grocery store brand works fine, but sift it to avoid dense cups. For the mini muffin cups, non-stick silicone or metal is ideal—grease them well if using metal. The vanilla extract should be pure; imitation won’t give that classic flavor. If you’re short on time, pre-made cookie dough from the refrigerated section at Trader Joe’s cuts prep time in half, though homemade tastes better.
No vanilla extract? Vanilla bean paste works beautifully—just use half the amount. Substitute the pudding mix with 4 oz cream cheese whipped with 1 tbsp powdered sugar for a richer filling. Short on chocolate chips? Melted chocolate bars piped into the centers add a similar effect. The dough can be chilled for 30 minutes if it feels too soft to handle. For a festive twist, swap half the chocolate chips for white chocolate chips or crushed peppermint candies—just adjust the baking time slightly if using candy.
Baked cookie cups keep in an airtight container at room temperature for 3 days, but honestly, they disappear faster. The pudding filling can be made 1 day ahead and stored separately. To reheat, microwave individual cups for 10-15 seconds—just enough to soften the filling. Freeze unbaked cups for up to 3 months; bake straight from frozen, adding 2-3 minutes to the time. Double the batch and freeze half for future treats—Betty Crocker’s original recipe was always about making ahead.
Why You'll Love This Recipe
- No Mixer Needed: I swear by this recipe because it’s one bowl, one hand mixer (or even a fork if you’re in a pinch). The butter and sugars creamed together melt into that perfect cookie dough consistency—no lumps, no fuss—just smooth, rich dough that’s ready to bake in minutes.
- Caramelized Crunch Core: That crispy, buttery shell hiding a gooey center? It’s the magic of brown sugar and butter baked just right. Honestly, the first time I bit into one still warm, I nearly dropped the whole tray. The contrast is ridiculously satisfying.
- Party in a Cup: These are my go-to for holidays, potlucks, or even a lazy Sunday afternoon. They’re easy to grab, share, and no one will guess they’re basically cookie dough in a cup. (Yes, even on a Tuesday night.)
- Budget-Friendly Indulgence: Flour, sugar, butter—these are pantry staples that won’t break the bank. A single batch makes 24 cups, and they freeze like a dream. I’ve pulled them out for last-minute treats or packed them in lunches for my kids (who always beg for seconds).
Step-by-step instructions for Betty Crocker cookie cups
Here's how to make these no-bake treats with crispy cookie shells and gooey centers.
Prepare the Cookie Dough
In a large mixing bowl, combine the 1 cup unsalted butter, 1.5 cups granulated sugar, and 0.5 cup packed brown sugar. Beat with an electric mixer on medium speed until light and fluffy, about 3-4 minutes. You'll know it's ready when the mixture looks pale and nearly doubles in volume.
Add the 2 whole large eggs, one at a time, beating well after each addition. Mix in the 1 tablespoon vanilla extract and continue beating for another 30 seconds. In a separate bowl, whisk together the 2 cups all-purpose flour, 0.5 teaspoon baking soda, and 0.5 teaspoon salt. Gradually add the dry ingredients to the wet mixture, mixing on low speed just until combined.
Fold in the 0.5 cup chocolate chips by hand using a spatula. The dough will be thick and slightly sticky—this is normal. Cover the bowl with plastic wrap and refrigerate for at least 30 minutes to firm up the dough before shaping.
Shape and Bake the Cookie Shells
Preheat your oven to 350°F. Line a baking sheet with parchment paper and set aside. Using a cookie scoop or tablespoon, drop rounded spoonfuls of dough into the 24 whole mini muffin cups, filling each about ¾ full. You'll need to work quickly but carefully to avoid overfilling.
Bake for 10-12 minutes until the edges are golden brown and the centers still look slightly soft. The shells should be firm to the touch but not fully set. Remove from the oven and let them cool in the muffin cups for 5 minutes before carefully transferring them to a wire rack to cool completely.
Here's the thing—don't overbake these shells. If they're too crisp, they'll crack when you add the pudding mixture. You want them sturdy but still flexible enough to hold their shape.
Make the Pudding Filling
In a medium bowl, whisk together the 1 box instant vanilla pudding mix and 1.5 cups cold whole milk. Let the mixture sit for 2 minutes to thicken slightly. Stir once more to ensure there are no lumps, then divide the pudding evenly among the cooled cookie shells using a small spoon or piping bag.
Fill each shell completely, mounding the pudding slightly above the rim. Place the filled shells back in the mini muffin cups and refrigerate for at least 4 hours or overnight. This chilling time is crucial—it allows the pudding to set properly and creates that perfect creamy texture.
Real talk: If you're short on time, you can speed this up by freezing the filled shells for 2 hours, but chilling overnight gives the best results. The longer they sit, the thicker and more stable the pudding becomes.
Serve and Enjoy
Once the pudding is fully set, run a small knife around the edges of each cookie cup to loosen them from the muffin cups. Gently pop them out and serve immediately. These treats are best enjoyed fresh from the refrigerator, straight from the mini muffin cups.
The contrast between the crispy cookie shell and the cool, creamy pudding center is what makes these so delicious. Serve them as a dessert, snack, or even a breakfast treat with a cup of coffee. Store any leftovers in an airtight container in the fridge for up to 3 days, though they rarely last that long!
Pro Tips For Making Betty Crocker Cookie Cups
- Cream Butter Properly: I learned this the hard way—skip the food processor and use a wooden spoon or your hands to mix the butter and sugars until it’s light and fluffy. That means scraping the bowl every 30 seconds for at least 3 minutes. The dough will hold its shape better in the muffin tin, and the cookies won’t spread like sad pancakes.
- Measure Brown Sugar Right: Pack that brown sugar like you’re stuffing a Thanksgiving turkey—press it firmly into the cup so it’s level with the rim. Too loose, and your cookie cups turn out dry and crumbly. (Yes, even if the recipe says "packed," double-check.)
- Rotate the Pan: After 12 minutes in the oven, swap the muffin tin front to back and side to side. Cookie cups bake unevenly, and this guarantees golden edges on every single one. Ignore this, and you’ll end up with a few overdone ones and a batch of sad, pale centers.
- Chill the Dough: Give the dough a 30-minute rest in the fridge before scooping. It’s not just about easier handling—it keeps the butter from melting too fast in the oven, so your cookie cups stay thick and chewy instead of spreading into flat, crispy disappointments. (I know, I know—you’re eager to bake. But trust me.)
Wine and beer pairings for this dish
Sweet Dessert Wines
For these cookie cups, I reach for Moscato d'Asti—its light, floral notes and subtle sweetness complement the vanilla pudding filling beautifully. A glass of chilled Moscato (around 9-10% alcohol) enhances the dessert's creamy texture without overpowering it.
If you prefer something richer, try a Riesling from Germany—its honeyed finish pairs wonderfully with the chocolate chips in the cookie shells. 🍷
Creamy Beer Pairings
A Belgian witbier like Hoegaarden is my go-to beer pairing—its citrusy coriander and spicy notes cut through the richness of the cookie cups. The effervescence cleanses your palate between bites, making each one feel fresh.
For a darker option, a Belgian dubbel (like Westmalle Dubbel) adds caramel and malt flavors that mirror the brown sugar in the dough. 🍺
Coffee Contrast
If you're serving these as an after-dinner treat, a cold brew or espresso works surprisingly well. The bitterness of coffee balances the sweetness of the pudding, creating a delightful contrast.
For a festive touch, add a splash of vanilla syrup to your coffee to tie into the dessert's flavor profile. This pairing is especially popular during holiday gatherings. ☕
Spiced Wine Twist
For a seasonal variation, warm a Spiced Chardonnay (infused with cinnamon and orange peel) and serve alongside the cookie cups. The warm spices echo the vanilla and chocolate in the dessert, creating a cozy, inviting experience.
This pairing works beautifully during fall and winter months when you want something comforting. 🍂
Non-Alcoholic Options
Don’t overlook non-alcoholic pairings! A sparkling apple cider (like Martinelli’s) adds a festive touch without alcohol. For something more sophisticated, try a ginger beer—its spicy kick complements the cookie cups' sweetness. These options are perfect for family gatherings or when you want to keep things light. 🍎
Nutrition facts
Frequently asked questions
Can I make these without mini muffin cups?
Use 24 standard silicone mini cupcake liners or even small tart pans for a slightly larger size. For a rustic look, try phyllo cups or even halved walnut halves—just adjust baking times since phyllo will crisp faster. The key is ensuring your "cups" are sturdy enough to hold the filling.
How do I fix cracked cookie shells?
Cracks usually happen from overbaking or underfilling. If they appear, press the edges gently with your fingers while still warm to seal them. For a quick fix, brush the cracks with melted chocolate or white chocolate before adding filling. The chocolate acts as a glue and adds extra flavor! Prevent cracks by baking just until edges are golden and centers are soft.
What's the best way to transport these to a party?
Assemble them completely, then place each cookie cup in a paper cupcake liner or mini muffin wrapper for easy handling. Stack them in a two-tier serving tray with parchment paper between layers. Keep them refrigerated until serving—this prevents the pudding from melting. For extra stability, secure the tray with a rubber band around the middle tier.
Can I make these gluten-free?
Yes! Replace the all-purpose flour with a 1:1 gluten-free baking flour blend like Bob's Red Mill. Add ½ teaspoon xanthan gum if your blend doesn't contain it. For the filling, use a gluten-free vanilla pudding mix or make your own with cornstarch and milk. The texture will be slightly different but still delicious—just expect the shells to be a touch crumbly.
Why did my pudding filling not set?
Under-chilling is the most common cause. Ensure you refrigerate for at least 4 hours (overnight is best). If the mixture is too runny, try adding 1 teaspoon cornstarch mixed with 1 tablespoon cold milk and whisking it in. For a firmer texture, reduce the milk in your pudding mix by ¼ cup next time. Always use cold milk—warm milk prevents proper thickening.