
Desserts
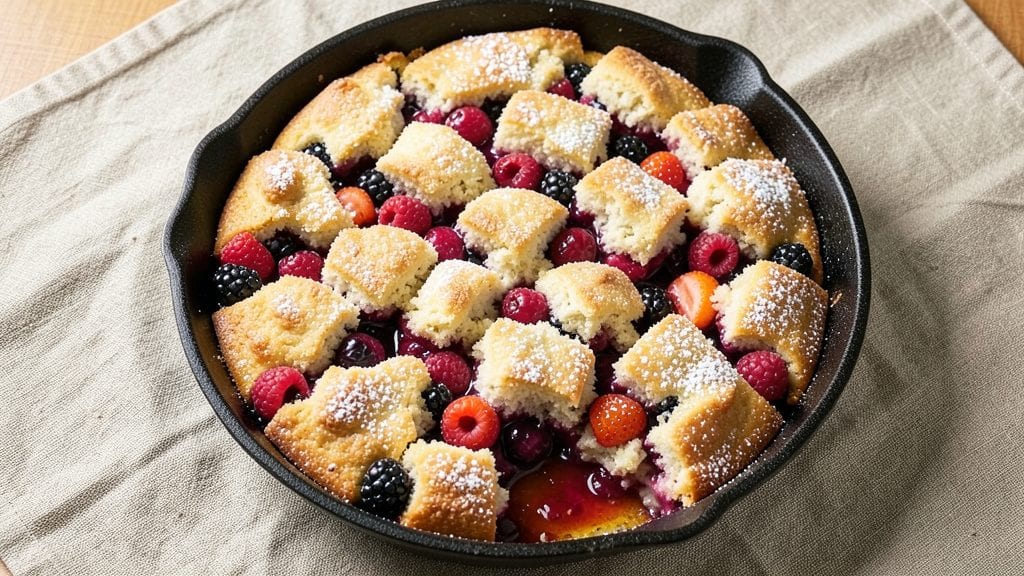
This Bisquick Berry Cobbler recipe delivers the perfect balance of juicy berry filling and a golden, buttery crust that bakes up crispy and inviting.
The secret to its success lies in a simple yet effective technique—simmering fresh berries with sugar and cornstarch until they thicken into a luscious, bubbling compote before topping with a Bisquick crust.
I developed this recipe during summer berry season when I wanted a dessert that felt effortless yet impressive, and it never fails to deliver.
The beauty of this cobbler is its foolproof simplicity—no fancy equipment or advanced skills required. You'll start by cooking the berry filling on the stovetop, which takes about 15 minutes, then assemble the crust and bake until the edges are golden and the filling is bubbling hot.
The Bisquick topping creates a tender yet crispy crust that contrasts beautifully with the juicy berries beneath. This recipe is designed to be quick while still feeling special enough for company.
By the time it emerges from the oven, you'll have a dessert that looks like it came from a bakery—golden crust crackling with caramelized edges and a filling so juicy it practically oozes with every bite.
The aroma alone will have everyone gathering around the table, and the texture—tender crust meeting velvety berries—is impossible to resist. Serve warm with a scoop of vanilla ice cream or a dollop of whipped cream for the ultimate summer treat.
Perfect for weekend gatherings, potlucks, or a cozy family dinner, this cobbler is versatile enough to adapt to your favorite berries—strawberries, blueberries, or a mixed berry medley. Let’s get started on creating this crowd-pleasing dessert that’s as easy as it is delicious.
Ingredients for bisquick berry cobbler
Six ingredients transform into a showstopping dessert that tastes homemade but feels effortless.
| Ingredient | Amount | Notes |
|---|---|---|
| Fresh Mixed Berries 🍓 | 4 cups | Strawberries, blueberries, or mixed |
| Granulated Sugar 🍚 | 1 ¼ cups | White or light brown preferred |
| Cornstarch 🌾 | ¼ cup | For perfect thick filling |
| Lemon Juice 🍋 | 1 tbsp | Freshly squeezed, bright flavor |
| Bisquick Baking Mix 🍞 | 1 ½ cups | Original flavor, not gluten-free |
| Unsalted Butter 🧈 | ½ cup | Cold, cubed for crust |
| Vanilla Extract 🍯 | 1 tsp | Pure extract, not imitation |
| Ground Cinnamon 🌿 | ½ tsp | Freshly ground for warmth |
| Salt 🧂 | ¼ tsp | Diamond Crystal preferred |
| Vanilla Ice Cream 🍦 | 1 ½ cups | For serving, optional |
| Heavy Whipping Cream 🥛 | ¼ cup | For topping, lightly whipped |
The berries are the star—freshness is key. Local farmers markets or the grocery store's pre-washed berry section work perfectly. I always grab a mix of strawberries and blueberries for that classic cobbler vibe, but don't stress if you only have one type. The sugar and cornstarch combo is non-negotiable here—it creates that perfect thick, jammy filling without turning gluey. Domino or C&H sugar both work great, but if you're using brown sugar, reduce by 1 tbsp since it's already moist. For the Bisquick, stick with the original version—gluten-free mixes can make the crust too dense.
No fresh berries? Frozen works perfectly—just don't thaw them first. The lemon juice can be swapped for bottled lemon juice in a pinch, but fresh is brighter. For the crust, melted butter instead of cold cubes gives a slightly softer texture, but cold butter creates those beautiful crispy edges. Want extra richness? Add 1 tbsp of melted butter to the Bisquick mix before assembling. The cinnamon can be omitted if you're sensitive to spice, but I promise it makes the crust taste like summer. For the ice cream topping, homemade vanilla bean ice cream elevates everything, but store-bought works too.
This cobbler reheats beautifully—just pop it in the oven at 350°F for 10-15 minutes until the crust is crispy again. Store leftovers covered at room temperature for up to 2 days or in the fridge for 4 days. The crust stays crispy for about 2 hours at room temperature, so serve it fresh out of the oven whenever possible. For make-ahead prep, assemble the cobbler in the pan and refrigerate overnight—bake straight from cold for even better results. The filling thickens as it cools, so if it seems too thin after baking, let it sit for 10 minutes before serving.
Why You'll Love This Recipe
- No-Pantry Pan Needed: I swear by this recipe when I forget to stock up—just grab whatever berries are on sale, dump in a bowl with sugar and cornstarch, and toss in a squeeze of lemon. The Bisquick crust handles the mess, and honestly? You’ll never need a fancy cobbler dish again.
- Juicy-Crisp Magic: That lemon juice in the berries brightens everything up, but the real star is the crust—flaky, buttery, and just crisp enough to cut through the syrupy berries. It’s the kind of dessert where the first bite makes you reach for the pan again.
- Weeknight Crowd-Pleaser: Between us, this is my go-to for potlucks, book club gatherings, or even lazy Sundays. Serve it warm with vanilla ice cream, and suddenly you’re the hero—no fancy plating required. My kids even ask for it (yes, even on a Tuesday).
- Leftovers? No Problem: The crust stays fresh for days, and the berries keep their jammy goodness when reheated. I’ll be real: I’ve eaten cold slices straight from the fridge, and they’re still solid. Plus, it’s cheaper than store-bought pies—win-win.
Step-by-step instructions for Bisquick berry cobbler
Here's the foolproof method that delivers a juicy, bubbling berry filling and a golden, crisp crust every single time.
Prepare the Juicy Berry Filling
In a large bowl, combine the 4 cups fresh mixed berries, 1.25 cups granulated sugar, 0.25 cup cornstarch, and 1 tablespoon lemon juice. Stir gently but thoroughly to coat the berries evenly with the sugar mixture. This ensures every bite will have that perfect balance of sweetness and thickness.
The lemon juice is crucial here—it brightens the berries' natural flavors and helps prevent the filling from turning mushy as it bakes. If using frozen berries, don't thaw them first. The cold berries will release their juices more gradually during baking, keeping the filling perfectly moist.
Assemble the Cobbler in a Baking Dish
Transfer the berry mixture to a 9x13-inch baking dish, spreading it out evenly. In a separate medium bowl, cut the 0.5 cup unsalted butter into small cubes and mix it with the 1.5 cups Bisquick baking mix, 1 teaspoon vanilla extract, 0.5 teaspoon ground cinnamon, and 0.25 teaspoon salt until the mixture resembles coarse crumbs with pea-sized butter pieces.
Sprinkle the Bisquick mixture evenly over the berries, pressing down gently with your fingertips in a few spots to create pockets for the filling to bubble into. The butter will melt during baking, creating that irresistible golden crust while keeping the berries juicy underneath.
Bake Until Golden and Bubbling
Preheat your oven to 375°F. Bake the cobbler for 40-45 minutes until the crust is deep golden brown and the filling is bubbling vigorously at the edges. The center should still have a slight jiggle when the dish is gently shaken—this indicates the filling is perfectly set but still juicy.
Here's the secret: If the crust starts browning too quickly, tent the dish loosely with aluminum foil at the 30-minute mark. This prevents over-browning while allowing the filling to cook through. The cobbler is done when a toothpick inserted near the center comes out clean or with just a few moist crumbs clinging to it.
Cool and Serve Warm
Remove the cobbler from the oven and let it cool for 10-15 minutes before serving. This resting period allows the filling to set slightly while maintaining its juicy texture. The crust will be at its crispest when served warm, while the berries remain vibrant and full of flavor.
For an extra-special touch, top each serving with a scoop of 1.5 cups vanilla ice cream and a dollop of lightly whipped 0.25 cup heavy whipping cream. The contrast of warm cobbler with cold ice cream creates the ultimate dessert experience. Serve immediately while the crust is still crisp and the filling is bubbling with juices.
Pro Tips For Making Bisquick Berry Cobbler
- Prep Berries First: Wash, hull, and drain those berries before mixing with sugar—wet berries release juice like a broken dam, turning your cobbler into a soggy mess. I learned this the hard way when my blueberries turned my Bisquick into a gloppy batter.
- Skip the Cornstarch: Unless you’re making a pie filling, cornstarch does nothing here. The Bisquick already thickens as it bakes—just toss your berries with sugar and lemon juice, then dump them in. (I used to add it every time until I realized the recipe was already foolproof.)
- Bake Until Golden: Don’t pull it out at 18 minutes just because the edges look set. Let it ride another 3–5 minutes until the top turns deep golden—almost caramelized. That’s when the Bisquick stops tasting like a sad biscuit and starts tasting like dessert.
- Use Cold Butter: Cut that ½ cup of butter into the Bisquick mix while it’s still cold—this keeps the topping flaky instead of greasy. I was skeptical until I tried it, and now I swear by it. (Yes, even if you’re impatient like me.)
Common mistakes when making your bisquick berry cobbler
Over-Mixing the Topping
I’ve seen so many cobblers turn out dense and flat because the Bisquick topping was overworked. Once you mix the Bisquick with cold butter, stop stirring as soon as you see pea-sized butter pieces—no need to fully incorporate everything.
Overmixing develops gluten, which makes the crust tough instead of tender. Just 8-10 gentle stirs are all it takes to distribute the butter evenly. 🍞
Skipping the Stovetop Cook
Some recipes call for dumping raw berries straight into the baking dish, but that’s a big mistake. Simmering the berries on the stovetop first (about 10-15 minutes) ensures the filling thickens properly and releases juices that create that classic bubbly texture.
Without this step, your cobbler will end up watery or undercooked in the center. Trust the process!
Uneven Baking Dish
Using a non-standard baking dish can throw off your cobbler’s texture and don’t even get me started on glass vs. metal. Stick to a 9x13-inch baking dish—it’s the perfect size for even heat distribution.
If your dish is too small, the crust will bake too quickly while the filling stays underdone. And if it’s too large, the edges will burn before the center cooks. Measure twice, bake once!
Ignoring the Resting Time
Cutting into the cobbler immediately after baking is a cardinal sin. The filling needs 10-15 minutes to set slightly so it doesn’t ooze out everywhere. This also lets the crust firm up enough to hold its shape.
I’ve seen too many cobblers turn into a messy berry puddle because someone couldn’t wait. Patience pays off here!
Overfilling the Dish
Packing the berries too tightly into the dish leaves no room for them to expand and bubble during baking. Fill the dish only ¾ full—this gives the berries space to release juices and creates that signature dome shape.
If you’re using frozen berries, don’t press them down; let them stay loose so they thaw and cook evenly. 🍓
Using Old or Expired Ingredients
Stale Bisquick or rancid butter will make your cobbler taste off, no matter how perfect the technique. Check your Bisquick’s expiration date—it should be fresh, not sitting in your pantry for months.
For butter, use unsalted and keep it cold until mixing. If your Bisquick smells musty or clumps together, toss it and start fresh. Fresh ingredients make all the difference!
Nutrition facts
Frequently asked questions
Can I use frozen berries instead of fresh?
Yes! Frozen berries work perfectly—just don't thaw them first. The cold berries will release juices gradually during baking, keeping the filling moist. Use the same amount (4 cups) and follow the stovetop cooking step exactly as written. The texture difference is minimal when prepared this way.
How do I adjust the recipe for a smaller or larger dish?
For a 9x9-inch dish, reduce all ingredients by 25% (about 3 cups berries, 1 cup Bisquick). For a 10x15-inch dish, increase by 50% (6 cups berries, 2.25 cups Bisquick). Always maintain the ¾ full rule—never overfill the pan. Baking time may vary slightly with different dish sizes.
Why did my crust turn out greasy instead of crispy?
Greasy crusts happen when butter melts too quickly before baking. Use cold cubed butter (not melted) and don't preheat the oven with the cobbler inside. Also, ensure your Bisquick is fresh—old mixes lose their binding properties. For extra crispiness, bake 5 minutes longer with foil removed.
Can I make this cobbler ahead of time?
Assemble the cobbler in the pan and refrigerate overnight. Bake straight from cold at 375°F for 50-55 minutes (the extra time accounts for the cold start). The crust will be even crispier when reheated. Store leftovers covered at room temperature for up to 2 days.
What's the best way to reheat leftover cobbler?
Pop the covered cobbler in a 350°F oven for 10-15 minutes until the crust is crisp again. For microwave reheating, cover with a damp paper towel and heat in 30-second bursts until warm—this prevents sogginess. The stovetop method (low heat) also works well for small portions.