
Sauces & Condiments
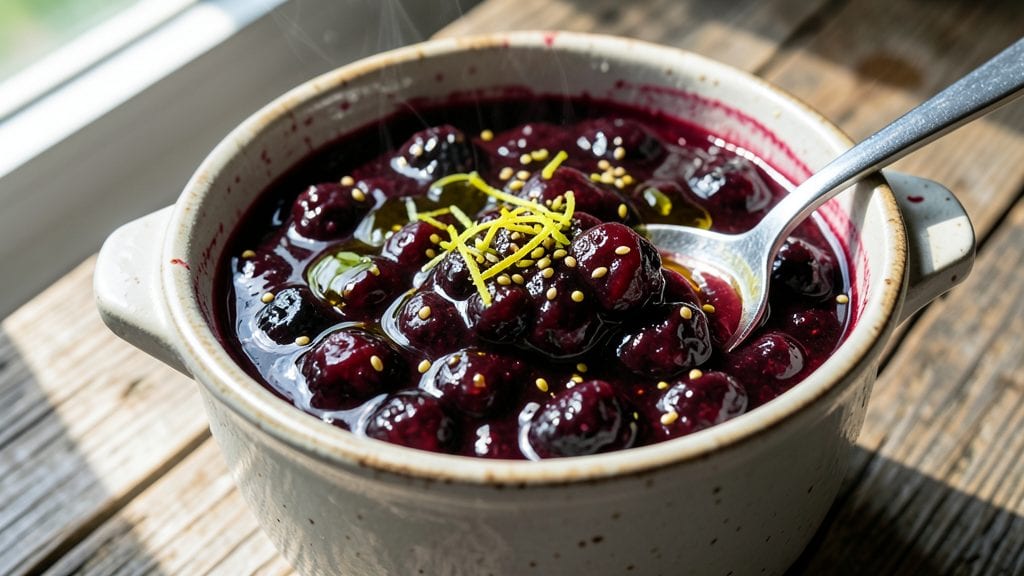
This blackberry lemon jam recipe transforms summer’s best berries into a vibrant condiment that brightens toast, yogurt, or desserts with every spoonful. The secret lies in balancing sweetness and acidity—just enough sugar to preserve while lemon juice keeps the flavor crisp and refreshing.
I’ve perfected this method over years of canning, ensuring the jam stays glossy, chunky, and full of berry flavor without overpowering bitterness.
The process is straightforward but precise: cook blackberries until they release their juices, then simmer with sugar and lemon juice until thickened. No pectin needed—chia seeds or a long simmer achieve the perfect set.
Sterilizing jars and sealing them properly guarantees shelf life of up to a year, so you can enjoy this jam long after blackberry season fades. Every batch yields about 4 pints, perfect for gifting or stocking your pantry.
What you’ll end up with is a jam that’s bursting with sunshine—tart, sweet, and studded with blackberry pieces that melt into a velvety texture. The lemon’s bright acidity cuts through the jam’s richness, making it versatile enough for breakfast toast or as a glaze for grilled chicken.
It’s the kind of homemade treat that elevates simple meals into something special.
For best results, use ripe but firm blackberries and freshly squeezed lemon juice. Adjust sugar to taste—some prefer it sweeter, others lean into the tartness. Once sealed, store jars in a cool, dark place.
This jam is a labor of love, but the reward is a pantry staple that tastes like summer all year round.
Ingredients for blackberry lemon jam
Eight simple ingredients transform summer blackberries into sunshine in a jar.
| Ingredient | Amount | Notes |
|---|---|---|
| Fresh Blackberries 🫐 | 4 cups | Ripe but firm, stems removed |
| Granulated Sugar 🍚 | 3 cups | Adjust to taste for sweetness |
| Fresh Lemon Juice 🍋 | ½ cup | From about 2-3 lemons |
| Chia Seeds 🌱 | 2 tbsp | For natural thickening |
| Extra-Virgin Olive Oil 🫒 | 1 tbsp | For glossy finish |
| Pasteurized Lemon Juice 🍋 | 1 tbsp | Optional for preservation |
| Ball Mason Jars 🍶 | 4 pints | With lids and rings |
| Salt 🧂 | ½ tsp | Pinch to enhance flavor |
Blackberries are the star—farmers markets often have the freshest, juiciest ones, but grocery store berries work too. Look for deep purple color and firmness (they should hold their shape but give slightly when squeezed). Trader Joe's usually has organic blackberries that are perfect for this jam. The sugar is your sweetness control—start with 3 cups, then adjust to taste. I always buy organic cane sugar for the best flavor, but regular granulated works fine. The chia seeds are a game-changer—they thicken the jam naturally without needing pectin, and they keep it glossy too. Just make sure they're organic and not pre-ground.
No fresh blackberries? Frozen blackberries work perfectly—just thaw and drain them first. Short on lemon juice? Bottled lemon juice works in a pinch, but fresh is always better. The olive oil might seem odd, but it adds that beautiful glossy finish that makes the jam look like it belongs on a fancy brunch table. No olive oil? A little vegetable oil or melted butter works too. The Ball Mason jars are non-negotiable for canning—Amazon or Walmart have great prices on pint-sized ones. If you don't have them, you can still make the jam and store it in the fridge for up to 3 weeks, but canning is what gives it that gorgeous shelf life.
This jam keeps for up to a year in a cool, dark pantry once properly canned. I always make a double batch—one for my kitchen and one to give as gifts. The jars are perfect for holiday presents too, just tie a ribbon around the lid. If you're not canning, it'll last 3 weeks in the fridge or 6 months in the freezer. The chia seeds help preserve the jam naturally, so you don't need to worry about mold. Just make sure your jars and lids are clean and dry before sealing—this is the most important step for long-term storage.
Why You'll Love This Recipe
- Five-Ingredient Magic: I swear by this recipe—just blackberries, sugar, lemon juice, chia seeds, and olive oil. That’s it. No fussing with pectin or endless stirring; the chia seeds do the thickening work while you sip your coffee.
- Bright & Tangy: The lemon juice cuts through the sweetness like a summer breeze, and those chia seeds add a subtle, earthy depth. Honestly? It’s the kind of jam that makes you want to slather it on toast and pair it with sharp cheeses—because why choose?
- All-Day Spread: This isn’t just breakfast jam. I’ve used it to glaze roasted chicken, dolloped it into yogurt for dessert, and even stirred it into cocktails. The olive oil keeps it silky, so it plays well with everything—savory or sweet.
- No Waste, All Gain: Blackberries are cheap in season, and this recipe stretches them far. Plus, the jam keeps for months in the fridge, so you’re always covered. Between us, I’ve made this same batch last all summer—no sad, forgotten jars here.
Step-by-step instructions for blackberry lemon jam with chia thickening
Here's how to create a vibrant, naturally thickened jam that shines with citrus brightness.
Prepare the Blackberries and Initial Cook
In a large, heavy-bottomed pot, combine the 4 cups fresh blackberries, 3 cups granulated sugar, and 0.5 cup fresh lemon juice. Stir gently to distribute the sugar evenly—this prevents clumping and ensures sweetness penetrates every berry. Place the pot over medium-high heat and bring to a gentle boil, stirring occasionally to prevent sticking.
Watch for the moment when the mixture reaches a rolling boil—this usually takes about 5-7 minutes. Once boiling, reduce heat to medium and let it simmer vigorously. The jam will thicken as it cooks, and you'll notice the blackberries begin to break down into a purée-like consistency. This process typically takes 15-20 minutes, but keep an eye on it—you want the texture to be syrupy but still pourable.
Here's the thing—don't rush this step. The initial cook develops the flavor foundation and ensures proper sugar dissolution. If you see sugar crystals lingering at the bottom, stir them in completely. This is where the magic begins, with those juicy blackberries releasing their vibrant color and tangy-sweet essence.
Add Chia Seeds and Olive Oil for Thickening
After the initial 20 minutes of simmering, remove the pot from heat and let it cool slightly for 5 minutes. This brief rest prevents the chia seeds from clumping when added. While the jam cools, whisk together the 2 tablespoons chia seeds and 1 tablespoon extra-virgin olive oil in a small bowl. The olive oil helps distribute the chia seeds evenly and adds a luxurious sheen to the finished jam.
Slowly stir the chia mixture into the warm jam using a wooden spoon. You'll notice the texture begin to thicken almost immediately as the chia seeds absorb liquid. Return the pot to low heat and stir continuously for another 5-7 minutes. The jam should now coat the back of a spoon but still be spreadable. If it thickens too quickly, add 1-2 tablespoons of pasteurized lemon juice to adjust the consistency.
This is the moment that matters: the chia seeds create a natural thickening without the need for pectin. The result is a jam with perfect body that won't crystallize over time. The olive oil also helps stabilize the emulsion, giving your jam that professional, glossy finish you'd expect from a gourmet product.
Finish with Lemon and Salt for Bright Flavor
Once the jam reaches your desired consistency, remove it from heat again and stir in the 1 tablespoon pasteurized lemon juice and 0.5 teaspoon salt. The lemon juice adds an extra layer of brightness that cuts through the sweetness, while the salt enhances all the flavors. Taste and adjust the sweetness if needed—you can add more granulated sugar if the jam tastes too tart, or more lemon juice if it needs more acidity.
Let the jam cool completely to room temperature, stirring occasionally. As it cools, it will thicken further. This final resting period allows all the flavors to meld together perfectly. Real talk: the jam will look slightly too thick when hot, but it'll reach that ideal spreadable consistency once cooled. This is normal—don't be tempted to add more liquid at this stage.
Sterilize Jars and Fill with Jam
While the jam cools, prepare your 4 pint Ball Mason jars by washing them in hot, soapy water and rinsing thoroughly. Then sterilize them by placing them upright in a large pot of water. Bring the water to a boil and keep the jars submerged for 10 minutes. This step is crucial for safe preservation—sterile jars prevent contamination and ensure your jam stays fresh.
Using a clean funnel, carefully ladle the cooled jam into the sterilized jars, filling each to about ½ inch from the top. The jam should be at room temperature when you seal it—hot jam can cause the jars to crack during processing. Wipe the rims of the jars with a clean, damp cloth to remove any jam residue that might prevent proper sealing.
Place the lids on the jars and screw on the rings until they're fingertip-tight. Don't overtighten—the jars need room to seal properly. Process the sealed jars in a water bath canner for 10 minutes to ensure long-term preservation. This heat treatment kills any remaining bacteria and creates an airtight seal.
Store and Enjoy Your Jam
After processing, remove the jars from the canner and let them cool completely on a wire rack. You'll hear a satisfying "ping" as the lids seal—this confirms your jam is properly preserved. Once cooled, store the jars in a cool, dark place. Properly sealed jam will keep for up to 1 year, though I find mine disappears in about 3 months!
To use, simply open a jar and spread this vibrant blackberry lemon jam on toast, scones, or yogurt. The perfect balance of sweet blackberries and bright citrus makes it an amazing breakfast spread. The chia seeds give it a pleasant texture that's neither too thick nor too runny—just right for that perfect spreadable consistency.
Pro Tips For Making Blackberry Lemon Jam
- Mash Those Berries: Skip the food processor—gently crush the blackberries with a potato masher or your hands to release juices without turning them into pulp. Over-blending turns jam into a mushy glop, and you’ll end up with more sugar needed to thicken it later.
- Use Real Lemon Zest: Don’t just squeeze the juice—grate a thin strip of lemon peel (about 1 teaspoon) and toss it in with the chia seeds. The oils in the zest brighten the flavor way more than juice alone, and it disappears into the jam instead of floating on top like a sad, bitter skin fragment.
- Simmer Low and Slow: After adding sugar, crank the heat to medium-high to dissolve it fast, then drop to a gentle simmer. Skipping this step means you’ll either scorch the jam or end up with a watery mess that never thickens—no matter how long you babysit it.
- Toast the Chia Seeds: Dry-toast the chia seeds in a small pan over low heat for 2–3 minutes until they smell nutty. This deepens their flavor and prevents that weird, raw seed aftertaste in the finished jam. (Yes, even if the recipe doesn’t say to.)
Perfect pairings for blackberry lemon jam
Breakfast Pairings
Spread this jam on crispy sourdough toast with a smear of whipped cream cheese for a brunch showstopper. The bright citrus cuts through the richness beautifully. I also love it on buttermilk biscuits—just warm them slightly first so the jam melts into the flaky layers.
For a protein boost, try it with Greek yogurt and a sprinkle of toasted pecans—the crunch contrasts perfectly with the jam's velvety texture. 🥞
Cheese Board Magic
This jam transforms any cheese board into a vibrant spread. Pair it with creamy brie or aged cheddar for a sweet-savory combo that guests will rave about. I always include sharp gouda and goat cheese—the tangy jam balances their richness.
Add a few crackers or baguette slices to complete the board. For a festive touch, drizzle with honey alongside the jam.
Dessert Elevations
Use this jam as a glaze for grilled peaches or pineapple slices—the heat intensifies the flavors. I also fold it into vanilla ice cream for a refreshing sorbet-like dessert.
For a showstopper, layer it with whipped cream and shortbread cookies in small jars. The jam's acidity brightens rich desserts, making them feel lighter and more vibrant. 🍰
Savory Surprises
Don't stop at sweet applications! Brush this jam on grilled chicken or pork tenderloin during the last few minutes of cooking for a sticky, citrusy glaze. The acidity tenderizes the meat while adding depth.
I've also used it as a filling for mini hand pies with a buttery crust—the contrast of sweet and savory is unexpected but delicious.
Beverage Pairings
This jam isn't just for food—it enhances drinks too. Stir a spoonful into sparkling water with mint leaves for a refreshing summer beverage. I also mix it with vanilla vodka and ginger ale for a citrusy cocktail.
For coffee lovers, add a dollop to lattes or chai tea—the berry notes complement warm spices beautifully. The key is balance: a little jam goes a long way. ☕
Gift-Worthy Presentation
Package the jam in small glass jars tied with burlap ribbon for a stunning homemade gift. I always include a handwritten recipe card with pairing suggestions. The vibrant color makes it instantly eye-catching on any shelf.
For a luxe touch, add a sprig of fresh rosemary or edible flowers on top before sealing. These thoughtful details make it feel like a boutique product. 🎁
Nutrition facts
Frequently asked questions
Can I substitute frozen blackberries for fresh ones?
Frozen blackberries work perfectly—just thaw them first and drain any excess liquid. This prevents a watery jam. For best results, use 1 cup of thawed frozen blackberries for every 1 cup of fresh berries called for in the recipe. The texture will be just as chunky and flavorful.
Why is my jam too runny? How do I fix it?
Runny jam usually means it didn't thicken enough during cooking. To fix it, return the jam to low heat and simmer for another 5-10 minutes, stirring constantly. If it still doesn't thicken, mix 1 tablespoon chia seeds with 1 tablespoon water, let it gel for 5 minutes, then stir into the jam. For future batches, ensure you simmer long enough—it should coat the back of a spoon when cool.
Do I need pectin for this recipe?
No pectin is needed! The recipe uses chia seeds as a natural thickener, which also adds a subtle earthy note. Chia seeds create a stable, glossy texture without crystallization. If you prefer a traditional approach, you could add 1 box of low-sugar pectin (about 1/3 cup) and reduce the chia seeds to 1 tablespoon, but the chia method is simpler and healthier.
How long will homemade blackberry lemon jam last?
Properly canned jam in sterilized jars lasts up to 1 year in a cool, dark pantry. If you skip canning, store it in the fridge for 3 weeks or freeze for 6 months. Always check for proper sealing—if the lid pops or bulges, discard the jar. The chia seeds help preserve the jam naturally, but sterilization is key for long-term storage.
Can I adjust the sweetness level?
Yes! The recipe starts with 3 cups sugar, but you can reduce it to 2.5 cups for a less sweet jam or increase to 3.5 cups if you prefer it sweeter. Taste the jam after the initial 20-minute simmer before adding chia seeds—this is the best time to adjust. Remember, sugar also acts as a preservative, so reducing it may shorten shelf life slightly.