
Main Courses
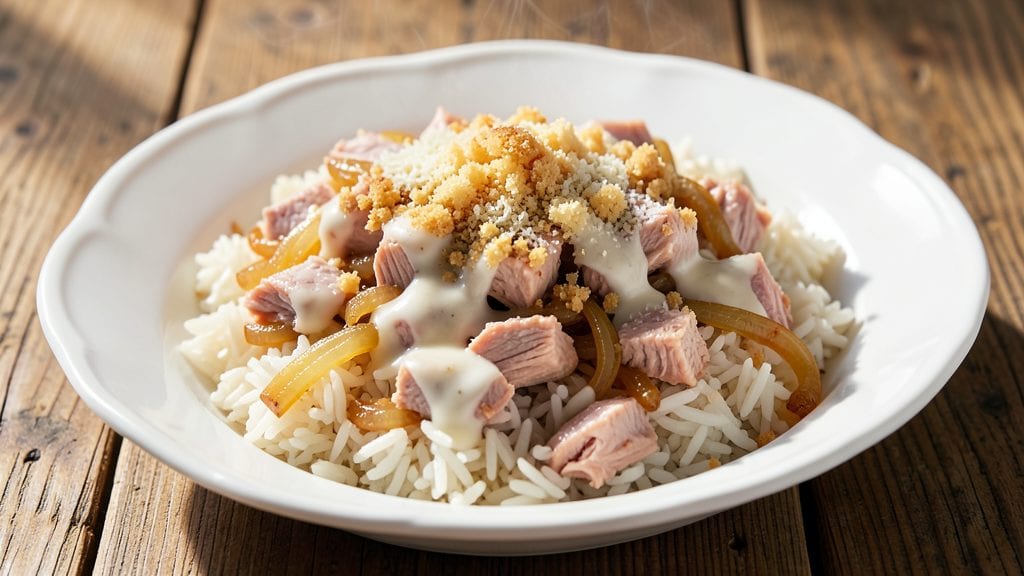
Transforming simple canned tuna and rice into a restaurant-worthy dish is all about the crispy top and creamy onion swirl that elevates every bite. This recipe proves how a pantry staple can become a protein-packed, flavorful meal with just a few smart techniques.
The crispy layer adds texture, while the creamy onions tie everything together in perfect harmony.
What makes this dish special is its versatility—adapt it to Japanese-style with soy and sesame, Mexican-inspired with lime and cilantro, or classic Western casserole flavors. The base is foolproof: long-grain rice cooked with aromatics, mixed with flaked tuna, and topped with a golden, crispy layer that holds up beautifully.
It’s a complete meal in one dish, balanced with protein, carbs, and optional veggies for extra freshness.
The result is a dish that’s creamy from the onion swirl and crispy on top, with tender rice and flaky tuna in every bite. The crispy layer adds a satisfying crunch, while the creamy onions cut through the richness, creating a flavor profile that’s both comforting and exciting.
Perfect for a quick weeknight dinner or meal prep, this recipe delivers restaurant-quality results without the fuss.
Pair it with a simple side salad or steamed vegetables to round out the meal, or serve it as-is for a hearty, protein-rich dish.
The beauty of this recipe lies in its adaptability—whether you’re following a pescatarian diet or simply looking for an easy, flavorful meal, it’s a game-changer for your dinner routine.
Ingredients for canned tuna and rice
Pantry staples meet restaurant magic—crispy, creamy, and protein-packed in one dish.
| Ingredient | Amount | Notes |
|---|---|---|
| Long-Grain White Rice 🍚 | 1 ½ cups | Uncooked, jasmine or basmati preferred |
| Canned Tuna in Water 🐟 | 2 cans | 5 oz each, drained well |
| Yellow Onions 🧅 | 1 ½ cups | Finely diced, caramelized |
| Heavy Cream 🥛 | ½ cup | Full-fat for creamy texture |
| Panko Breadcrumbs 🍞 | ½ cup | Japanese-style for extra crisp |
| Parmesan Cheese 🧀 | ¼ cup | Freshly grated, fine |
| Butter 🧈 | 4 tbsp | Unsalted, melted |
| Garlic Cloves 🧄 | 3 cloves | Minced, for rice base |
| Chicken Broth 💧 | 1 ½ cups | Low-sodium preferred |
| Salt 🧂 | 1 tsp | Kosher or sea salt |
| Black Pepper 🌶️ | ½ tsp | Freshly ground |
| Dried Thyme 🌿 | ½ tsp | Or 1 tsp fresh chopped |
| Mayonnaise 🥫 | 2 tbsp | For optional creaminess |
| Lemon Juice 🍋 | 1 tbsp | Freshly squeezed |
| Green Onions 🧅 | 2 whole | Sliced, for garnish |
The rice is the foundation, so choose jasmine or basmati for that perfect grain-to-grain separation. Costco or Trader Joe's carry these at great prices—just avoid pre-washed varieties, which can be gummy. For the tuna, Starkist or Wild Planet are solid choices; opt for water-packed to avoid excess oil. The onions are key for that creamy swirl—yellow onions caramelize best, but red will work in a pinch. Freshly grated Parmesan makes all the difference here—Whole Foods or specialty stores have the best quality, but a wedge from the deli counter works too. Pre-grated cheese is a flavor crime in this dish.
No panko? Crushed cornflakes or breadcrumbs will work, though the texture won't be as crisp. Short on heavy cream? Half-and-half or whole milk stretches it, but the richness suffers. For a Japanese twist, swap the Parmesan for sesame oil and soy sauce in the crispy topping. Mexican-inspired? Add lime zest and cilantro to the tuna mixture. The mayonnaise is optional but adds a luxurious creaminess—Hellmann's or Duke's are reliable brands. If you're avoiding dairy entirely, Greek yogurt works beautifully in the onion swirl. Always drain the tuna thoroughly—excess water ruins the texture.
This dish reheats like a dream—cover with foil for 5 minutes to revive the crispy top. Store leftovers in the fridge for up to 4 days, though the crispy layer softens after day 2. For meal prep, assemble the dish without baking, then refrigerate and bake straight from the fridge for 10-12 minutes—the longer cook time makes it extra crispy. Freeze portions for up to 3 months, but the crispy topping may lose its crunch. Garnish with green onions and extra Parmesan right before serving for maximum freshness.
Why You'll Love This Recipe
- Pantry Magic: I swear by this one—no fresh herbs, no fancy prep. Just open a can, chop one onion, and you’re golden. The heavy cream and panko add richness without extra effort, and honestly? That’s the kind of meal that saves my sanity after work.
- Creamy Crunch Magic: That crispy panko topping with the silky cream and flaky tuna? It’s the best of both worlds. The onions caramelize just enough to give it depth, and the rice soaks up all the good stuff—no dry bites here.
- Lunchbox Hero: Between us, this is my go-to for meal prep. Double the batch, pack it in containers, and you’ve got a protein-packed lunch for days. My kids actually eat it cold (yes, really), and it reheats like a dream—no soggy rice in sight.
- Budget Win: I make this at least once a week, and it costs me pennies. Canned tuna, rice, and cream stretch forever, and I never feel like I’m sacrificing flavor. It’s the kind of dish that makes grocery day feel like a victory.
Step-by-step instructions for crispy tuna rice with creamy onion swirl
Here's how to transform simple ingredients into a restaurant-worthy dish with perfect texture contrasts.
Sauté Onions and Garlic for Flavor Foundation
Melt 2 tablespoons of the butter in a large skillet over medium heat. Add the 1.5 cups yellow onions and cook for 8-10 minutes until they become soft and golden, stirring occasionally. This slow cooking caramelizes the natural sugars in the onions, creating deep sweetness that will carry through the entire dish.
When the onions are nearly done, add the 3 cloves garlic cloves and cook for an additional 30 seconds until fragrant. Here's the thing—don't let the garlic burn. It should smell wonderful but not bitter. Remove the skillet from heat and set aside, leaving the onions and garlic in the pan. This mixture will form the creamy base of your onion swirl later.
Cook the Rice to Perfect Al Dente Texture
In a separate pot, combine the 1.5 cups long-grain white rice with the 1.5 cups chicken broth. Bring to a boil over high heat, then immediately reduce to low heat, cover tightly, and simmer for 15 minutes. Don't peek or stir during this time—it disrupts the cooking process and can lead to uneven texture.
After 15 minutes, remove from heat and let the rice steam covered for an additional 5 minutes. The rice should be tender but still have a slight bite—this is what we call al dente. Fluff the rice gently with a fork, then stir in the 1 tsp salt, 0.5 tsp black pepper, and 0.5 tsp dried thyme. These seasonings will infuse evenly throughout the rice as it cools.
Create the Crispy Topping Mixture
In a small bowl, combine the 0.5 cup panko breadcrumbs, 0.25 cup parmesan cheese, and remaining 2 tablespoons butter. Mix until the breadcrumbs are evenly coated with butter and cheese. This combination creates a golden, crispy crust that contrasts beautifully with the creamy rice underneath.
Spread the rice evenly in a 9-inch oven-safe skillet or baking dish. Create a well in the center and pour in the 0.5 cup heavy cream and 2 tbsp mayonnaise. Gently stir these ingredients into the rice until fully combined. The mayonnaise adds richness while the cream creates that signature creamy texture you're after.
Assemble and Bake for Crispy Top and Creamy Base
Spoon the caramelized onion and garlic mixture over the rice, creating swirl patterns as you go. This visual presentation makes the dish look as good as it tastes. Sprinkle the crispy breadcrumb mixture evenly over the top, pressing down gently to ensure good contact with the rice.
Bake in a 375°F preheated oven for 20-25 minutes until the top is golden brown and crispy. The key here is patience—don't open the oven door early. The heat needs to penetrate evenly to create that perfect contrast between the crispy top and creamy interior. You'll know it's done when the top looks beautifully browned and slightly puffed.
Finish with Lemon Zest and Garnish
Remove the skillet from the oven and let it rest for 5 minutes. This resting period allows the flavors to meld together and makes the crispy topping even more satisfying. Stir in the 1 tbsp lemon juice and 2 whole green onions (sliced) just before serving. The lemon brightens all the rich flavors while the green onions add a fresh, crisp contrast.
Serve immediately while the top is still crispy and the interior remains creamy. Each bite should deliver that perfect texture combination: crispy breadcrumb topping, creamy onion swirl, and tender rice underneath. The lemon juice ties all the flavors together for a dish that's both comforting and elegant.
Pro Tips For Making Canned Tuna And Rice
- Rinse That Rice: Drain the cooked rice under cold water for 30 seconds—this cuts the starch and keeps your tuna-rice mix from turning gummy. I learned this the hard way after serving a batch that stuck together like glue.
- Drain and Pat the Tuna: Open the canned tuna, drain it thoroughly, then pat it dry with a paper towel. The extra moisture in the juice makes the rice soggy, and nobody wants a watery tuna-rice casserole.
- Sauté Onions Low and Slow: Cook the onions on medium-low heat until soft, not browned—you’re building flavor, not caramelizing. Burnt onions make the whole dish taste bitter, and no one’s here for that.
- Mix Cream Last, Fast: Stir in the heavy cream right before baking (or right before serving if stovetop) to keep it from curdling. If you add it too early, the heat turns it grainy—trust me, you’ll taste the difference.
Make-ahead tips for this canned tuna and rice
Prep Ahead Strategy
Assemble the dish completely up to the baking step, then refrigerate uncovered for up to 24 hours. This allows flavors to meld deeply. When ready to bake, simply preheat your oven to 375°F and add 5-7 extra minutes to the baking time to compensate for the cold start.
The crispy topping will still form beautifully, though it may need slightly longer. 💡
Freezer-Friendly Assembly
For long-term storage, assemble the dish without baking and freeze in a single layer in an airtight container or heavy-duty freezer bag. Thaw overnight in the fridge, then bake from cold for 30-35 minutes at 375°F.
The extra time ensures the crispy topping forms properly, even after freezing. Label with the date—this keeps track of your 3-month freezer life. ❄️
Reheating Leftovers
Reheat individual portions in the microwave for 90 seconds on 50% power, then cover with a damp paper towel for 1 minute to restore moisture.
For oven reheating, cover with foil and bake at 350°F for 10 minutes, then uncover and broil for 2-3 minutes to crisp the top again. The onion swirl stays creamy while the crispy layer gets a satisfying crunch. 🔥
Meal Prep Portioning
Divide the baked dish into 4 individual portions in glass meal prep containers with tight-sealing lids. Store in the fridge for up to 4 days. Reheat each portion separately to maintain crispiness—microwave reheating works best for individual servings.
For extra freshness, keep the crispy topping separate until reheating and sprinkle fresh green onions on top after warming. 📅
Crispy Top Revival
If the crispy topping loses its crunch after refrigeration, sprinkle 1 tbsp panko breadcrumbs on top and broil for 2-3 minutes before serving. This quick fix restores the satisfying texture contrast.
For extra flavor, mix the breadcrumbs with 1 tsp grated Parmesan before broiling. This works like magic for leftovers! 💫
Flavor Boost Before Storing
Before refrigerating or freezing, stir in 1 extra tbsp lemon juice and 1 tbsp mayonnaise to enhance richness. This prevents the dish from tasting flat after storage. For a Japanese-inspired twist, add 1 tsp soy sauce before storing. The flavors intensify overnight, making every bite more delicious when reheated. 🍋
Nutrition facts
Frequently asked questions
Can I use instant rice for this recipe?
Instant rice works in a pinch, but it won't give you the same texture or flavor depth. The dish relies on long-grain rice for its tender yet distinct grains. If you must use instant rice, reduce the cooking time to 5 minutes after boiling, then proceed with the recipe. The crispy topping will still form, but the overall texture will be softer.
How do I keep the crispy topping from getting soggy?
Prevent sogginess by baking the dish on the middle rack of your oven for even heat distribution. Let the baked dish rest for 5 minutes before serving to allow the crispy layer to set. If reheating leftovers, cover with foil and bake at 350°F for 10 minutes, then broil for 2-3 minutes to restore crispiness.
What can I substitute for heavy cream in the onion swirl?
For a lighter version, use ½ cup Greek yogurt or ½ cup whole milk mixed with 1 tbsp butter. If you prefer a richer texture, try ½ cup sour cream or ½ cup evaporated milk. The dish will still be creamy, though the flavor profile will shift slightly. For a vegan option, use ½ cup coconut cream and adjust seasoning to taste.
Can I make this recipe without mayonnaise?
Skip the mayonnaise or replace it with 2 tbsp Greek yogurt or 2 tbsp sour cream for a lighter texture. The heavy cream and caramelized onions will still create a rich, creamy base. If you want extra richness, add 1 tbsp butter to the rice mixture. The dish will just be slightly less indulgent.
How do I make this dish spicier?
Add ½ tsp smoked paprika or ¼ tsp cayenne pepper to the rice while cooking. For extra heat, stir in 1 tbsp sriracha or 1 chopped jalapeño (seeds removed) into the onion swirl. Garnish with chopped cilantro and a squeeze of lime for a zesty kick. Start with small amounts—you can always add more!