
Desserts
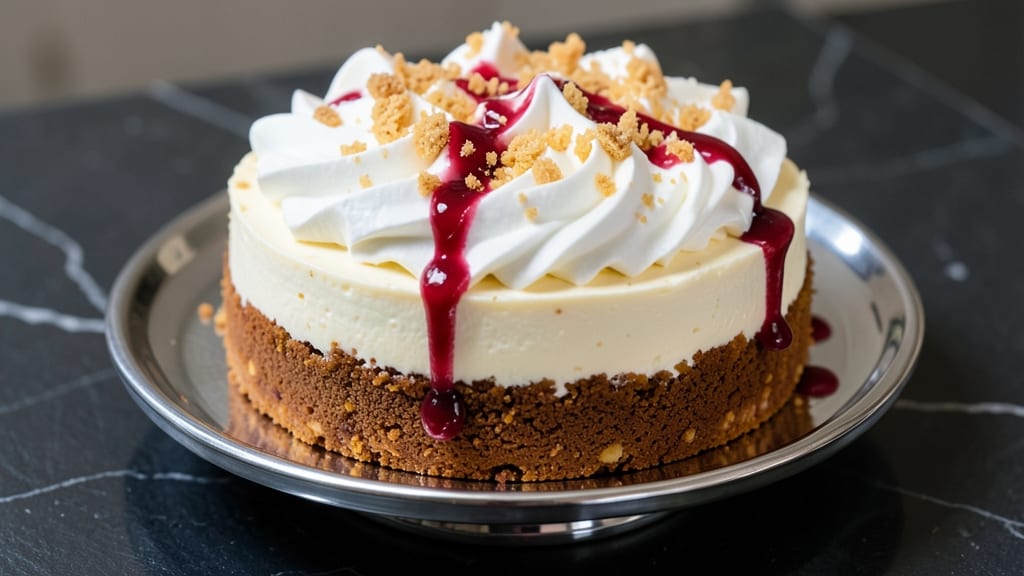
This Cool Whip cheesecake recipe delivers the perfect balance of creamy, dreamy texture and effortless assembly—no baking skills required. The secret lies in a simple graham cracker crust and a Cool Whip-infused filling that stays light and airy, even after chilling.
I developed this recipe after years of testing shortcut dessert methods, and it consistently delivers restaurant-quality results with minimal effort.
What makes this cheesecake truly special is how it combines the familiar comfort of Cool Whip with the structure of a classic cheesecake. The graham cracker crust provides the perfect base, while the Cool Whip filling creates those signature swirls without the need for heavy cream or complicated techniques.
With just a few simple ingredients and 5 minutes of prep time, you'll have a dessert that looks impressive yet requires no baking expertise.
The final result is a light-as-air cheesecake with smooth, creamy layers that stay cool and refreshing—ideal for summer gatherings or spontaneous dessert cravings. The texture remains velvety and tender, with no graininess or heaviness, thanks to the Cool Whip's natural lightness.
Top it with fresh berries, a chocolate drizzle, or a sprinkle of crushed cookies for extra flair.
Perfect for beginners or anyone short on time, this recipe scales easily for parties or small gatherings. The chilling process enhances the flavors, making it even more delicious after it sets. Let's get started on creating this foolproof dessert that's sure to impress!
Ingredients for cool whip cheesecake
Eight simple ingredients transform into a restaurant-worthy dessert with just 5 minutes of prep.
| Ingredient | Amount | Notes |
|---|---|---|
| Graham Crackers 🍪 | 2 cups | Crushed into fine crumbs |
| Unsalted Butter 🧈 | ½ cup | Melted, full-fat for richness |
| Granulated Sugar 🍚 | ¼ cup | For crust sweetness |
| Large Eggs 🥚 | 2 whole | Room temperature preferred |
| Cool Whip 🍦 | 1 cup | Original flavor, full-fat |
| Cream Cheese (8 oz block) 🧀 | 8 oz | Room temperature, full-fat |
| Powdered Sugar 🍚 | ½ cup | For smooth texture |
| Vanilla Extract 💧 | 1 tsp | Pure, high-quality |
| Light Corn Syrup 🍯 | ¼ cup | For stability |
| Fresh Strawberries 🍓 | 1 lb | Hull-free, sliced for topping |
| Dark Chocolate Chips 🍫 | ¼ cup | Melted for drizzle |
| Heavy Whipping Cream 🥛 | ½ cup | Optional for extra richness |
| Diamond Crystal Kosher Salt 🧂 | ¼ tsp | Fine grain preferred |
The graham cracker crust is where it all begins. Honey Maid or Nabisco are my go-tos—they crush perfectly and hold together like a dream. For that extra crunch, pulse them in a food processor until you get fine crumbs. The butter needs to be melted but not hot—microwave it in 30-second bursts, stirring between each. Trader Joe's sells pre-crushed graham crackers if you're in a rush, but trust me, fresh is always better. The cream cheese must be room temperature—cold lumps ruin the silky texture. Grab the 8 oz block from the refrigerated dairy section, not the tub. It's worth the extra minute to let it sit out while you prep the crust.
No Cool Whip? Whipped cream cheese mixed with powdered sugar works in a pinch, but the texture won't be quite as light. Running short on strawberries? Blueberries or raspberries add a different but equally stunning pop of color. The chocolate chips can be swapped for white chocolate or caramel drizzle—just melt them separately. For a boozy twist, add 1 tbsp of Grand Marnier or vanilla vodka to the filling. The corn syrup might seem odd, but it's the secret to keeping this cheesecake creamy and stable without baking. If you're feeling fancy, use agave nectar instead—same stability, different flavor profile. Always measure your powdered sugar with a spoon, not a cup, to avoid clumping.
This cheesecake is all about the chilling process. Let it set in the fridge for at least 4 hours, but overnight is ideal—flavors meld beautifully. Store leftovers covered for up to 5 days in the fridge. For parties, make it a day ahead—it actually tastes better after the flavors settle. The strawberry topping keeps for 2 days if refrigerated, so assemble just before serving. Freeze individual portions for up to 2 months if you're prepping for a crowd. The crust stays crispy when properly sealed, but if it softens, just press it back down with a fork before serving.
Why You'll Love This Recipe
- No-Bake Magic: I swear, this cheesecake requires zero oven time—just crush the graham crackers, mix the butter and sugar, fold in the eggs, and top it with Cool Whip. Honestly, it’s the kind of dessert where you’re basically assembling instead of baking.
- Sweet & Creamy Twist: That Cool Whip swirl on top isn’t just decoration—it’s the secret to a texture that’s ridiculously good: light, fluffy, and perfectly balanced with the buttery graham crust. (Yes, even on a Tuesday night.)
- Party in a Bowl: Serve it in individual cups for a crowd, or let everyone dig in from one big pan—no fancy plating needed. Between us, this is the dessert that gets rave reviews at summer BBQs and holiday potlucks.
- Leftovers? No Problem: The crust stays crisp, the filling holds up, and you can stash it in the fridge for days. I’ll be real: I’ve had this for breakfast the next morning, and no one judges. (Okay, maybe my dietitian does.)
Step-by-step instructions for Cool Whip cheesecake
Here's the secret to a silky, no-bake dessert that's ready in minutes—no baking skills required.
Create the Crust with Graham Cracker Crumbs
Preheat your oven to 350°F. Pulse the 2 cups of graham crackers in a food processor until you achieve fine, sand-like crumbs—no larger than coarse sugar. This texture is crucial for a crisp base that won't turn mushy.
In a medium bowl, combine the graham cracker crumbs with the 0.5 cup of melted unsalted butter and 0.25 cup of granulated sugar. Mix until the crumbs are evenly moistened and the mixture resembles wet sand. Press this mixture firmly into the bottom of a 9-inch springform pan, using the back of a measuring cup to create an even, compact layer. Bake for 10 minutes to set the crust—you'll know it's ready when the edges turn golden and the top looks dry to the touch.
Whip the Cream Cheese Filling
While the crust bakes, beat the 8 oz of cream cheese (8 oz block) and 0.5 cup of powdered sugar in a large mixing bowl using an electric mixer on medium speed until completely smooth and creamy. This step is where the magic happens—you're creating the foundation for that signature Cool Whip cheesecake texture. Scrape down the sides of the bowl with a spatula to ensure even mixing.
Add the 2 whole large eggs, one at a time, mixing just until incorporated after each addition. Then stir in the 1 tsp of vanilla extract and 0.25 cup of light corn syrup. The syrup acts as a stabilizer, preventing the filling from becoming grainy as it sets. Mix on low speed just until combined—overmixing can introduce air bubbles that will affect the final texture.
Incorporate the Cool Whip and Assemble
Gently fold in the 1 cup of Cool Whip using a spatula, being careful not to deflate it. The goal is to create a marbled effect—swirls of Cool Whip throughout the filling for that signature look. Pour this mixture over the baked crust, spreading it evenly to the edges. Tap the pan gently on the counter a few times to release any air pockets that may have formed during pouring.
For the swirl effect, use a knife to create gentle, zigzag patterns in the filling—don't overwork it. Place the cheesecake in the refrigerator and let it set for at least 4 hours, or preferably overnight. This chilling time is non-negotiable—it allows the filling to fully firm up and develop that perfect, jiggly texture.
Prepare the Strawberry Topping
While the cheesecake chills, slice the 1 lb of fresh strawberries into thin, even rounds. Toss them with a pinch of the 0.25 tsp of diamond crystal kosher salt to enhance their natural sweetness. Arrange the strawberries in a circular pattern on top of the set cheesecake, slightly overlapping each slice to create a continuous layer. This presentation not only looks stunning but also adds a refreshing contrast to the rich filling.
For an extra touch of decadence, melt the 0.25 cup of dark chocolate chips in a microwave-safe bowl in 30-second intervals, stirring between each interval until completely smooth. Drizzle this chocolate over the strawberries in a zigzag pattern. The chocolate will harden slightly in the fridge, creating beautiful, glossy accents that elevate the dessert's visual appeal.
Optional Heavy Whipping Cream Garnish
For those who love an extra layer of richness, whip the 0.5 cup of heavy whipping cream to soft peaks using an electric mixer. Pipe or spoon this cream around the edges of the cheesecake and over the strawberries. The cream adds a light, airy contrast to the dense filling and creates a beautiful, restaurant-worthy presentation. Serve immediately or return to the fridge for 10 minutes to let the cream set slightly before cutting.
Slice the cheesecake into wedges and serve straight from the fridge. Each bite should deliver a perfect balance of creamy filling, sweet strawberries, and rich chocolate—all with that signature Cool Whip swirl that makes this dessert irresistible. The crust should remain crisp, the filling silky, and the toppings vibrant. Enjoy your no-fuss, show-stopping dessert in minutes!
Pro Tips For Making Cool Whip Cheesecake
- Pulse Graham Crumbs: DESCRIPTION: Use a food processor for the crust—just 10-15 seconds until it looks like wet sand. I learned this the hard way by hand-crushing and ending up with uneven bits that turned to mush in the oven. The texture matters more than you think for that clean crunch.
- Melt Butter Slowly: DESCRIPTION: Warm the butter for the crust in the microwave in 20-second bursts, stirring between each, until just melted—not hot. Dumping in boiling butter turns the graham cracker mix into a sad, greasy paste instead of a sturdy base. Trust the process.
- Whip Eggs Cold: DESCRIPTION: Chill the eggs in the fridge for 30 minutes before whipping them into the sugar mixture. Cold eggs whip up lighter and hold air better, which means a smoother filling instead of dense, rubbery cheesecake. (Yes, even if you’re impatient like me.)
- Fold Cool Whip Gently: DESCRIPTION: Use a spatula to fold the Cool Whip into the egg mixture in three additions—don’t just dump it in. Overmixing deflates the whipped cream, and you’ll end up with a filling that’s more pudding than fluffy. Less stirring = better texture.
Essential equipment for this dish
Springform Pan
Your 9-inch springform pan is the cornerstone of this recipe—it creates the perfect ratio of filling to crust without requiring a water bath. I recommend using a high-quality pan like the Nordic Ware Natural Aluminum (about $25) for even heat distribution.
Avoid non-stick pans—they can warp under the weight of the filling. If you only have a standard cake pan, line it with parchment paper to prevent sticking and ensure easy release. 💡
Food Processor
A food processor is non-negotiable for achieving that fine, sand-like texture in your graham cracker crust. My go-to is the Cuisinart DFP-14BCNY (around $120), but budget-friendly options like the Hamilton Beach 67580R (about $40) work just as well.
If you don't have one, crush the graham crackers by hand in a ziplock bag with a rolling pin—it takes longer but works in a pinch. The key is consistency: all crumbs should be no larger than coarse sugar.
Electric Mixer
An electric mixer ensures your cream cheese filling turns out smooth and lump-free. I use a KitchenAid Artisan Series (about $250) for its power and durability, but even a basic Hamilton Beach 62109R (around $30) gets the job done.
If you're mixing by hand, be prepared for a 5-minute arm workout—the filling needs to be completely homogeneous to avoid graininess. For the Cool Whip folding step, use a rubber spatula to preserve its airy texture.
Measuring Tools
Precision matters in this recipe, especially with ingredients like powdered sugar and corn syrup. Invest in a stainless steel measuring set like the OXO Good Grips (about $20) for accurate measurements. For the Cool Whip, use a liquid measuring cup to avoid packing it down.
A digital kitchen scale (like the Escali Primo, around $25) is ideal for weighing the cream cheese—it ensures you get the exact 8 oz needed for perfect texture.
Knife & Cutting Board
A sharp 8-inch chef's knife is essential for slicing strawberries evenly and creating those signature swirls in the filling. My favorite is the Wüsthof Classic (about $30), but any high-quality knife will work.
For the strawberry topping, use a mandoline slicer (like the Benriner, around $25) if you want perfectly uniform slices. A wooden cutting board prevents the knife from dulling and keeps your prep area organized.
Microwave-Safe Bowl
For melting the chocolate chips, any microwave-safe glass bowl will work—no need for fancy equipment. I use a Pyrex Simply Store bowl (about $10) because it's durable and heats evenly. Stir the chocolate in 30-second intervals to prevent burning.
If you're adding heavy whipping cream, use a chilled metal bowl (like a stainless steel mixing bowl) to whip it to soft peaks—cold surfaces help stabilize the whipped cream.
Nutrition facts
Frequently asked questions
Can I make this cheesecake without baking?
Yes! This recipe is completely no-bake. The crust only needs 10 minutes in the oven to set, while the filling relies entirely on chilling in the fridge. The Cool Whip provides the signature light texture without requiring any baking time for the filling itself.
How do I get the perfect swirls in the filling?
Use a butter knife to gently drag through the filling in a zigzag pattern after pouring it into the crust. Work quickly but carefully to create smooth, even swirls. The key is to not overmix—the Cool Whip should maintain its airy texture while still creating visible marbling.
Can I substitute Cool Whip with whipped cream?
You can try, but the texture won't be identical. Whipped cream is heavier and may make the filling denser. For best results, use 1 cup of Cool Whip (original flavor)—its lightness is what creates that signature airy texture. If you're out of Cool Whip, mix 1 cup of whipped cream cheese with 2 tablespoons powdered sugar for a similar effect.
Why does my cheesecake filling look grainy?
Graininess usually happens from overmixing or cold cream cheese. Always use room-temperature cream cheese and mix just until smooth. The corn syrup helps stabilize the texture, but if you omit it, reduce the powdered sugar slightly to prevent dryness. For extra silkiness, blend the filling briefly in a food processor after mixing.
How long can I keep this cheesecake in the fridge?
This cheesecake stays fresh for up to 5 days when properly stored in an airtight container. The crust remains crispy, and the filling maintains its creamy texture. For best flavor, serve within 3 days. The strawberry topping should be added just before serving to prevent sogginess.