Main Courses
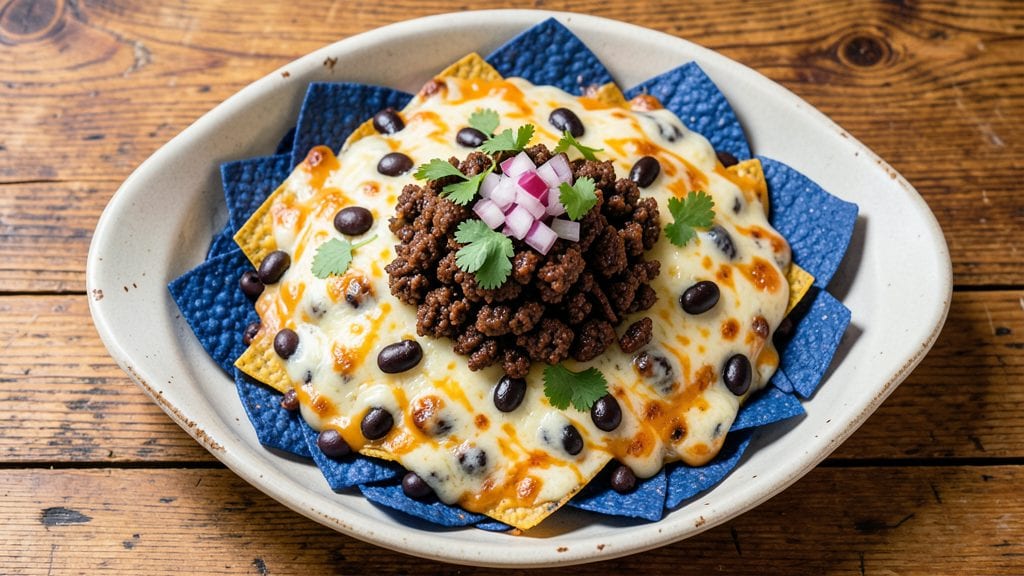
Recreating Denny's nachos at home delivers that iconic crispy tortilla stack with gooey cheese and bold toppings—just like the restaurant version. I spent weeks perfecting this recipe after a late-night craving led me to realize how easy it could be with the right technique.
The secret lies in layering chips and cheese properly for maximum crispiness and melt.
This method uses a combination of cheddar and Monterey Jack for that signature Denny's flavor, baked until bubbly and golden. I've tested it multiple times to ensure the chips stay crispy at the bottom while the cheese melts perfectly on top.
The toppings—jalapeños, sour cream, and guacamole—are added after baking to keep everything fresh and vibrant.
By the time you're done, you'll have a towering nacho platter with perfectly balanced textures: crispy chips, creamy cheese, and cool toppings that cut through the richness.
It's the kind of dish that brings friends together for game day or a casual dinner. Let's get started on making restaurant-quality nachos at home.
Whether you're feeding a crowd or treating yourself to a snack-sized portion, this recipe scales beautifully. The key is patience—don't rush the baking, and let the cheese melt naturally for that authentic Denny's experience. Here's everything you need to recreate it perfectly.
Ingredients for denny's nachos
Six layers of cheesy, crispy perfection—just like Denny's. These ingredients bring the iconic nacho experience home.
| Ingredient | Amount | Notes |
|---|---|---|
| Blue Corn Tortilla Chips 🍟 | 6 cups | Sturdy for layering, not dusty |
| Sharp Cheddar Cheese 🧀 | 1 ½ cups | Shredded fresh, not pre-shredded |
| Monterey Jack Cheese 🧀 | 1 cup | Shredded fresh for creaminess |
| Black Beans 🌿 | 1 ½ cups | Drained and rinsed well |
| Ground Beef 🥩 | 1 lb | 80/20 fat ratio for flavor |
| Taco Seasoning 🌶️ | 1 tbsp | Homemade or store-bought mix |
| Diced Tomatoes 🍅 | 1 cup | Canned or fresh, drained |
| Diced Jalapeños 🌶️ | ½ cup | Pickled or fresh, seeds removed |
| Sour Cream 🥛 | ½ cup | Full-fat for best texture |
| Guacamole 🥑 | 1 cup | Homemade or store-bought |
| Sliced Avocado 🥑 | 2 whole | For garnish, sliced thin |
| Salsa 🌶️ | ½ cup | Medium or mild heat |
| Butter 🧈 | 2 tbsp | Unsalted, for crisping chips |
| Salt 🧂 | 1 tsp | Kosher or sea salt |
| Black Pepper 🌶️ | ½ tsp | Freshly ground for heat |
The cheese blend is non-negotiable. Sharp cheddar and Monterey Jack give that signature Denny's flavor—pre-shredded gets gummy, so grab a block and shred it yourself. For the chips, blue corn tortilla chips hold up better than regular corn chips when layered. I always buy Tostitos Scoops or Fritos for that sturdy texture. The ground beef? 80/20 fat ratio is key—it stays juicy and adds depth to the beans. If you're short on time, pre-cooked seasoned ground beef from the deli section works too.
No black beans? Refried beans or pinto beans work in a pinch, but they change the texture. Short on jalapeños? Pickled red onions or hot sauce add that tangy kick. The guacamole and sour cream should be added after baking—store-bought works fine, but homemade always tastes fresher. For the avocado, pick ripe but firm ones—they'll hold up better when sliced. The butter and salt combo on the chips before baking is what makes them crispy at the bottom while the cheese melts perfectly on top.
This recipe scales like crazy—double or triple the ingredients for a crowd. The baked nachos keep well for 2-3 days in the fridge, but the toppings get soggy fast. I always assemble the toppings separately and let everyone customize their own plate. Store the baked nachos in an airtight container with parchment paper between layers. For parties, pre-bake the cheese layer ahead and add toppings just before serving.
Why You'll Love This Recipe
- Here’s what sold me: the cheddar turns glossy while the Jack stretches just enough to hold everything together. That crispy chip edge? Still perfect even after reheating. (Yes, even on a Tuesday night.)
- No Fuss Assembly: I swear, this takes less effort than ordering takeout. Just layer chips, dump the seasoned ground beef, sprinkle those cheeses—sharp cheddar for bite, Monterey Jack for melt—and call it a day. The blue corn chips add that earthy crunch without extra work.
- Melty Magic Combo: Here’s what sold me: the cheddar turns glossy while the Jack stretches just enough to hold everything together. That crispy chip edge? Still perfect even after reheating. (Yes, even on a Tuesday night.)
- Game for Any Gathering: Between us, these work for everything—weeknight dinners, tailgates, or when your kid’s soccer team shows up unannounced. Double the batch, split it, and no one’s left picking at sad leftovers.
Step-by-step instructions for Denny's nachos recipe
Here's how to build that iconic cheesy, crispy tower of nachos at home.
Brown the Ground Beef and Season It Perfectly
Heat a large skillet over medium-high heat and add the 1 pound of ground beef. Break it into small pieces with a wooden spoon as it cooks, letting it brown evenly for about 5-6 minutes. You want to see those edges turn dark and crispy—this builds deep flavor.
Once the beef is mostly browned, drain any excess fat and return it to the skillet. Stir in the 1 tablespoon of taco seasoning, the 1 teaspoon of salt, and the 0.5 teaspoon of black pepper. Cook for another 2 minutes, letting the spices bloom and coat the beef evenly. This step is where all the savory magic happens.
Layer the Chips for Maximum Crispiness
Preheat your oven to 375°F. Spread half of the 6 cups of blue corn tortilla chips on a large baking sheet, overlapping them slightly but not too tightly. This creates a sturdy base that won't crumble when you add toppings. Melt the 2 tablespoons of butter in a small saucepan over low heat, then brush it evenly over the chips using a pastry brush. The butter will help keep them crispy as they bake.
Place the baking sheet in the oven and bake for 5 minutes. This pre-baking step ensures the chips stay crispy through all the cheesy layers. While they're baking, prepare the remaining toppings so everything is ready when you take them out.
Assemble the Nachos with Cheese and Protein
Remove the chips from the oven and immediately sprinkle half of the 1.5 cups of sharp cheddar cheese and half of the 1 cup of monterey jack cheese evenly over the top. Then add half of the browned ground beef, spreading it in an even layer. Follow with half of the 1.5 cups of black beans and half of the 1 cup of diced tomatoes. This balanced layering prevents any one ingredient from overwhelming the others.
Repeat the process with the remaining chips, cheeses, beef, beans, and tomatoes. The key is to work quickly so the chips don't lose their crispiness. For extra flavor, sprinkle the 0.5 cup of diced jalapeños evenly over the top layer. These layers should feel substantial but not overcrowded.
Melt the Cheese and Finish with Toppings
Return the assembled nachos to the oven and bake for 8-10 minutes, or until the cheese is fully melted and bubbly. You'll see golden brown spots forming on the cheese—this is your signal that it's perfectly melted. If the cheese starts to brown too quickly, tent the baking sheet loosely with aluminum foil to prevent burning.
Once the cheese is melted, remove the nachos from the oven and let them cool for 2-3 minutes. This resting period helps everything set slightly, making it easier to serve without losing toppings. Then, dollop the 0.5 cup of sour cream evenly over the top, followed by the 1 cup of guacamole and the 2 whole sliced avocados arranged artistically on top. Finish with the 0.5 cup of salsa drizzled over everything.
Pro Tips For Making Denny'S Nachos
- CRANK THE HEAT FOR CHEESE: DESCRIPTION: The first 2 minutes of melting cheese are the most critical—get that pan screaming hot before adding the Monterey Jack and cheddar mix. I learned this the hard way after ending up with a sad, clumpy mess instead of that glossy, stretchy blanket everyone loves. If you’re using a skillet, medium-high is your sweet spot; if it’s a sheet pan, broil for 2-3 minutes once the cheese starts bubbling.
- DRY THOSE CHIPS FIRST: DESCRIPTION: Wet chips = soggy nachos. Pat your blue corn tortilla chips dry with a paper towel before layering them—even if they look fine. The extra moisture in store-bought chips (especially if they’ve been sitting around) will turn your nachos into a sad, greasy pile. Trust me, five seconds of drying saves you from a whole new batch.
- SALT THE BEANS BEFORE HEATING: DESCRIPTION: Season your black beans before warming them, not after. A pinch of salt and a squeeze of lime while they’re still cold makes a real difference—it keeps them from tasting bland once mixed with the beef and cheese. I used to skip this, and the beans always felt like an afterthought. Now? They’re the star of the show.
- LAYER BEANS UNDER CHEESE: DESCRIPTION: Don’t just dump everything on top—sandwich the black beans under the cheese layer. The heat from the beef and cheese will warm them through without turning them mushy. This isn’t the prettiest method, but it works: the beans stay hot, the chips stay crisp, and no one has to fish for a dry chip at the bottom.
Pro cooking tips for great denny's nachos
Cheese Layering Secrets
Denny's nachos rely on that perfect cheese blend—sharp cheddar and Monterey Jack—shredded fresh for maximum melt. I've found that pre-shredded cheese gets gummy, so grab a block and shred it yourself using the large holes on your box grater.
For even melting, mix the cheeses together before layering. Spread them in an even layer over the chips, then add the next ingredient. This way, the cheese melts evenly without clumping. 🧀
Don't overlook the butter trick! Brush melted butter over the chips before baking—they stay crispy at the bottom while the cheese melts perfectly on top. I use 2 tablespoons of unsalted butter for a large baking sheet, and it makes all the difference.
The butter also helps the chips hold up better under the weight of toppings.
Browning the Beef
The ground beef needs to brown properly for deep flavor. I always use an 80/20 fat ratio—the extra fat keeps it juicy while browning. Break the beef into small pieces with a wooden spoon as it cooks, and don't rush it.
Those crispy edges are where the flavor develops. After browning, drain the excess fat and return the beef to the pan with the taco seasoning. This step is non-negotiable for that authentic Denny's taste.
For extra flavor, I sometimes add a splash of beef broth when seasoning the beef. It helps distribute the spices evenly and adds a subtle depth. If you're short on time, pre-cooked seasoned ground beef from the deli section works too—just heat it through before layering.
Pre-Baking the Chips
Pre-baking the chips for 5 minutes before adding toppings is the secret to keeping them crispy. Spread them on a baking sheet in a single layer, overlapping slightly but not too tightly.
This creates a sturdy base that won't crumble when you add the cheese and toppings. The butter brush is what makes them stay crispy through the baking process—don't skip it!
While the chips are pre-baking, prepare your toppings so everything is ready when you take them out of the oven. This keeps the process efficient and ensures the chips stay crispy. I like to have everything measured out and within reach before I start assembling the nachos.
Toppings Timing
Add the sour cream, guacamole, and avocado after baking to keep them fresh and vibrant. These toppings are best served immediately—they'll get soggy if added too soon. I like to dollop the sour cream first, then spread the guacamole, and finish with sliced avocado.
This order keeps the toppings from mixing too much and ensures each bite has a balance of flavors.
For a crowd, assemble the toppings separately and let everyone customize their own plate. This also makes it easier to adjust portion sizes. Store the baked nachos in an airtight container with parchment paper between layers to keep them fresh for up to 2-3 days.
The toppings can be stored separately and added just before serving. 🥑
Nutrition facts
Frequently asked questions
Can I make Denny's nachos without ground beef?
Swap the beef for seasoned black beans or crumbled chorizo for a vegetarian/vegan option. For extra protein, add refried beans or spiced lentils. Just ensure the toppings stay balanced—reduce beans slightly if using multiple protein sources. The key is keeping the layers sturdy so chips stay crispy.
Why does my cheese get clumpy instead of smooth?
Clumpy cheese usually means moisture or improper shredding. Always shred your own cheese (not pre-shredded) using a box grater, and mix cheddar and Monterey Jack thoroughly before layering. For extra smooth melt, sprinkle a pinch of cornstarch over the cheese blend. Also, avoid adding toppings too soon—the cheese needs 8-10 minutes at 375°F to melt evenly.
How do I keep the chips crispy all the way through?
Pre-baking the chips for 5 minutes before adding toppings is critical. Brush them with melted butter first, then bake again after layering. Use sturdy blue corn chips (like Tostitos Scoops) that hold up better than regular corn chips. For extra crispiness, bake on a wire rack over a baking sheet so air circulates underneath.
Can I make these nachos ahead of time?
Yes! Assemble everything up to the cheese layer, then bake as directed. Let cool completely, then store in an airtight container with parchment between layers. Reheat at 350°F for 5-7 minutes until melted. Add toppings fresh—sour cream, guacamole, and avocado should go on right before serving to prevent sogginess. The baked base stays crispy for 2-3 days.
What's the best way to scale this for a crowd?
Double or triple all ingredients, but use two baking sheets instead of one large pan. This ensures even baking and prevents overcrowding. For parties, assemble toppings in small bowls so guests can customize their plates. Pre-bake the cheese layers ahead, then add toppings just before serving. Use a large serving platter to create a towering presentation—layer chips in a spiral pattern for visual appeal.