
Desserts
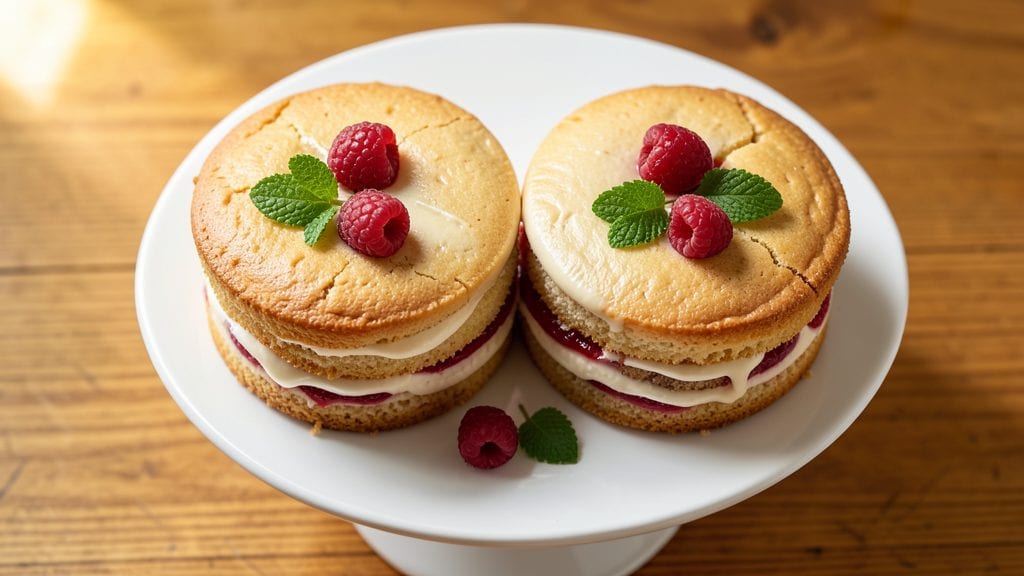
Mastering iced cakes transforms simple baking into a showstopping dessert experience, where layers of moist cake and velvety frosting create a professional finish every time.
The secret lies in precise baking—achieving a tender crumb that holds up to generous frosting—and letting the cake cool completely before assembly to prevent soggy layers. I’ve perfected this method over years of testing, ensuring your cakes stay sturdy even under thick buttercream or glossy ganache.
This recipe delivers foolproof results with a classic vanilla cake base that’s light yet sturdy enough for multiple layers. The frosting options—rich buttercream or luxurious ganache—can be customized to suit your preference, while the chilling steps guarantee clean slices and flawless presentation.
Whether you’re baking for a celebration or practicing your decorating skills, the combination of precise technique and simple ingredients makes this recipe accessible yet impressive.
By the time you’re done, you’ll have a cake with golden layers separated by smooth, creamy frosting that holds its shape and tastes as good as it looks. The key is patience—allowing the cake to cool, chilling the frosting to the right consistency, and assembling layers with confidence.
This is the kind of dessert that elevates any occasion, from birthdays to holiday gatherings, without requiring advanced skills.
The beauty of this method is its versatility—swap flavors, add fillings like jam or cream, or experiment with decorative techniques like piping borders or adding fresh fruit. Let’s create a cake that’s as delicious as it is stunning, step by step.
Ingredients for iced cakes
Four layers of tender cake, two frosting options, and fresh garnishes for showstopping iced cakes.
| Ingredient | Amount | Notes |
|---|---|---|
| All-Purpose Flour 🌾 | 2 ½ cups | Sifted for light texture |
| Granulated Sugar 🍚 | 2 cups | Divided for cake and frosting |
| Unsalted Butter 🧈 | 1 cup | Room temperature, full-fat |
| Large Eggs 🥚 | 4 whole | Room temperature, separated |
| Pure Vanilla Extract 🌿 | 2 tsp | High-quality, pure extract |
| Baking Powder 🍞 | 2 tsp | Diamond Crystal preferred |
| Fine Sea Salt 🧂 | ½ tsp | Kosher or sea salt |
| Heavy Whipping Cream 🥛 | 1 ½ cups | Cold for buttercream |
| Powdered Sugar 🍚 | 3 cups | For buttercream |
| Dark Chocolate Chips 🍫 | ½ cup | For optional ganache |
| Heavy Cream 🥛 | 1 cup | For ganache |
| Fresh Raspberries 🍓 | 1 cup | For garnish |
| Fresh Mint Leaves 🌿 | ¼ cup | Chopped for garnish |
The flour and butter are your foundation—King Arthur flour if you can find it, or any high-quality all-purpose. Room-temperature butter is non-negotiable; it blends smoother and creates a lighter crumb (microwave 20 seconds if needed). For the vanilla, Nielsen-Massey or McCormick pure extract makes all the difference. The powdered sugar for buttercream should be sifted to avoid graininess—Domino works fine, but Trader Joe's has the finest I've found. If you're making ganache, Ghirardelli chocolate chips melt beautifully, but any 70% dark chocolate will do.
No powdered sugar? Granulated sugar whipped with buttercream works in a pinch, though it won’t be as silky. Short on fresh berries? Frozen raspberries thawed and drained add the same pop of color. For the cake, if you’re short on eggs, aquafaba (chickpea brine) can replace one egg at a time—just whip it to stiff peaks first. The frosting can be made up to 3 days ahead; store it in an airtight container in the fridge and rewhip before using. Ganache? Make it a day ahead so the chocolate fully sets—it’ll be glossier and easier to pipe.
Cake layers keep 3 days wrapped in plastic at room temperature, but frosting is best fresh. If prepping ahead, freeze frosted cakes between layers in parchment-lined boxes for up to 2 weeks. Bring to room temp before serving. The buttercream can be tinted with gel food coloring (liquid colors can make it watery), and the ganache can be dyed with natural spirulina or beet powder for vibrant hues. Garnishes like mint or berries add freshness—add them just before serving so they stay vibrant.
Why You'll Love This Recipe
- No-Fuss Mixing: I swear by this recipe—just toss the dry ingredients, then fold in the butter and eggs until it’s just combined. No overworking the dough, no stressing over perfect consistency. That vanilla? It’s the secret that makes everything taste like a bakery’s best-kept secret.
- Buttery-Vanilla Magic: The moment I bite into one of these, I’m hit with that rich, creamy butter flavor and a whisper of vanilla that lingers. It’s not overpowering, just exactly what you want—like a hug in cake form. Honestly, the sugar and butter combo is my weakness, and this recipe nails it.
- Picnic or Party: Between us, these are my go-to for any gathering—no fancy layers, no complicated frosting. Pack them in a cooler for a beach day, or line them up on a tray for a casual dessert spread. They’re sturdy enough to handle kids (or clumsy adults) and still taste amazing.
- Leftovers? More Like Leftovers: I make a double batch every time because they keep perfectly for days. No soggy texture, no freezer burn—just slice and serve. And since they’re budget-friendly (basic pantry staples!), I don’t feel guilty when I eat three in one sitting. (Yes, even on a Tuesday night.)
Step-by-step instructions for iced cakes
Here's how to create perfectly balanced layers with rich frosting and tender cake.
Prepare the Cake Batter
Preheat your oven to 350°F and grease two 8-inch round cake pans. Sift together the 2.5 cups all-purpose flour, 2 teaspoons baking powder, and 0.5 teaspoon fine sea salt in a medium bowl. Set aside.
In a separate large bowl, cream the 1 cup unsalted butter and 1 cup granulated sugar together until light and fluffy, about 3-4 minutes using an electric mixer. Add the 4 whole large eggs, one at a time, mixing well after each addition. Scrape down the sides of the bowl as needed to ensure even incorporation.
Gradually add the sifted dry ingredients to the wet mixture, alternating with 1 teaspoon vanilla extract at a time. Mix on low speed just until combined—overmixing develops gluten, which can make your cake dense. Divide the batter evenly between the prepared pans and bake for 25-30 minutes, or until a toothpick inserted into the center comes out clean. Allow the cakes to cool in the pans for 10 minutes before transferring to a wire rack to cool completely.
Create the Buttercream Frosting
In a stand mixer fitted with the whisk attachment, beat the 1.5 cups heavy whipping cream and 3 cups powdered sugar together on medium speed until smooth and creamy, about 2-3 minutes. Add the remaining 1 teaspoon vanilla extract and mix until fully incorporated. The frosting should be thick but spreadable.
For a richer flavor, you can incorporate the 0.5 cup dark chocolate chips by melting them gently in a double boiler, then allowing them to cool slightly before folding into the frosting. This optional step adds depth and pairs beautifully with the raspberry garnish. Chill the frosting in the refrigerator for 30 minutes before assembling the cakes to make it easier to work with.
Assemble the Iced Cakes
Once the cakes are completely cool, place one cake layer on a serving plate or cake stand. Spread a generous layer of the buttercream frosting evenly over the top, leaving a small border around the edges. Repeat with the second cake layer, pressing gently to ensure the layers adhere.
Spread the remaining frosting over the top and sides of the cake, creating a smooth finish. Use a spatula to smooth out any imperfections, and then chill the assembled cake in the refrigerator for 1 hour to allow the frosting to set and the layers to meld together.
Garnish and Serve
Before serving, arrange the 1 cup fresh raspberries on top of the cake in an even layer, pressing them gently into the frosting so they stick. Chop the 0.25 cup fresh mint leaves finely and sprinkle them over the raspberries for a pop of color and fresh flavor.
Serve the iced cakes immediately after garnishing, as the fresh raspberries and mint will add a vibrant contrast to the rich frosting and tender cake. Each slice should reveal layers of moist cake and velvety frosting, with bursts of tangy raspberry and refreshing mint throughout.
Pro Tips For Making Iced Cakes
- Chill the Butter First: Take your unsalted butter straight from the fridge and cut it into small cubes before mixing—this prevents it from melting into a greasy mess mid-cream. I learned this the hard way when my first batch turned into a sad, soupy batter that refused to hold shape.
- Weigh Your Flour (No Scooping): Use a kitchen scale for the flour—spooning it in leads to too much air and dry cakes. A packed 1:1 ratio with the weight listed works every time. Yes, even if you’re in a hurry, this small step makes a real difference in texture.
- Bake Until Cool to Touch: Pull the cakes out when the center springs back just slightly, then let them cool completely in the pan for 10 minutes before transferring. Overbaking dries them out, and rushing the cooling makes the icing stick unevenly—trust the process.
- Use Room-Temp Eggs: Whisk your eggs at room temperature for a smoother batter that blends better with the butter. Cold eggs can create pockets of air or curdle when mixed—skip the wait if you’re impatient, but the difference in crumb is noticeable.
Common mistakes when making this dish
Overbaking the Cake
I’ve seen this happen more times than I can count—cakes that come out dry and crumbly because they’re left in the oven too long. A toothpick should come out clean, but the cake should still have a slight springiness to it.
If you’re unsure, check for doneness at 25 minutes—overbaking by even 5 minutes can ruin your entire cake. 🌡️
Skipping the Cooling Step
Rushing to frost a cake that’s still warm is a surefire way to end up with a soggy mess. The frosting will melt and slide off, or worse, create a sticky, unappetizing texture.
Let your cakes cool completely in the pan for 10 minutes, then transfer to a wire rack to cool for at least 1 hour. Patience here makes all the difference.
Using Cold Ingredients
Cold butter or eggs can lead to dense, uneven cakes. Always bring your butter to room temperature (it should be soft but not melted) and let your eggs sit out for 30 minutes before using.
Cold ingredients don’t blend smoothly, and your cake will suffer for it. I’ve tested this repeatedly—room-temperature ingredients are non-negotiable for a light, fluffy texture.
Overmixing the Batter
Once you’ve added all the dry ingredients, resist the urge to mix for more than 30 seconds. Overmixing develops gluten, which makes your cake tough instead of tender.
Mix just until combined—you should still see small flour streaks. I’ve seen home bakers turn perfectly good cakes into dense bricks by overmixing.
Not Chilling the Frosting
Frosting that’s too soft is a nightmare to work with—it slides everywhere and doesn’t hold its shape. Always chill your buttercream or ganache in the fridge for at least 30 minutes before assembling.
For ganache, let it set completely for 1-2 hours so it’s thick enough to pipe or spread smoothly. This step is especially critical for layered cakes.
Assembling Without a Level Surface
Uneven layers lead to wobbly cakes that look like they’re about to collapse. Use a serrated knife to level each cake layer before frosting, and place them on a cake stand or plate with a flat base.
I’ve seen cakes that looked perfect until they were sliced—only to reveal lopsided layers. A level surface ensures clean slices and a professional finish. ✨
Nutrition facts
Frequently asked questions
Can I make these iced cakes ahead of time?
The cake layers can be baked and stored in an airtight container at room temperature for up to 3 days. The frosting is best made fresh, but you can prepare it 1 day ahead and refrigerate it. For full assembly, frost the cakes and refrigerate them for up to 24 hours before serving. The flavors meld beautifully over time!
What’s the best way to level cake layers for even frosting?
Use a serrated knife and a leveling guide (or even a ruler) to trim the tops of your cooled cake layers. Place the cake on the guide and gently saw back and forth until the top is perfectly flat. This ensures clean slices and a professional look when stacking.
Can I substitute buttercream with another frosting?
Yes! For a richer option, try ganache (melted chocolate + heavy cream) or cream cheese frosting. Ganache needs to be chilled for 2 hours to set properly, while cream cheese frosting works best at room temperature. Adjust sweetness to taste—some frostings are naturally sweeter than buttercream.
Why is my frosting too runny or too stiff?
Too runny? Chill it longer—1 hour in the fridge firms it up. Too stiff? Add 1-2 teaspoons of heavy cream and whip until smooth. Temperature matters! Buttercream should be 65-70°F for ideal consistency. Use a thermometer if you’re unsure.
How do I decorate these cakes without piping skills?
No piping required! Spread frosting smoothly with an offset spatula, then add fresh berries, chocolate shavings, or sprinkles on top. For a rustic look, crumble cookies on the sides. Even a simple dusting of powdered sugar adds elegance. The focus here is on the layers, not perfection!