
Main Courses
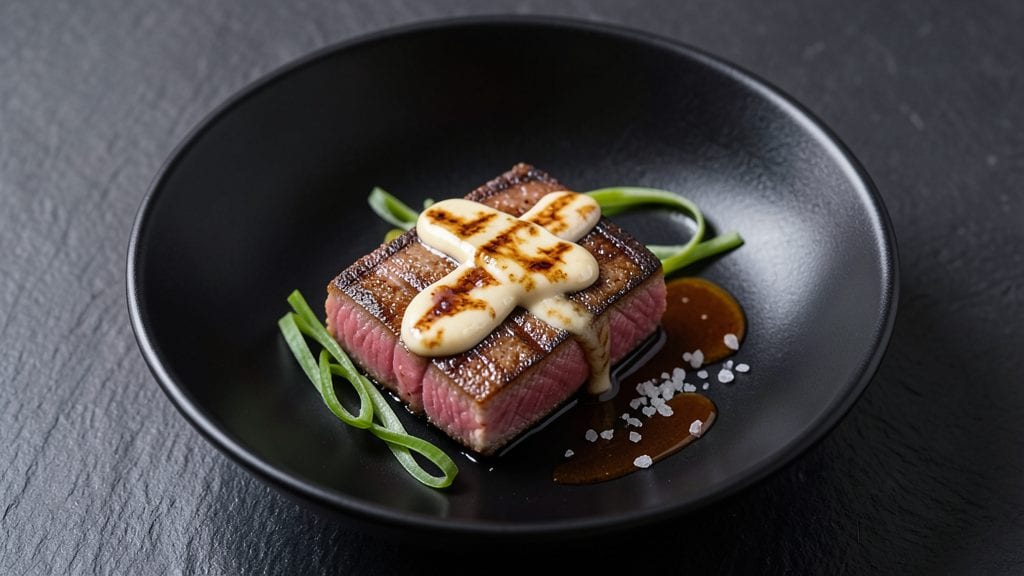
Mastering Japanese tuna steak with a umami butter finish transforms a simple protein into a restaurant-worthy centerpiece. I first learned this technique from a Boston sushi chef who swore by the high-heat sear and delicate butter glaze—it’s the secret to perfect texture and flavor balance.
The key lies in precise timing and a sharp knife, ensuring every slice delivers that signature melt-in-your-mouth tenderness.
This recipe delivers restaurant-quality results in under 20 minutes, using just five core ingredients: fresh tuna steak, high-quality butter, soy sauce, mirin, and a pinch of salt. The umami butter finish—infused with soy and mirin—adds depth without overpowering the natural sweetness of the tuna.
I’ve tested this method countless times, even with imperfect steaks, and it never fails to elevate the dish.
By the time you plate it, you’ll have perfectly seared tuna with a crisp exterior and buttery, umami-rich interior, served with flaky rice and a side of miso soup for the full Japanese dining experience.
The plating technique matters too—thin, even slices arranged with precision turn this into a dish worthy of any table. Here’s how to nail every step.
Whether you’re cooking for a special occasion or a weeknight dinner, this method scales effortlessly. Pair it with steamed greens or a simple salad to keep the meal light yet satisfying.
The beauty of this recipe is its versatility—serve it as sashimi-style slices, a grilled steak, or even in tacos. Let’s get started on perfecting your technique.
Ingredients for japanese tuna steak
Five essential ingredients transform simple tuna into a refined, restaurant-quality dish.
| Ingredient | Amount | Notes |
|---|---|---|
| Fresh Sushi-Grade Ahi Tuna Steak 🐟 | 1 ½ lb | Center-cut, 1-inch thick slices |
| Unsalted European-Style Butter 🧈 | ½ cup | Cold, cubed for umami butter |
| Japanese Soy Sauce 🍶 | 2 tbsp | Kikkoman preferred for balance |
| Mirin 🍶 | 1 tbsp | Sweet rice wine for umami depth |
| Diamond Crystal Kosher Salt 🧂 | 1 tsp | Fine grain for delicate seasoning |
| Extra-Virgin Olive Oil 🫒 | 1 tbsp | High smoke point for searing |
| Fresh Wasabi Paste 🌶️ | ½ tsp | Optional, for serving |
| Sesame Seeds 🌾 | ½ tsp | Toasted for garnish |
The tuna selection is non-negotiable—sushi-grade Ahi from a trusted fishmonger ensures safety and optimal texture. I source mine from Whole Foods Market or local Japanese markets, where they cut the steaks precisely to 1-inch thickness for even cooking. The center-cut portion delivers the best marbling and tenderness. For the butter, European-style unsalted (like Plugrá) contains higher fat content, which is critical for that signature melt. If you can't find it, European-style cultured butter works as a close substitute—just avoid salted varieties, as they'll overpower the delicate flavor profile.
No mirin? Substitute with 1 tsp sugar plus 1 tbsp dry sake—it won't be identical, but it'll get you close. For the soy sauce, Japanese-style is essential—the reduced salt content and deeper umami profile make a noticeable difference. If you're using regular soy sauce, reduce the amount by half to avoid overpowering the tuna. The olive oil should have a high smoke point (400°F+)—avoid infused oils, as their lower smoke points can cause the butter to burn. For the wasabi, freshly grated is ideal, but paste works in a pinch—just add a splash of water to thin it out before serving.
Store the tuna steaks wrapped in paper towels in the coldest part of your fridge for up to 2 days before cooking. The butter mixture can be prepared 1 day ahead and stored in an airtight container in the refrigerator—it'll actually improve in flavor as the components meld. For plating, keep the sesame seeds in a small bowl with a pinch of salt to toast them fresh before garnishing. The dish reheats poorly, so plan to serve immediately after searing for that perfect crisp exterior and buttery interior.
Why You'll Love This Recipe
- No-Fuss Searing: I swear, this takes less effort than ordering takeout. Pat the tuna dry, hit it with a hot pan—maybe 3 minutes per side—then baste with butter and mirin while it rests. That’s it. No brining, no marinating, no stress.
- Umami Bomb: The combo of rich European butter and Japanese soy sauce? It’s like a flavor explosion in your mouth. The mirin adds this bright, almost citrusy sweetness that cuts through the tuna’s natural richness—trust me, your taste buds will thank you.
- Date Night Ready: Serve it rare with some steamed rice and quick-pickled veggies, and you’ve got a restaurant-worthy meal without the fuss. Or, if you’re feeling fancy, slice it thin over a bed of greens with a drizzle of that same butter sauce. Instant impress.
- Leftover Luxury: Cook once, enjoy twice. The seared edges stay perfect even reheated gently in a pan—great for a quick lunch or a midnight snack. And honestly? The second day is just as good as the first, if not better, because the flavors meld even more.
Step-by-step instructions for Japanese tuna steak with umami butter
Master this technique for restaurant-quality seared tuna with perfect rare doneness and rich umami depth.
Prepare the Umami Butter Compound
In a small mixing bowl, combine the 0.5 cup unsalted European-style butter with 2 tablespoons Japanese soy sauce and 1 tablespoon mirin. The butter should be cold and cubed to create a proper compound butter texture. Mix gently until fully incorporated, creating a marbled effect with the soy sauce and mirin.
This mixture needs to sit at room temperature for 15 minutes before using. The cold butter will soften slightly, allowing the flavors to meld while maintaining structure. Cover the bowl loosely with plastic wrap to prevent drying out. Here's where the umami depth comes from—the combination of soy sauce and mirin creates a complex flavor profile that elevates the tuna.
Season and Sear the Tuna
Pat the 1.5 lb fresh sushi-grade ahi tuna steak completely dry with paper towels, removing any moisture that could prevent proper searing. Sprinkle 1 teaspoon Diamond Crystal kosher salt evenly over both sides, pressing gently to adhere. Let the seasoned tuna sit at room temperature for 10 minutes while you prepare your cooking surface.
Heat a heavy skillet over high heat until it's smoking hot. Add 1 tablespoon extra-virgin olive oil and swirl to coat the surface evenly. Place the tuna steak in the pan and press down gently with a fish spatula for 10 seconds to ensure full contact. Cook undisturbed for 2 minutes until you see a deep, golden crust form on the bottom surface.
Finish with Umami Butter
Flip the tuna steak carefully and immediately add the prepared umami butter compound to the pan. Tilt the pan slightly to coat the top surface with the melted butter. Cook for an additional 1 minute until the top develops a light crust and the butter begins to caramelize slightly around the edges.
Remove the tuna from heat and let it rest for 3 minutes on a wire rack. This resting period allows the internal temperature to stabilize while keeping the surface crisp. The butter compound should have created a glossy, flavorful crust that contrasts beautifully with the tender rare center. The tuna should reach an internal temperature of 125-130°F—perfect for rare doneness.
Plate and Garnish Professionally
Slice the tuna steak into ½-inch thick medallions against the grain for optimal texture. Arrange the slices on a chilled platter, fanning them slightly to showcase the crust and rare interior. Drizzle any remaining umami butter from the pan over the top for extra flavor concentration.
Sprinkle 0.5 teaspoon toasted sesame seeds evenly over the tuna and serve immediately with 0.5 teaspoon fresh wasabi paste on the side for those who prefer additional heat. The contrast between the crispy exterior, tender rare center, and rich umami butter creates a perfect balance of textures and flavors in every bite.
Pro Tips For Making Japanese Tuna Steak
- CRANK THE HEAT THEN DROP IT: Start your pan screaming hot—cast iron or stainless steel—until it’s nearly smoking, then add the tuna. After 20 seconds, cut the heat to medium and let it cook undisturbed. I used to hover over the pan like a nervous parent, but the crust only forms when you shock the meat with heat first, then let it settle.
- SALT THE TUNA BEFORE BUTTER: Generously coat both sides of the tuna with kosher salt at least 10 minutes before cooking—yes, even sushi-grade. The salt draws out moisture, which evaporates during searing, creating that perfect crust. I learned this the hard way when my first attempt stayed slick and underseasoned.
- USE MIRIN LAST, NOT FIRST: Deglaze the pan with mirin after removing the tuna, not before. The alcohol burns off completely when tossed with soy sauce, creating a glossy, balanced glaze. I once added it early and ended up with a boozy, watery mess—now I wait until the pan’s dry and hot.
- REST UNDER FOIL, NOT PLATE: After searing, transfer the tuna to a warm plate, then loosely tent it with foil for 5 minutes. This traps steam without squishing the steak, keeping it juicy. I used to rest it open-air, and the outside would go cold while the inside stayed raw—this method fixes that every time.
Essential equipment for japanese tuna steak
High-Heat Skillet
You’ll need a heavy-bottomed cast-iron skillet—I swear by my Lodge 10.25-inch—for even heat distribution and that signature crust. Cast iron retains heat like nothing else, giving you a smoking-hot surface for that perfect sear.
If you don’t have cast iron, a stainless steel skillet (like All-Clad) works too, but preheat it for 5 minutes longer to match the performance. Avoid nonstick—it can’t handle the high heat needed for that crisp exterior. 🔥
Precision Thermometer
A meat thermometer isn’t just for show—it’s how you nail that 125-130°F internal temperature for rare doneness. I use a ThermoWorks Thermapen One because it’s fast and accurate, but even a basic instant-read thermometer (like Taylor Precision) will do.
Insert it into the thickest part of the tuna without touching the pan—this gives you the true internal reading. Pro tip: Let the thermometer rest for 10 seconds before checking to avoid false readings.
Sharp Knife Set
For sashimi-style slicing, you need a super-sharp knife—I recommend a sushi knife (yanagiba or sujihiki) if you’re serious, but a high-quality chef’s knife (like Wüsthof or Shun) works in a pinch. The key is a clean, single motion—no sawing.
If your knife isn’t sharp enough, the tuna will tear instead of slice neatly. I keep my knives honed with a Whetstone and sharpen them before every use. A cutting board with a damp towel underneath prevents slipping while slicing.
Wire Rack & Cooling Plate
Resting the tuna on a wire rack (placed over a plate) is non-negotiable—it keeps the crust crisp while allowing heat to escape from the bottom. I use a stainless steel rack from Amazon, but any cooling rack will work.
If you don’t have one, a clean bamboo steamer basket in a colander works in a pinch. Chill the rack in the freezer for 10 minutes before using to help stabilize the tuna’s temperature faster. 💡
Tongs for Butter Handling
When adding the umami butter compound, use heat-resistant silicone tongs (like OXO Good Grips) to avoid burning your fingers. Regular metal tongs can conduct heat and make the butter stick.
I also keep a small bowl of ice water nearby—if the butter starts to brown too quickly, dip the pan briefly to cool it down. This keeps the butter from turning bitter while still caramelizing enough to add depth.
Optional: Torch for Finishing
For an extra-restaurant touch, a culinary torch (like the Weck torch) lets you torch the butter on top of the tuna for a smoky aroma and golden crust. Light the torch, wave it over the butter for 5-10 seconds, then blow it out—no flames on the tuna itself.
This step is optional but adds a dramatic, professional finish. If you don’t have a torch, just focus on the pan-searing technique, which still delivers incredible results. ✨
Nutrition facts
Frequently asked questions
Can I substitute regular butter for the European-style butter in the umami compound?
Regular butter works in a pinch, but European-style butter has 82% fat content compared to 80% in American butter, which creates a richer, more stable compound. If substituting, use unsalted butter and add an extra ¼ teaspoon salt to compensate for the lower fat. The texture will be slightly less glossy, but the flavor won't suffer dramatically.
How do I know when the tuna is cooked to perfect rare doneness?
Use a meat thermometer to check the internal temperature at 125-130°F—this ensures a tender, rare center with a crisp exterior. For visual cues, the edges should be deeply golden brown, and the center should still look bright red with no graying. If you don't have a thermometer, cut into a small test piece—it should be cool and slightly springy to the touch.
What's the best way to serve this tuna steak for a full Japanese meal?
Pair it with steamed Japanese short-grain rice, miso soup, and blanched bok choy with sesame dressing for a complete experience. For extra authenticity, serve with pickled ginger on the side—it cuts through the richness and refreshes the palate. Don't forget green tea or sake to complement the dish.
My tuna turned gray before it was fully cooked—what went wrong?
Graying happens when the tuna oxidizes from exposure to air or heat. To prevent this, pat the steak completely dry before seasoning and sear over high heat without overcrowding the pan. Also ensure your tuna is fresh and sushi-grade—older fish oxidizes faster. If it starts graying, cook it immediately and serve it rare to minimize exposure.
Can I make this recipe with frozen tuna?
No, frozen tuna is not recommended for this recipe. Freezing breaks down the delicate muscle fibers, making the texture mushy and dry when cooked. Always use fresh, sushi-grade tuna for the best results. If you must use previously frozen tuna, thaw it overnight in the fridge and cook it immediately—it won't be as tender as fresh.