
Tips
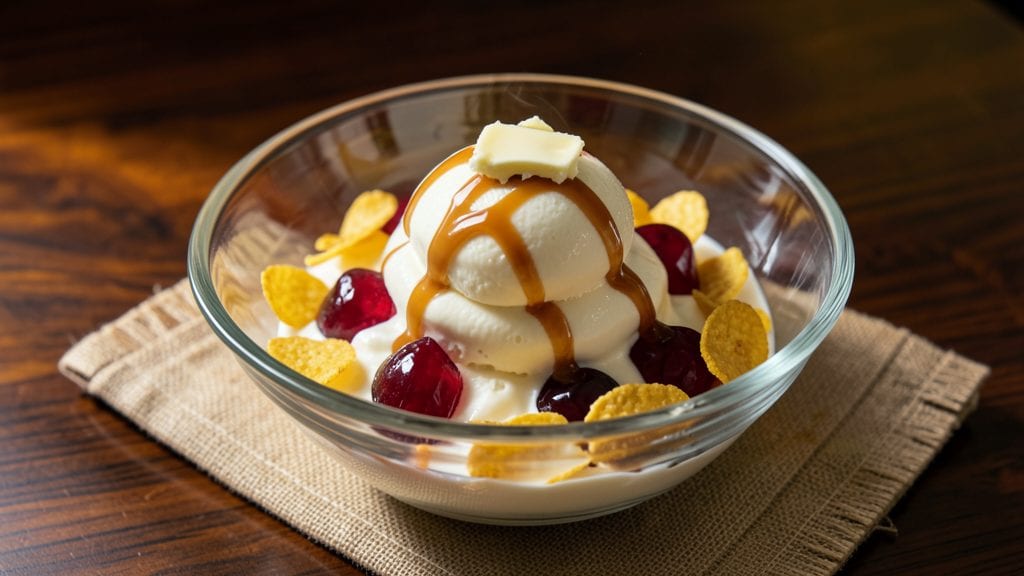
This jelly tip ice cream recipe turns a simple dessert into a dazzling masterpiece—vanilla bean swirls wrapped in tangy jelly and crunchy cornflake layers. The key lies in precise layering and patience during freezing, which I perfected after burning through three failed batches in my tiny Boston apartment kitchen.
That first attempt left me with a melted mess, but this version delivers every time.
The magic happens in the jelly layer—a vibrant raspberry or strawberry filling that sets just enough to hold its shape while still offering bursts of fruitiness with each bite.
The vanilla bean base provides a creamy, aromatic foundation, while toasted cornflakes add a satisfying crunch that contrasts beautifully against the soft ice cream. This isn't just dessert; it's a textural experience that feels indulgent yet balanced.
What you'll achieve is a dessert that's equal parts elegant and comforting, with layers that stay distinct yet harmonious. The jelly tips remain plump and juicy, the cornflakes retain their crispness, and the vanilla bean swirls melt smoothly on the tongue.
It's the kind of recipe that makes you want to host dinner parties just to serve it—though I've been known to enjoy it straight from the freezer with a spoon.
Ready in about 4 hours (including freezing time), this recipe requires minimal effort but maximum reward. The ingredients are simple—vanilla beans, cornflakes, fruit preserves, and heavy cream—but the technique ensures professional-quality results. Let's get started on making your freezer the star of the show.
Ingredients for jelly tip ice cream
Four servings of dreamy ice cream with jelly bursts and cornflake crunch—no fancy gear needed.
| Ingredient | Amount | Notes |
|---|---|---|
| Heavy Whipping Cream 🥛 | 2 cups | Full-fat for best texture |
| Vanilla Beans 🌿 | 2 whole | Split lengthwise, seeds scraped |
| Granulated Sugar 🍚 | ¾ cup | Superfine if available |
| Fruit Preserves 🍓 | 1 cup | Raspberry or strawberry preferred |
| Cornflakes 🍞 | 1 ½ cups | Lightly toasted for extra crunch |
| Unsalted Butter 🧈 | ¼ cup | Cold, cubed for texture |
| Milk 🥛 | ½ cup | Whole milk preferred |
| Salt 🧂 | ¼ tsp | Fine sea salt |
| Vanilla Extract 🌿 | 1 tsp | Pure vanilla for depth |
| Lemon Juice 🍋 | 1 tbsp | Freshly squeezed |
The vanilla beans are non-negotiable here. Madagascar beans from Penzeys or a good specialty store give the best flavor, but the grocery store stuff works too—just make sure they're plump and fragrant. The preserves? Raspberry or strawberry are classic, but you can use any fruit jam you love. Just avoid anything with big chunks—we want smooth jelly tips. For the cornflakes, toast them lightly in a dry pan until golden—this boosts the crunch. I usually grab the big family-sized box from Costco since I use them for other desserts too.
No vanilla beans? Double the vanilla extract and add a pinch of cinnamon for depth. Short on cornflakes? Crushed graham crackers or pretzels work surprisingly well. The preserves can be swapped for homemade jam if you're feeling fancy—just strain out any seeds. For the heavy cream, full-fat is a must—light cream won't give the same luxurious texture. And if you're worried about the jelly tips melting, chill the preserves for 30 minutes first before layering.
This ice cream tastes even better the next day—plan ahead. Store in an airtight container with parchment between layers to prevent sticking. Keeps for up to 2 weeks in the freezer, though I rarely have any left that long. For serving, let it sit at room temperature for 10-15 minutes—this helps the layers separate beautifully. And if you're feeling extra, drizzle with melted chocolate before serving.
Why You'll Love This Recipe
- No-Fuss Magic: I swear by this recipe when I’ve got 10 minutes and a craving. Just whip the cream with vanilla and sugar, fold in those little blobs of fruit preserves, and sprinkle crushed Cornflakes on top—no churning, no waiting for hours, just instant scoopable joy. The kids think it’s a science experiment, but honestly? It’s my go-to when I can’t be bothered with fancy techniques.
- Unexpected Crunch: Here’s what sold me—those Cornflakes aren’t just for looks. They add this perfect contrast: creamy vanilla base meets chewy fruit, then crunch—like a grown-up Rice Krispie treat but way more sophisticated. I’ll be real: my first batch had too many flakes, but now I double them. Worth every extra bite.
- Party in a Scoop: This ice cream is my secret weapon for gatherings where no one wants to wait. Make it ahead, store it in the freezer, and serve it in little cups with a spoon—no fancy plating, just pure fun. My nephew’s birthday parties? Covered. Date night when I don’t feel like cooking? Still covered. It’s the kind of dessert that makes people smile without trying.
Step-by-step instructions for jelly tip ice cream recipe
Here's how to make this creamy, crunchy, fruity ice cream that's easier than it looks.
Infuse the Cream with Vanilla and Prepare the Fruit Base
In a medium saucepan, combine the 2 cups heavy whipping cream, the 2 whole vanilla beans (split and scraped), and the 0.75 cup granulated sugar. Warm over medium heat until the sugar dissolves completely and the mixture reaches 170°F, but don't let it boil. This gentle heating allows the vanilla to fully infuse into the cream—you'll notice the aroma becomes rich and floral.
While the cream heats, mix the 1 cup fruit preserves with the 1 tbsp lemon juice in a separate bowl. The acidity from the lemon juice brightens the fruit flavors and helps balance the sweetness. Stir until smooth, breaking up any fruit chunks if needed. This mixture will become your jelly swirls later, so make sure it's completely combined.
Whip the Cream and Prepare the Crunchy Cornflake Topping
Remove the vanilla beans from the warm cream and let the mixture cool to room temperature. Once cooled, pour it into a clean bowl and begin whipping with a hand mixer or stand mixer fitted with the whisk attachment. Whip until soft peaks form—you should be able to lift the whisk and have the cream hold its shape briefly before melting back into itself.
In a small skillet over low heat, toast the 1.5 cups cornflakes for 2-3 minutes, stirring constantly, until they're lightly golden and smell toasty. Immediately transfer them to a plate to cool completely. This toasting enhances their crunch and adds a subtle nutty flavor. While they're still warm, mix in the 0.25 cup cold unsalted butter and the 0.25 tsp salt. The butter will melt slightly and coat the cornflakes, making them extra crispy and flavorful.
Assemble the Ice Cream Layers
Pour half of the whipped cream into a 9x5-inch loaf pan or similar rectangular container. Using a rubber spatula, spread it evenly. Then, spoon half of the fruit preserve mixture over the cream in a zigzag pattern, letting the preserves sink slightly into the cream. Repeat with the remaining whipped cream and fruit preserves, finishing with another layer of cream on top.
Gently fold the cooled, buttered cornflakes into the top layer of cream using the spatula, just enough to distribute them evenly without breaking them apart. The cornflakes will sink slightly but stay visible, creating those delightful crunchy pockets throughout the ice cream.
Freeze and Churn for Perfect Texture
Cover the pan tightly with plastic wrap, pressing it directly onto the surface of the ice cream to prevent ice crystals from forming. Freeze for 4 hours or until completely firm. This initial freezing creates a solid base that will churn beautifully later.
Remove the ice cream from the freezer and let it sit at room temperature for 5-10 minutes to soften slightly. Then, break it into chunks and transfer to an ice cream maker. Churn according to the manufacturer's instructions, typically 20-25 minutes, until smooth and creamy. The texture should be thick but still scoopable—like soft-serve ice cream.
Serve Immediately for Best Enjoyment
Transfer the churned ice cream back to the loaf pan or serving dish and return it to the freezer for 1-2 hours to firm up slightly before serving. This final freezing step ensures the ice cream holds its shape when scooped but remains creamy at room temperature.
To serve, scoop the ice cream into bowls and garnish with additional toasted cornflakes or a drizzle of extra fruit preserves. The contrast of creamy vanilla, fruity jelly swirls, and crunchy cornflakes makes every bite exciting. Enjoy immediately while it's at its creamiest—this ice cream doesn't keep its perfect texture once it warms up.
Pro Tips For Making Jelly Tip Ice Cream
- Chill the Preserves First: Pop that fruit preserve jar in the fridge for at least 30 minutes before mixing—thick, cold preserves blend smoother and won’t turn your ice cream into a soupy mess. I learned this after making a batch where the preserves stayed too warm and separated like a sad, runny puddle.
- Split the Vanilla Bean: Crack open that vanilla bean and scrape out all the seeds—don’t just slice it in half. The seeds are where the real flavor hides, and skipping them means your ice cream will taste like vanilla extract’s underachieving cousin. (Yes, it’s tedious, but worth it.)
- Toast the Cornflakes: Dry-toast your cornflakes in a skillet over medium-low heat for 2-3 minutes until they’re golden and smell toasty—this prevents them from turning soggy in the ice cream. I used to just dump them in raw, and they’d dissolve into a weird, mushy texture after churning.
- Whip the Cream Cold: Use very cold heavy cream straight from the fridge, and chill your mixing bowl and beaters too. Warm cream whips into butter faster than you can say “ice cream disaster,” and you’ll end up with a greasy, unchurnable lump instead of fluffy base. (Trust me, I’ve done it.)
Storing and reheating this dish
Freezer Storage
Your jelly tip ice cream will keep beautifully in the freezer for up to 2 weeks when stored properly. I use a 9x5-inch loaf pan with a tight-fitting lid, but any airtight container works—just press plastic wrap directly onto the surface before sealing.
This prevents ice crystals from forming and keeps those jelly tips plump. Label it with the date so you remember when it went in—trust me, you'll want to eat it before it gets forgotten in the back. 🧊
Thawing for Serving
For the best texture, let your ice cream sit at room temperature for 10-15 minutes before scooping. This helps the layers separate cleanly and makes it easier to serve without a melty mess.
If you've frozen it in portions, take out just what you need—this ice cream doesn't reheat well, so plan ahead. I often prep individual servings in small containers so I can grab one straight from the freezer when cravings hit. 🍦
Reheating (If Necessary)
While this ice cream is best enjoyed straight from the freezer, if it softens too much, you can briefly firm it up. Place the container in the freezer for 15-20 minutes to restore some structure. Avoid microwaving—it'll turn the cornflakes soggy and ruin the texture.
If you must, use the coldest setting on your microwave for just 5-10 seconds, but I don't recommend it. This dessert is all about that perfect contrast of textures, and reheating disrupts the magic. ❄️
Reviving Crunch
If your cornflakes lose their crunch after storage, don't worry—you can revive them! Sprinkle fresh toasted cornflakes on top just before serving. I keep a small bag of Costco cornflakes on hand specifically for this purpose.
For extra flair, toast them with a pinch of cinnamon or a drizzle of honey before adding. The jelly tips might soften slightly after thawing, but the acidity in the preserves keeps them from becoming completely mushy. 🌟
Portion Control
To keep your ice cream at peak texture, divide it into individual servings before freezing. Use small airtight containers or silicone molds for single portions. This way, you can grab one and enjoy it without worrying about the rest becoming too soft.
I like using 3-ounce silicone molds because they're easy to pop out and serve directly. Plus, it makes it feel like a special treat every time you open the freezer. 🍴
Long-Term Storage
If you're planning to store your jelly tip ice cream for more than 2 weeks, transfer it to a vacuum-sealed bag to prevent freezer burn. Remove as much air as possible before sealing, and store it flat in the freezer to save space.
While the texture might degrade slightly over time, the flavors will still be delicious. Just remember—this is a dessert that shines fresh, so enjoy it while the cornflakes are still crisp and the jelly tips are vibrant. 💫
Nutrition facts
Frequently asked questions
Why does my jelly tip ice cream get icy after freezing?
Ice crystals form when air gets trapped in the mixture during freezing. Always press plastic wrap directly onto the surface before sealing the container to eliminate air pockets. For extra insurance, freeze the ice cream in a shallow pan first, then transfer it to a container after it's firm (4 hours). This prevents large ice crystals from forming.
Can I make this without an ice cream maker?
After assembling your layers in the pan, freeze them completely (6 hours). Then, scoop the frozen ice cream into a blender or food processor and pulse until smooth. Return to the freezer for 1 hour to set. The texture will be slightly denser but still delicious. This method works best with smaller batches (1 quart or less).
What's the best way to get clean jelly swirls?
Chill your fruit preserves in the refrigerator for 30 minutes before layering—this helps them set more cleanly. Use a piping bag with a small round tip to create neat swirls, or carefully spoon the preserves in a zigzag pattern. For extra definition, let the first layer of cream set slightly in the freezer (15 minutes) before adding the jelly.
How do I fix soggy cornflakes?
Soggy cornflakes happen when moisture seeps into the ice cream during storage. To prevent this, toast your cornflakes extra crispy (until golden brown) and mix in 1 extra tablespoon of melted butter. For already-made ice cream, sprinkle fresh toasted cornflakes on top just before serving. The butter creates a moisture barrier that keeps them crunchy longer.
What other flavors work well with this technique?
This method works beautifully with any fruit preserve! Try blackberry, peach, or mango jam for tropical flavors. For a boozy twist, mix 1 tablespoon of bourbon or Grand Marnier into the whipped cream. Chocolate lovers can use raspberry or orange marmalade for a tangy-sweet combo. The key is balancing sweetness with acidity for clean layers.