
Desserts
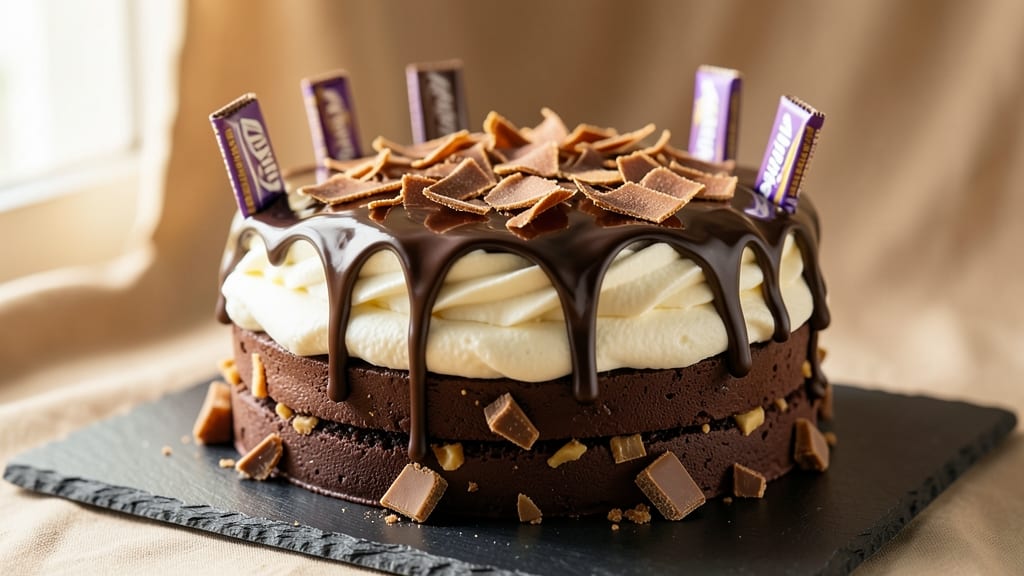
Creating a Kit Kat candy bar ice cream cake transforms a simple dessert into a showstopper that combines rich chocolate fudge layers with creamy vanilla ice cream and the signature crunch of Kit Kat bars.
This recipe delivers a professional-quality dessert with minimal fuss—just a few key techniques to ensure the layers stay sturdy and the crunch remains intact.
The secret lies in baking a dense chocolate base that holds up against the ice cream, then strategically placing Kit Kat pieces for maximum crunch in every bite.
What sets this ice cream cake apart is the balance of textures: a fudgy, slightly crisp crust contrasts beautifully with the smooth ice cream and the satisfying snap of Kit Kat pieces. The assembly process is straightforward but requires patience—chilling each layer thoroughly prevents melting and ensures clean slices.
Whether you're celebrating a birthday or simply craving a decadent treat, this recipe delivers restaurant-quality results without the complexity.
The final cake features layers of chocolate cake, creamy vanilla ice cream, and chunks of Kit Kat bars, all held together by a thin layer of melted chocolate for stability. The exterior gets a glossy chocolate ganache finish that adds elegance while keeping the focus on the indulgent fillings.
Every forkful combines the rich chocolate flavor of the cake, the cool creaminess of the ice cream, and the unmistakable crunch of Kit Kat.
Perfect for special occasions or spontaneous dessert cravings, this cake serves 8-10 and takes just under 2 hours from start to finish, including chilling time. The key to success is working efficiently—prep the cake layers first, then assemble while the ice cream is still slightly soft for easier spreading.
Let's get baking!
Ingredients for kit kat candy bar ice cream cake
Rich chocolate cake layers, creamy ice cream, and Kit Kat crunch—this dessert delivers restaurant-quality indulgence with just 13 ingredients.
| Ingredient | Amount | Notes |
|---|---|---|
| Kit Kat Candy Bars 🍫 | 12 whole | Original flavor, broken into chunks |
| All-Purpose Flour 🌾 | 2 cups | Sifted for smooth batter |
| Unsalted Butter 🧈 | 1 ½ cups | Cold, cubed for fudgy texture |
| Granulated Sugar 🍚 | 1 ¾ cups | Light brown preferred |
| Dark Chocolate Chips 🍫 | 1 ½ cups | Semi-sweet, 60% cocoa |
| Large Eggs 🥚 | 2 whole | Room temperature |
| Vanilla Extract 🌸 | 1 tbsp | Pure, high-quality |
| Baking Powder 🍞 | ½ tsp | Metal container preferred |
| Salt 🧂 | ½ tsp | Fine sea salt |
| Vanilla Ice Cream 🍦 | 3 cups | High-fat, premium brand |
| Heavy Cream 🥛 | 1 cup | Cold, for ganache |
| White Chocolate Chips 🍫 | ½ cup | For ganache finish |
| Milk Chocolate Bars 🍫 | 8 oz | Melted for ganache base |
The Kit Kat bars are the star, so grab the original flavor—it holds up best when broken into chunks. Trader Joe's and Costco often have bulk packs that save money. For the chocolate cake, use light brown sugar for moisture and a deeper flavor. The butter must be cold—take it out of the fridge just before mixing. Dark chocolate chips (60% cocoa) create a fudgy texture that contrasts perfectly with the ice cream. If you can't find semi-sweet, 70% cocoa works too, but reduce by 0.25 cup to avoid bitterness.
No vanilla ice cream? Homemade or high-fat store-bought is ideal—Brunswick or Breyers are reliable choices. Short on Kit Kat bars? Crushed Oreos or butterscotch chips add crunch, though nothing matches that signature snap. The ganache requires milk chocolate bars or chips—avoid chocolate bars with nuts or caramel if you want clean flavor. For the cake, sift the flour and baking powder together to prevent lumps. The eggs should be at room temperature to blend smoothly into the batter, but if you're in a hurry, let them sit in warm water for 5 minutes.
The cake layers must chill at least 2 hours before assembly to prevent melting. Wrap tightly in plastic wrap and store in the fridge. The ganache thickens as it cools—microwave in 20-second bursts if it becomes too firm. This cake keeps for 3 days in the fridge, but the ice cream layer softens over time. For longer storage, freeze the assembled cake (unfrosted) for up to 2 months. Let it thaw in the fridge overnight before serving.
Why You'll Love This Recipe
- No Baking Skills Needed: I swear, you don’t even need to turn the oven on. This cake starts with crushed Kit Kats folded into a simple flour-butter base—no eggs, no fuss—then gets swirled with melted chocolate and ice cream. Honestly, my 12-year-old "helped" (read: made a mess) and still got rave reviews.
- Taste Like Childhood: That first bite of crispy Kit Kat wafer crunch followed by creamy ice cream and rich chocolate? It’s like your favorite candy bar got a grown-up hug. Between us, I’ve made this for birthdays, movie nights, and even as a "sorry I forgot your anniversary" dessert—works every time.
- One Bowl, Endless Uses: Make it for a crowd, then stash leftovers in the freezer for lazy weeknights. Double the Kit Kat chunks for extra indulgence, or swap in white chocolate chips if you’re feeling fancy. I’ll be real: I’ve served it at potlucks, kids’ parties, and even as a "dessert" for my book club—no one judges.
- Budget Magic: You’re basically turning pantry staples into something luxurious. A box of Kit Kats and a bag of chocolate chips cost less than takeout, yet this cake feels like a bakery showstopper. Plus, the flour and butter stretches further than you’d think—my wallet thanks me every time.
Step-by-step instructions for Kit Kat candy bar ice cream cake
This recipe delivers a decadent dessert with fudgy chocolate layers and crispy Kit Kat crusts.
Prepare the Chocolate Crust
Preheat your oven to 350°F. In a food processor, pulse 12 whole Kit Kat Candy Bars (broken into chunks) until finely crushed—about 30 seconds. The mixture should resemble coarse sand with visible Kit Kat pieces.
In a large bowl, combine the crushed Kit Kats with 1.5 cups Unsalted Butter (cubed and cold) and 1.75 cups Granulated Sugar. Use a pastry cutter or your fingers to work the butter into the mixture until it resembles wet sand. Press this mixture firmly into a 9-inch springform pan, creating an even layer. Bake for 12-15 minutes until the edges are golden brown and the crust is set. Let it cool completely before proceeding.
Make the Chocolate Fudge Layer
In a medium saucepan, melt 1.5 cups Dark Chocolate Chips with 1 cup Heavy Cream over low heat, stirring until smooth. Remove from heat and stir in 1 tbsp Vanilla Extract and 0.5 cup White Chocolate Chips. Let the mixture cool slightly to 100°F—it should be thick but pourable.
Spread the chocolate mixture evenly over the cooled crust, creating a ¼-inch layer. Place the pan in the freezer for 30 minutes to set. While it chills, prepare the cake base by mixing 2 cups All-Purpose Flour, 0.5 tsp Baking Powder, and 0.5 tsp Salt in a bowl.
Bake the Chocolate Cake Base
In a separate bowl, beat 2 whole Large Eggs and 0.5 cup Granulated Sugar until pale and slightly thickened. Gradually fold in the flour mixture until just combined—do not overmix. Pour this batter over the set chocolate layer in the springform pan.
Bake at 350°F for 18-20 minutes, until a toothpick inserted into the center comes out clean. The cake should be moist but set. Let it cool completely before adding the ice cream layer.
Assemble with Vanilla Ice Cream
Spread 3 cups Vanilla Ice Cream evenly over the cooled cake base, creating a ½-inch layer. Press the ice cream gently with a spatula to ensure it adheres to the cake. Return the pan to the freezer for 1 hour to firm up.
Melt 8 oz Milk Chocolate Bars in a double boiler or microwave, stirring until smooth. Drizzle this ganache evenly over the ice cream layer. Use a fork to create decorative swirls in the ganache. Freeze for an additional 30 minutes before serving.
Serve and Enjoy
Remove the cake from the freezer 10 minutes before serving to soften slightly. Use a sharp knife to cut into 10 equal slices, wiping the blade with warm water between cuts to ensure clean pieces. Serve immediately for the best texture—soft cake, creamy ice cream, and crispy Kit Kat crust in every bite.
Pro Tips For Making Kit Kat Candy Bar Ice Cream Cake
- MELT KIT KATS GRADUALLY: Toss whole Kit Kats into warm (not boiling) milk or cream first—they’ll soften faster than you’d expect. Then, pulse in a food processor until you get that perfect, smooth-but-still-chunky texture. I learned this the hard way after ending up with a gloppy mess that wouldn’t set.
- CHILL THE BUTTER: Take your unsalted butter straight from the fridge and cut it into small cubes before mixing with sugar. Cold butter creates air pockets that make the cake lighter, and it won’t turn into a greasy disaster when you add flour. Trust me, your cake will thank you.
- SKIP THE OVERMIXING: Once you add flour to the butter-sugar mix, stir just until combined—no more. Overmixing develops gluten, and your cake will turn out dense instead of tender. I used to think extra mixing meant better texture, but it’s the opposite.
- FREEZE LAYERS BETWEEN ADDING ICE CREAM: After baking and cooling the first layer, pop it in the freezer for 10-15 minutes before adding ice cream. This keeps the filling from melting too fast and turning your cake into a soggy mess. Yes, it’s an extra step, but it’s worth it.
Storing and reheating this dish
Refrigerator Storage
Store your assembled ice cream cake in an airtight container (I use Pyrex with a snap-on lid) for up to 3 days in the fridge. The key is to wrap it tightly in plastic wrap first to prevent air exposure, which can dry out the cake layers.
Place it on the middle shelf where the temperature stays most consistent around 38-40°F. The ice cream layer will soften slightly, but the cake structure remains intact. 💫
Freezer Prep
For longer storage, freeze the unfrosted cake (before adding the final ganache) for up to 2 months. Wrap each layer individually in plastic wrap, then place them in a freezer-safe bag with all air removed.
Label the bag with the date—this helps track freshness. When ready to serve, thaw overnight in the fridge and add the ganache just before slicing. This preserves the cake's texture better than freezing the fully assembled dessert.
Reheating Ice Cream Layers
If your cake sits too long and the ice cream melts completely, don't worry! Spread 1 cup softened vanilla ice cream over the cake and return it to the freezer for 30 minutes to firm up.
For extra richness, drizzle 2 tbsp melted milk chocolate over the top before refreezing. This restores the creamy texture without making the cake soggy. 🍦
Ganache Refresh
The ganache can thicken in the fridge—simply microwave it in 10-second bursts while stirring until smooth. If it becomes too runny, chill for 10 minutes to thicken again. For a glossy finish, brush the top with 1 tsp heavy cream before serving.
This trick makes the cake look freshly made even if it's been stored for a few days. ✨
Serving After Storage
Let the cake sit at room temperature for 10-15 minutes before slicing to soften the edges slightly. Use a hot knife (dip in hot water and wipe dry) for cleaner cuts. Serve slices immediately—the contrast of warm cake against the cold ice cream is what makes this dessert magical.
For parties, assemble the cake 2 hours before serving to avoid last-minute melting. 🍫
Kit Kat Crunch Preservation
To keep the Kit Kat pieces extra crispy, store any leftover crushed Kit Kat mixture in a small airtight container at room temperature. If you're making the cake ahead, press a fresh layer of crushed Kit Kats onto the top of each slice just before serving.
This ensures that signature crunch in every bite, even after storage. 💪
Nutrition facts
Frequently asked questions
Can I substitute white chocolate for the dark chocolate in the cake?
You can try, but the texture and flavor will differ significantly. Dark chocolate (60% cocoa) creates the fudgy, rich base that contrasts perfectly with the ice cream. White chocolate would make the cake sweeter and less dense. If you prefer white chocolate, reduce the amount by 0.25 cup and add 1 tbsp cocoa powder to maintain structure.
How do I prevent the ice cream layer from melting too quickly?
Chill the cake layers thoroughly before assembly—at least 2 hours in the freezer. Use a high-fat, premium ice cream brand (like Breyers) that holds its shape better. Spread the ice cream layer evenly and press it gently to help it adhere. Freeze the assembled cake for 1 hour before adding the ganache. Serve immediately after removing from the freezer for the best texture.
What's the best way to cut this cake without messy ice cream drips?
Use a hot knife—dip it in hot water, wipe dry, and cut through the cake. This creates clean slices and prevents the ice cream from sticking. Wipe the knife between cuts to maintain sharpness. For extra stability, chill the cake for 10 minutes before slicing to firm up the ice cream slightly.
Can I make this cake ahead of time for a party?
Assemble the cake (without the final ganache) up to 24 hours ahead and store it in the freezer. Wrap each layer tightly in plastic wrap. When ready to serve, thaw in the fridge for 2 hours, add the ganache, and let it set for 30 minutes. This method keeps the cake structure intact and prevents melting.
What if I don't have a springform pan?
Use a standard 9-inch round cake pan with a removable bottom. Line it with parchment paper for easier removal. If you only have a non-removable pan, grease it well and use a thin metal spatula to loosen the edges before unmolding. The cake will still hold together, but the crust might be slightly thicker.