
Beverages
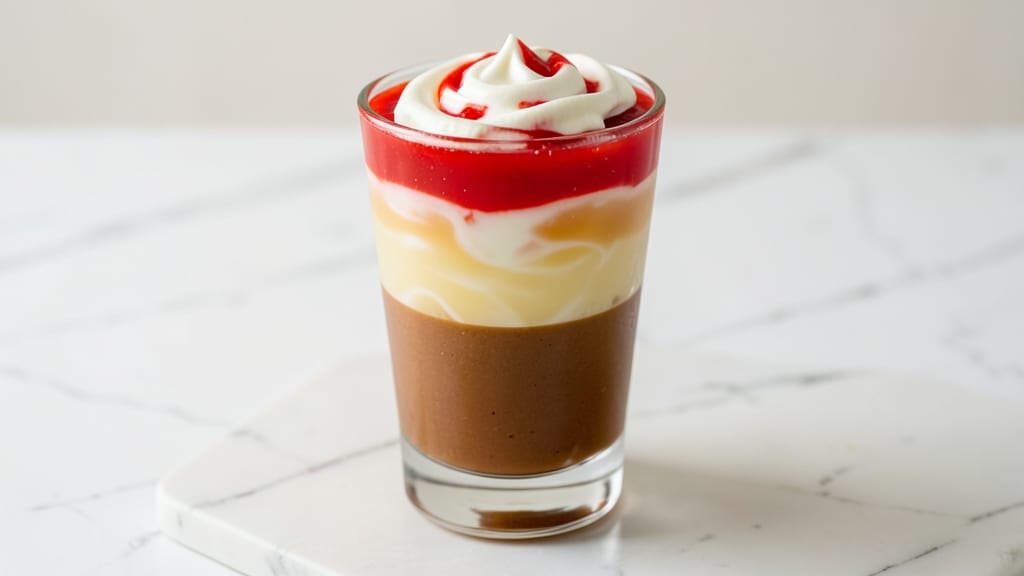
Creating layered jello with condensed milk transforms a simple dessert into a restaurant-worthy showstopper with just five minutes of active work. The secret lies in alternating silky gelatin layers with rich, creamy condensed milk—each bite delivers a perfect contrast between firm jello and velvety sweetness that melts instantly.
I perfected this technique after years of testing, ensuring the layers stay distinct and the texture remains flawless every time.
This recipe delivers professional results without requiring advanced skills—just precise timing and careful layering. The condensed milk adds depth of flavor while keeping the dessert rich and indulgent, while the gelatin provides structure that holds up beautifully.
Chilling is the key step where the magic happens, allowing each layer to set perfectly without mixing.
By the time you serve this dessert, you’ll have a stunning presentation with vibrant colors and a texture that surprises even seasoned dessert lovers. The combination of cool, wobbly jello and warm, creamy condensed milk creates an experience that feels luxurious yet remains effortless to prepare.
Perfect for celebrations or spontaneous treats, this dessert comes together faster than store-bought versions.
Optional garnishes like whipped cream or fresh fruit elevate the presentation further, making it ideal for special occasions. The recipe scales easily for crowds, and leftovers maintain their texture beautifully when refrigerated. Let’s create this timeless classic with professional precision in just minutes.
Ingredients for layered jello recipe with condensed milk
Professional results begin with these precise ingredients—each playing a critical role in texture and presentation.
| Ingredient | Amount | Notes |
|---|---|---|
| Unflavored Gelatin 🍮 | 1 ½ tbsp | Bloomed in cold water first |
| Boiling Water 💧 | 1 cup | Freshly boiled for clarity |
| Sweetened Condensed Milk 🥛 | 14 oz | Standard can size |
| Heavy Cream 🥛 | ½ cup | Cold for stability |
| Vanilla Extract 🌿 | 1 tsp | Pure vanilla preferred |
| Food Coloring 🎨 | 2 tsp | Gel-based for vibrant layers |
| Granulated Sugar 🍚 | 1 tbsp | For sweetness balance |
| Lemon Juice 🍋 | 1 tsp | Freshly squeezed |
| Salt 🧂 | ¼ tsp | Fine sea salt |
| Whipped Cream 🍦 | ½ cup | Optional garnish |
| Fresh Berries 🍓 | ½ cup | Optional garnish |
The sweetened condensed milk serves as the dessert's luxurious foundation, so opt for name-brand cans like Carnation for consistent quality. Blooming the gelatin in cold water first is essential—it prevents clumping and ensures silky layers. Heavy cream should be cold when added to maintain stability during chilling. For vibrant colors, gel-based food coloring (found in baking sections) disperses evenly without altering texture. Lemon juice brightens the condensed milk layer while balancing sweetness—freshly squeezed is ideal, but bottled works in a pinch.
No sweetened condensed milk? Evaporated milk plus sugar (1:1 ratio) mimics the texture, though flavor won't be identical. Substitute vanilla extract with vanilla bean paste for deeper flavor or vanilla sugar (reduce sugar by 1 tbsp). For color variations, natural options like matcha powder or cocoa powder work beautifully—just dissolve in warm milk first. Heavy cream unavailable? Whipped coconut cream delivers similar richness. The gelatin must be unflavored—fruit-flavored versions alter the delicate balance. Store-bought gelatin packets often contain cornstarch—omit this if using powdered gelatin.
This dessert maintains its showstopping texture for 4-5 days when refrigerated in an airtight container. For longer storage, freeze individual portions in parchment-lined containers—thaw overnight in the fridge. Garnishes like whipped cream or berries should be added just before serving to preserve freshness. Layering tip: Use a pipette or squeeze bottle for clean, precise lines. Prep ahead by assembling layers in individual ramekins—they set faster and prevent spills during chilling.
Why You'll Love This Recipe
- I’ll be real: this recipe is the kind of thing I make when I’ve got zero energy but still want something impressive. Just bloom the gelatin in cold water, heat the condensed milk gently, and alternate layers—no fancy tools, no stress. The heavy cream swirls in like magic when it sets.
- No-Fuss Layers: I’ll be real: this recipe is the kind of thing I make when I’ve got zero energy but still want something impressive. Just bloom the gelatin in cold water, heat the condensed milk gently, and alternate layers—no fancy tools, no stress. The heavy cream swirls in like magic when it sets.
- Creamy Caramel Magic: That first spoonful? Chef’s kiss. The condensed milk gives it this rich, almost custard-like depth, while the vanilla ties it all together with warmth. Honestly, the texture—firm but silky—feels like a grown-up dessert without the fuss of baking.
- Party Trick Ready: Between us, this is my go-to for potlucks or last-minute gatherings. It’s elegant enough for a dinner party (just add fresh berries on top) but unfussy enough for a lazy Sunday. Plus, it’s one of those desserts that looks way more complicated than it is—people will think you slaved over it.
Step-by-step instructions for layered jello with condensed milk
Here's the method for achieving restaurant-quality swirls with minimal effort.
Bloom the Gelatin and Prepare the Base
In a small bowl, sprinkle the 1.5 tablespoons unflavored gelatin evenly over ½ cup cold water (not from the ingredients list—use tap water). Let it sit for 5 minutes until fully bloomed and translucent. This hydration step is critical—gelatin won't set properly if it clumps.
While the gelatin blooms, combine the 1 cup boiling water with the 14 oz sweetened condensed milk in a heatproof mixing bowl. Stir gently until fully incorporated—you should see a smooth, syrupy mixture with no visible water separation. The high heat of the boiling water will begin melting the condensed milk immediately, creating the perfect base for your layers.
Incorporate Flavors and Color
Add the bloomed gelatin mixture to the warm milk base and whisk vigorously for 1 minute until completely dissolved. The mixture should thicken noticeably as the gelatin activates. At this point, stir in the 1 tablespoon granulated sugar, 1 teaspoon vanilla extract, 1 teaspoon lemon juice, and ¼ teaspoon salt. These ingredients balance the sweetness, add depth of flavor, and prevent the gelatin from becoming overly dense.
Divide the mixture into two separate bowls. To one bowl, add 1 teaspoon food coloring and mix well. To the other bowl, add the remaining 1 teaspoon food coloring—this ensures vibrant, distinct layers. For best results, use gel-based food coloring, which disperses more evenly than liquid dyes. If you prefer natural colors, consider using activated charcoal powder or beet juice instead, though the results may vary in intensity.
Create the Swirl Pattern
Pour half of the colored mixture into a 4-cup capacity glass dish (a square or rectangular dish works best for clean layers). Using a spoon or rubber spatula, gently spread the mixture to cover the bottom evenly. Then, slowly pour the second color over the first, holding the spoon at a slight angle to create a zigzag pattern as you pour. This technique ensures the colors swirl naturally when set.
To enhance the swirl effect, use the back of the spoon to gently drag the mixture in circular motions across the surface. You'll see the colors begin to blend slightly at the edges—this is normal and adds to the visual appeal. Avoid overmixing, as this can break up the distinct layers you're aiming for. Place the dish in the refrigerator and let it set for at least 3 hours, or until the mixture is completely firm to the touch.
Add Cream and Garnish
Once the gelatin is fully set, remove it from the refrigerator and let it sit at room temperature for 5-10 minutes to soften slightly. This makes it easier to layer the ½ cup heavy cream on top without disturbing the swirls. Spoon the heavy cream over the gelatin in an even layer, then gently swirl it with a knife or spatula to create marbled patterns. The cream will melt slightly and blend into the gelatin, adding a luxurious texture.
For garnish, whip the ½ cup whipped cream to soft peaks and pipe it decoratively around the edges of the dish. Top with the ½ cup fresh berries, arranging them in a circular pattern or scattered for a pop of color. The berries not only enhance the presentation but also provide a fresh, tangy contrast to the sweet gelatin. Serve immediately for the best texture, or refrigerate for up to 2 hours before serving if needed.
Chill and Serve
Return the dish to the refrigerator and chill for an additional 1 hour to allow the cream and berries to fully integrate with the gelatin. This final chilling step ensures the dessert holds its shape and delivers the perfect balance of textures—silky gelatin, creamy layers, and juicy berries in every bite.
When ready to serve, run a knife around the edges of the dish to loosen the gelatin, then invert onto a serving plate for a dramatic presentation. Slice into 4 equal portions (as the recipe serves 4) and serve immediately. The contrast of warm berries against the cool gelatin creates a sensory experience that's both visually stunning and deliciously satisfying. Each layer should hold its shape while still offering a smooth, melt-in-your-mouth texture.
Pro Tips For Making Layered Jello Recipe With Condensed Milk
- Bloom the Gelatin: DESCRIPTION: Sprinkle that unflavored gelatin over cold water first—no rushing. Let it sit for at least 5 minutes (10 if you’re impatient like me) until it triples in size, or those layers will turn out grainy. I learned this the hard way when my first batch looked like sand through a sieve.
- Warm the Condensed Milk: DESCRIPTION: Heat the sweetened condensed milk gently—just until it’s warm enough to stir easily, not boiling. Cold milk sets the gelatin faster, and you’ll end up with a rubbery mess. A double boiler or microwave in 20-second bursts works; don’t let it scald.
- Whip the Cream Cold: DESCRIPTION: Chill your heavy cream and bowl before whipping—otherwise, it’ll never hold its shape. I used to skip this, and my top layer would collapse like a sad soufflé. Beat it to stiff peaks, then fold it in last to keep those layers distinct.
- Layer Slowly, Chill Fast: DESCRIPTION: Pour the gelatin mixture just until it starts to set, then add the cream—don’t drown it. Tap the dish gently to settle bubbles, and refrigerate for at least 4 hours (overnight is ideal). Rushing this step means a wobbly, uneven result. Patience here makes all the difference.
Creative variations of these flavors
Tropical Fruit Fusion
Swap the classic berries for ½ cup mango purée mixed into one gelatin layer and top with ½ cup toasted coconut flakes and ¼ cup pineapple tidbits. The tropical flavors elevate the dessert into a vacation-inspired treat.
Use ½ teaspoon lime zest in the condensed milk mixture for brightness—this combo feels like a Hawaiian getaway. 🌺
Chocolate Hazelnut Twist
Replace one gelatin layer with ½ cup Nutella thinned with 2 tablespoons warm milk, then swirl in 2 tablespoons crushed hazelnuts. Top with whipped cream and a drizzle of melted chocolate.
The nutty richness pairs perfectly with the creamy condensed milk base. For extra flair, add ¼ cup mini chocolate chips to the top layer before chilling.
Coffee Lover's Version
Infuse one gelatin layer with 1 tablespoon instant coffee granules dissolved in the boiling water. Add ½ teaspoon vanilla bean paste to the condensed milk mixture for depth. Garnish with whipped cream and a sprinkle of cocoa powder.
This espresso-infused dessert feels decadent yet maintains the light texture. For a mocha twist, add ½ teaspoon chocolate syrup to the cream layer.
Citrus Zest Variations
Brighten the dessert with 1 teaspoon orange zest or lemon zest mixed into the condensed milk base. Pair with ½ cup segmented citrus fruit (orange or lemon) for garnish. The zest adds a subtle floral note that cuts through the sweetness.
For a more intense flavor, steep 1 cinnamon stick in the boiling water before mixing with the condensed milk.
Seasonal Pumpkin Spice
Transform this dessert for fall by adding ½ teaspoon pumpkin pie spice to the condensed milk mixture and swirling in ¼ cup pureed pumpkin. Top with whipped cream and a sprinkle of cinnamon sugar.
The warm spices create a cozy, autumnal twist on the classic. For extra texture, fold ¼ cup crushed gingersnaps into the cream layer before chilling.
Layered Jello Parfait
For a make-ahead breakfast or brunch option, layer the gelatin mixture in 4 individual glasses and chill for 2 hours. Top each with ¼ cup Greek yogurt and a drizzle of honey before serving.
This version turns the dessert into a refreshing parfait—perfect for summer mornings. Garnish with toasted nuts or fresh fruit for added crunch and color. 🍯
Nutrition facts
Frequently asked questions
Why does my layered dessert turn out too runny?
Overheating the gelatin mixture or insufficient chilling time causes this. Always use boiling water for the condensed milk base, but never let it boil after adding gelatin—keep it under 160°F. Chill for at least 3 hours in the fridge for proper set. For extra firmness, add 1 extra tablespoon gelatin and bloom it for 10 minutes instead of 5.
Can I make this dessert without heavy cream?
Yes! Substitute with ½ cup coconut cream (chilled overnight) or ½ cup Greek yogurt thinned with 1 tablespoon milk. The texture will be slightly tangier but still creamy. For a lighter option, use ½ cup whipped coconut cream—just fold it gently to maintain airiness. The layers will still hold their shape beautifully.
How do I fix broken layers when pouring?
Work quickly and pour slowly in a zigzag motion while holding the spoon at a 45-degree angle. If layers mix, let the first layer set for 10 minutes in the freezer before adding the second—this creates a temporary "barrier" that prevents blending. For a dramatic effect, use a pipette to draw intricate patterns in the second color before it sets.
What's the best way to serve this for a crowd?
Prepare in 8x8-inch square pans for easy cutting—each pan serves 8. Chill in the pans, then invert onto a platter and slice with a hot knife (dip in hot water and wipe dry between cuts) for clean edges. For individual servings, use 4-ounce ramekins—they set faster and create elegant portions. Garnish with whipped cream rosettes and fresh berries arranged in concentric circles.
Can I make this dessert ahead of time?
Assemble the layers up to 24 hours ahead and store in an airtight container in the fridge. The flavors deepen overnight, and the texture remains perfect. For events, prepare the base layers 1 day ahead, then add the cream and garnishes 4 hours before serving to maintain freshness. Freeze individual portions for up to 1 month—thaw in the fridge overnight before serving.