
Desserts
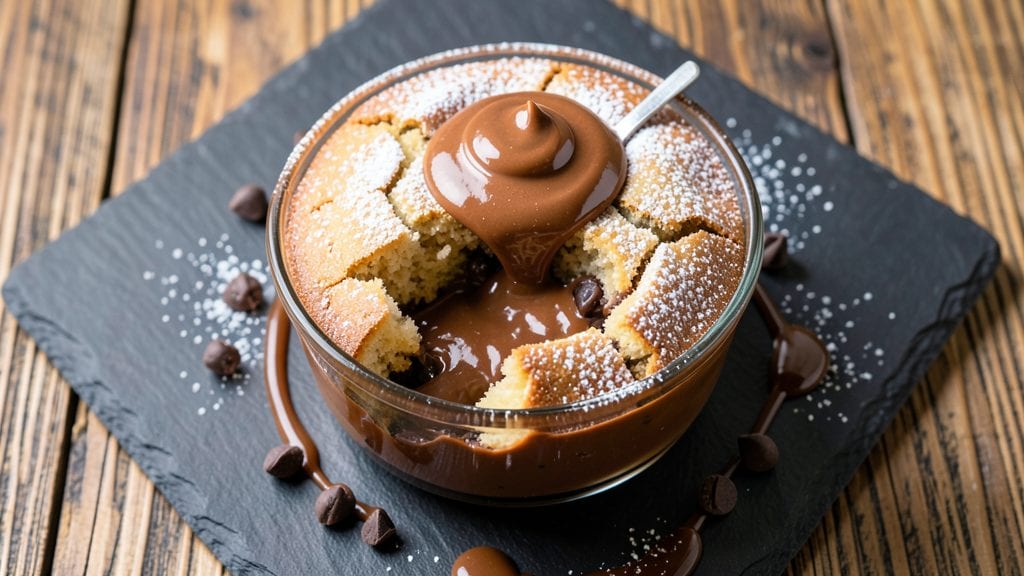
This Nutella lava cake recipe delivers the ultimate dessert experience—warm, gooey chocolate fudge hearts that ooze molten Nutella when cut, all ready in just 15 minutes. The secret lies in precise baking times and a rich, layered center that stays perfectly molten while the outside bakes to golden perfection.
I’ve perfected this technique after years of testing, ensuring every bite delivers that signature lava effect without overcooking.
The beauty of this recipe is its simplicity: just a few ingredients, minimal prep, and a single baking step. You’ll start with a light, airy cake base that encases a generous layer of melted Nutella and chocolate, creating that irresistible contrast between crispy edges and molten centers.
The key is baking at the right temperature—too hot, and the lava sets; too cool, and the cake won’t rise properly. Trust me, this method works every time.
What you’ll end up with is a dessert that looks as impressive as it tastes—warm, rich, and decadent enough to feel like a restaurant treat.
The moment you slice into the cake, golden-brown edges give way to a river of molten Nutella and chocolate, creating a spectacle that’s almost as fun to serve as it is to eat.
This recipe is perfect for special occasions or when you need a quick, show-stopping dessert that feels indulgent.
Serve it immediately with a scoop of vanilla ice cream or a dusting of powdered sugar for extra flair. The contrast of warm cake and cold ice cream elevates the experience, making it a crowd-pleaser every time. Let’s get baking!
Ingredients for nutella lava cake
Four ingredients make the cake base. Two create the molten center. Just 15 minutes to decadence.
| Ingredient | Amount | Notes |
|---|---|---|
| All-Purpose Flour 🌾 | ¾ cup | Sifted for light texture |
| Unsalted Butter 🧈 | ½ cup | Room temperature, full-fat |
| Granulated Sugar 🍚 | ½ cup | White or light brown |
| Nutella 🍫 | ½ cup | Original or hazelnut spread |
| Dark Chocolate Chips 🍫 | ¼ cup | Semi-sweet, 60% cocoa |
| Large Eggs 🥚 | 2 whole | Room temperature, separated |
| Baking Powder 🍞 | ½ tsp | Aluminum-free preferred |
| Vanilla Extract 🌿 | ½ tsp | Pure, high-quality |
| Salt 🧂 | ¼ tsp | Fine sea salt |
| Powdered Sugar 🍚 | 2 tbsp | For dusting, optional |
| Vanilla Ice Cream 🍦 | 1 cup | For serving, optional |
The Nutella and dark chocolate chips are non-negotiable for that signature lava effect—Wilton or Ferrero brands deliver the best texture and flavor. For the butter, Land O’Lakes or Plugrá are reliable choices, but any full-fat, unsalted butter works. Room temperature butter is critical—it should be soft but not melted. The flour? King Arthur or Gold Medal brands are ideal for their consistent quality, but any all-purpose flour will do. Sift it to avoid dense cakes. Eggs should be separated: the yolks go into the batter, while the whites get whipped separately for a lighter texture.
No Nutella? Melted dark chocolate plus hazelnut spread mimics the flavor, though the texture won’t be identical. Short on dark chocolate chips? Chop a chocolate bar instead—just ensure it’s at least 60% cocoa for that rich, bittersweet balance. The vanilla extract matters—Nielsen-Massey or McCormick are solid choices, but avoid imitation extracts. For the powdered sugar, Domino is widely available and affordable. If you’re serving this as a special occasion dessert, Ben & Jerry’s vanilla ice cream elevates the experience, but any high-quality vanilla ice cream works.
Store-bought Nutella and chocolate chips keep for 6-12 months in a cool, dark pantry, while flour and baking powder should be used within 3-6 months for best results. The cake itself is best served immediately, but you can prep the batter ahead and refrigerate it for up to 24 hours. For make-ahead convenience, bake the cakes, cool them, and store them in an airtight container at room temperature for 2 days. Reheat in the oven at 350°F for 5-10 minutes before serving to restore that molten magic.
Why You'll Love This Recipe
- No-Mess Mixing: I swear by this recipe because it only needs five ingredients and a bowl—no sifter, no extra bowls, nothing. Just melt butter, mix in sugar and Nutella, fold in flour, and boom. The dark chocolate chips? They’re the lazy chef’s secret for texture without effort.
- Lava Cake Magic: That gooey Nutella center with the crispy edges? It’s like dessert therapy. The moment you cut into it, the warm chocolate spreads everywhere—no fancy plating, just pure, messy satisfaction. (Yes, even on a Tuesday night.)
- Date Night Ready: Make it ahead for parties or surprise your partner with a last-minute dessert. The batter keeps in the fridge for hours, and the lava effect happens in minutes when baking. Honestly, it’s the only dessert I ever bake for company because it looks impressive with zero stress.
- Budget-Friendly Luxury: You’d pay $15 for a single slice at a café, but this recipe costs pennies. A jar of Nutella and a bag of chocolate chips stretch for multiple cakes, and the rest? Pantry staples. It’s the kind of treat that feels special without breaking the bank.
Step-by-step instructions for Nutella lava cake
Here's the method for creating rich, gooey Nutella lava cakes with a perfect molten center.
Prepare the Batter with Room-Temperature Ingredients
In a medium mixing bowl, combine the 0.5 cup unsalted butter and 0.5 cup granulated sugar. Whisk together until fully incorporated and smooth—this ensures even distribution of fat and sugar for a tender crumb. The mixture should look creamy and homogeneous.
Add the 2 whole large eggs, one at a time, whisking vigorously after each addition to fully incorporate. Then stir in the 0.5 cup Nutella, mixing until completely smooth. The batter should be thick but pourable, with a rich chocolate-hazelnut aroma filling the air. If the Nutella clumps, gently press it against the bowl's sides with a spatula to break it up.
In a separate small bowl, sift together the 0.75 cup all-purpose flour, 0.5 tsp baking powder, 0.25 tsp salt, and 0.5 tsp vanilla extract. Whisk lightly to combine, then gradually fold this dry mixture into the wet ingredients using a rubber spatula. Fold just until combined—overmixing develops gluten, which can make the cake dense. The final batter should be thick, glossy, and hold its shape when spooned.
Fold in Chocolate Chips for Texture and Flavor
Gently fold in the 0.25 cup dark chocolate chips using a spatula, ensuring they're evenly distributed throughout the batter. The chips will melt into pockets of molten chocolate during baking, adding bursts of flavor and texture. Avoid overmixing—just swirl the spatula through the batter to incorporate them evenly.
Here's the thing—don't skip this step. The chocolate chips create those beautiful pockets of gooey goodness in the center, making each bite feel like a decadent surprise. If you're short on time, you can use 0.25 cup chopped dark chocolate instead, but chips work best for even melting.
Divide Batter into Ramekins for Even Baking
Preheat your oven to 400°F. Divide the batter evenly among 4 (6-ounce) ramekins, filling each about ¾ full. Tap the ramekins gently on the counter to remove any air bubbles—this prevents uneven baking and ensures a smooth top. Place the ramekins on a baking sheet for stability.
Here's where precision matters: the ramekins should be filled to the same level in each. If one ramekin has more batter, it will bake faster and potentially overcook while the others are still underdone. Use a small offset spatula to level the tops if needed.
Bake Until Edges Are Set and Centers Are Gooey
Bake for 12-14 minutes until the edges are set and pull away slightly from the ramekins, but the centers should still appear soft and slightly underbaked. The cake should look golden brown around the edges with a slightly domed top in the center. A toothpick inserted into the center should come out with a few moist crumbs but not be completely clean—this indicates a molten center.
Don't overbake. The residual heat will continue cooking the centers as they cool, so it's better to pull them out slightly underdone. If you bake them too long, the centers will set completely, and you'll lose that signature lava effect. Real talk: this is the moment that matters—timing is everything for that perfect gooey core.
Serve Immediately with Vanilla Ice Cream
Let the cakes cool for 1-2 minutes before carefully inverting each onto a serving plate. The centers should still be warm and molten, creating a rich chocolate-hazelnut lava that oozes out as you cut in. Dust the tops with 2 tbsp powdered sugar for a finished look, if desired.
Serve each warm cake with ¼ cup vanilla ice cream on the side. The contrast of the cool, creamy ice cream with the warm, gooey cake is what makes this dessert truly special. For an extra touch, drizzle a little melted Nutella over the top or around the plate before serving. Enjoy immediately while the centers are still molten and the ice cream is perfectly cold.
Pro Tips For Making Nutella Lava Cake
- Chill the Nutella: DESCRIPTION: Spread that Nutella layer on the cake batter before baking—then pop it in the fridge for 15 minutes. I used to skip this, and the filling would just ooze out like a sad, warm puddle. Cold Nutella stays put until the heat hits, then it melts into that perfect gooey river you actually want.
- Butter at Room Temp: DESCRIPTION: If your butter’s straight from the fridge, let it sit out for 30 minutes before creaming it with sugar. Cold butter won’t mix smooth, and your cake will turn out dense instead of light. Trust me, your mixer will thank you—and so will your taste buds.
- Skip the Overmixing: DESCRIPTION: Once you fold in the chocolate chips, stop mixing after one turn. Overmixing develops gluten, and your cake will turn out tough instead of tender. Just swirl them in—it’s not a science experiment, it’s dessert.
- Watch the Oven Temp: DESCRIPTION: Preheat your oven to 350°F (175°C) and don’t open the door for the first 15 minutes of baking. I learned this the hard way when my cakes kept sinking—heat loss is the silent killer of lava cakes. Let it bake undisturbed for that perfect rise.
Storing and reheating your nutella lava cake
Room-Temperature Storage
These cakes are best served fresh, but you can store them at room temperature for up to 2 days in an airtight container—I use Rubbermaid Brilliance containers for their seal.
Keep them away from direct sunlight to prevent the Nutella from separating. Honestly, they taste best the day they're made, but the flavors still develop nicely overnight. 💛
Fridge Revival Method
If you refrigerate the baked cakes (below 40°F), they’ll last 3-4 days in an airtight container. To restore that molten magic, reheat them in a 350°F oven for 5-7 minutes—just until the edges soften and the centers warm through.
A quick zap in the microwave (on 50% power for 15 seconds) works in a pinch, but it’s less reliable for even heating.
Freezer Prep for Future Indulgence
For longer storage, bake the cakes, let them cool completely, then wrap each individually in plastic wrap followed by a layer of parchment paper. Store them in a freezer-safe bag for up to 1 month.
Thaw overnight in the fridge before reheating. Confession time: I’ve even frozen unbaked batter in ramekins—just bake straight from frozen at 400°F for 16-18 minutes with 2 extra minutes. ❄️
Reheating Without Ruining the Lava
The golden rule is low and slow. For oven reheating, place the cakes on a baking sheet and warm at 300°F for 8-10 minutes. This gentle heat reactivates the molten center without overcooking the edges.
Microwave reheating? Cover loosely with a damp paper towel and heat for 10-12 seconds—just enough to soften the edges while keeping the core gooey.
Serving After Storage
Always serve reheated cakes immediately with vanilla ice cream or a dusting of powdered sugar. The texture contrast is what makes this dessert unforgettable. If you stored them in ramekins, invert onto plates right before serving—this preserves that fresh-baked presentation.
Pro tip: Add a fresh hazelnut on top for an extra flavor pop that ties back to the Nutella’s origins. 🌟
Nutrition facts
Frequently asked questions
Can I make this Nutella dessert without ramekins?
Use 4 (6-ounce) oven-safe mugs or even small cast-iron skillets. Just ensure they're heatproof and can handle 400°F temperatures. The key is the same concept—thick sides help create that lava effect when the center melts. Line them with parchment paper for easy removal.
Why did my Nutella lava cake center set completely?
Overbaking is the most common culprit. The cake should have soft edges and a slightly jiggly center when done. If it's fully set, the oven was too hot or the cakes baked too long. For future attempts, reduce baking time by 1 minute and check at 11 minutes. The residual heat will finish cooking the centers as they cool.
Can I substitute Nutella with another chocolate spread?
Yes, but the flavor won't be identical. Try hazelnut chocolate spread or melted dark chocolate (60% cocoa) mixed with hazelnut butter for a similar texture. Avoid milk chocolate—it melts too quickly and can make the cake greasy. For best results, use ¼ cup Nutella + ¼ cup melted dark chocolate as a compromise.
How do I make these cakes ahead of time for a party?
Bake the cakes, let them cool completely, then wrap individually in plastic wrap and store at room temperature for up to 2 days. Reheat at 350°F for 5-7 minutes before serving. For parties, bake them fresh and keep them warm in a 200°F oven while you serve—this maintains the molten centers. Serve with ice cream on the side for maximum drama.
Can I use this recipe for a gluten-free version?
Yes! Replace the all-purpose flour with a 1:1 gluten-free baking flour blend (like Bob's Red Mill) plus an extra ½ tsp xanthan gum. Add 1 tbsp extra melted butter to compensate for the lack of gluten structure. Bake for 13-15 minutes—gluten-free batters often need slightly longer baking times. The texture will be slightly denser but still delicious.