Appetizers
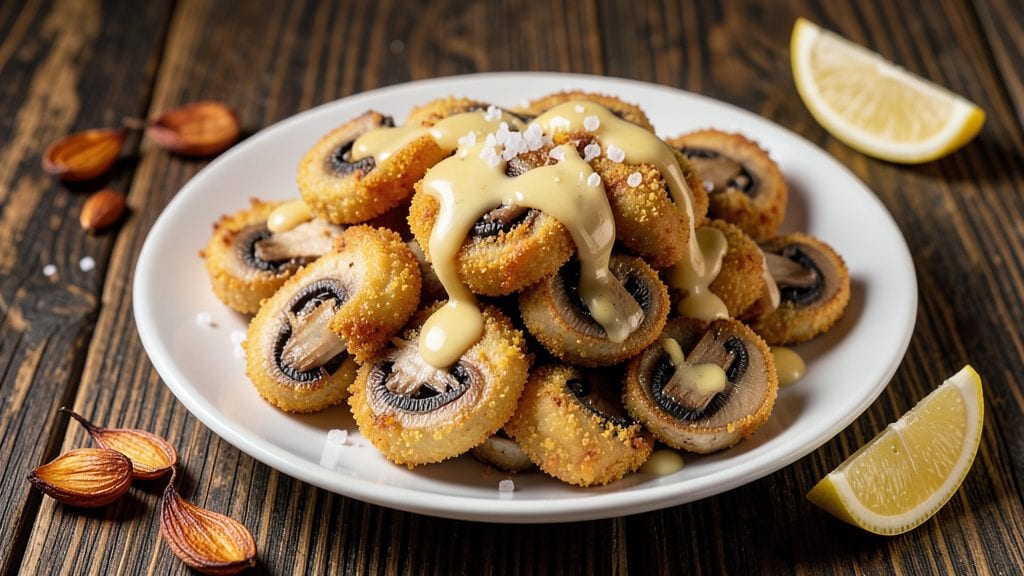
This Outback-style fried mushrooms recipe delivers the same crispy, golden crunch you crave from restaurant appetizers—right in your own kitchen. The secret lies in a light cornmeal batter that creates a satisfying crunch while keeping the mushrooms tender inside.
I’ve perfected this technique over years of testing, ensuring every bite has that perfect balance of texture and umami flavor.
What sets this recipe apart is the combination of cornmeal and beer in the batter, which adds depth and a subtle tang that pairs beautifully with the mushrooms. The frying process is straightforward, but timing is everything—just a few minutes in hot oil transforms these into irresistible bites.
This dish is ideal for game day, appetizer spreads, or as a standout side dish at dinner.
By the time you finish, you’ll have a plate of crispy, golden mushrooms with edges that crackle at every bite. The batter clings perfectly without overwhelming the natural earthy flavor of the mushrooms, creating a dish that’s both indulgent and satisfying.
Serve with your favorite dipping sauce or a sprinkle of fresh parsley for an extra touch of freshness.
This recipe scales easily for parties, and leftovers reheat beautifully in the oven. Whether you're hosting a gathering or just craving a restaurant-quality appetizer, these fried mushrooms will impress. Let’s get started on creating your own crispy, umami-packed masterpiece.
Ingredients for outback fried mushroom
Crispy, golden mushrooms with a crunchy cornmeal crust—just like Outback. Eight ingredients, one unforgettable bite.
| Ingredient | Amount | Notes |
|---|---|---|
| White Mushrooms 🍄 | 1 ½ lb | Large, whole, stems intact |
| All-Purpose Flour 🌾 | ½ cup | Sifted for light batter |
| Fine Yellow Cornmeal 🌽 | ½ cup | For extra crunchiness |
| Light Beer 🍺 | ½ cup | Lager or pale ale preferred |
| Large Eggs 🥚 | 1 whole | Room temperature for smooth batter |
| Diamond Crystal Kosher Salt 🧂 | 1 tsp | Fine grain for seasoning |
| Ground Black Pepper 🌶️ | ½ tsp | Freshly ground for heat |
| Garlic Powder 🧄 | ½ tsp | For subtle umami depth |
| Vegetable Oil 🫒 | 2 cups | High smoke point preferred |
| Fresh Parsley 🌿 | ¼ cup | Chopped, for garnish |
| Lemon Wedges 🍋 | 2 whole | For serving |
| Unsalted Butter 🧈 | ½ cup | Melted, for dipping |
The mushrooms are the star, so pick firm, dry ones—no slimy stems or bruised caps. Trader Joe's or Whole Foods carry the best quality, but your regular grocery store works too. Look for white button mushrooms with intact stems—they hold up better during frying. If you're using baby bella, trim the stems since they're thicker. The cornmeal is non-negotiable for that signature crunch—Bob's Red Mill is my go-to, but any fine yellow cornmeal will do. Store your mushrooms in a paper bag in the fridge for up to 5 days—they'll stay fresher longer than plastic.
No beer on hand? Substitute chicken broth or sparkling water—just add a splash of lemon juice for tang. The beer adds depth, but it's not make-or-break. For extra umami, toss the mushrooms in 1 tsp soy sauce before battering. If you're frying for a crowd, double the batter ingredients and keep them warm in a 200°F oven between batches. The batter should be thick but pourable—if it's too stiff, add 1 tbsp more beer. For a gluten-free version, swap the flour for gluten-free all-purpose flour and use a cornmeal blend.
These stay crispy for about 20 minutes after frying, so serve immediately if possible. For make-ahead prep, fry the mushrooms, drain on paper towels, and reheat in a 375°F oven for 5-7 minutes until crispy again. The melted butter for dipping keeps best in the fridge for 3 days, but it's worth making extra—everyone will want seconds. Store leftovers in an airtight container, but they won't be as crispy. Garnish with parsley right before serving—it adds a pop of color and freshness that makes the dish look restaurant-worthy.
Why You'll Love This Recipe
- Crispy in Minutes: I swear, the cornmeal crust locks in that golden crunch so fast—no waiting around for a double-fry. Just slice the mushrooms, toss in the egg wash, and hit the pan. That beer in the batter? It’s the secret to the texture—light, airy, and not greasy.
- Tastes Like a Pub: Honestly, the combo of flour and cornmeal gives you that classic Outback vibe, but better. The beer adds a subtle maltiness that cuts through the richness, and the mushrooms stay juicy inside. It’s the kind of dish that makes you forget you’re cooking—until you take the first bite.
- Game for Any Meal: Between us, these fried mushrooms disappear at happy hours, game days, or even as a side for steak night. I’ve served them with mashed potatoes, tossed them into salads, or just eaten them straight with a cold beer. They’re the ultimate crowd-pleaser with zero fuss.
- Leftovers? More Like Left-Bites: Here’s what sold me—they reheat shockingly well. Toss them in the oven for 5 minutes, and they’re crispy again. And since mushrooms are cheap, you’re not breaking the bank if you make a big batch. I’ve got a freezer stash for lazy nights—proof they’re my secret weapon.
Step-by-step instructions for Outback-style fried mushrooms
Here's how to achieve that signature Outback crispy texture with deep umami flavor—every bite will be golden and crunchy.
Prepare the Mushrooms for Maximum Crispiness
Start by cleaning the 1.5 lb white mushrooms thoroughly with a damp paper towel—don't soak them or they'll absorb too much moisture. Cut each mushroom in half lengthwise, leaving the stems intact. This shape ensures even cooking and maximum surface area for that perfect golden crust.
In a large bowl, whisk together the 0.5 cup sifted all-purpose flour, 0.5 cup fine yellow cornmeal, 1 tsp diamond crystal kosher salt, 0.5 tsp ground black pepper, and 0.5 tsp garlic powder. The cornmeal is what gives these mushrooms that signature crunchy exterior, so don't skip it. In a separate bowl, beat the 1 whole large egg until frothy—room temperature eggs create a smoother batter.
Create the Beer Batter for Extra Flavor
Pour the 0.5 cup light beer into a deep dish or pie plate. The beer adds subtle depth and helps create a lighter, crispier coating than water would. In another shallow dish, pour the beaten egg. This three-stage dredging—flour mixture, egg, then flour again—ensures an extra-crispy exterior.
Working in batches to avoid overcrowding, dip each mushroom half first into the flour mixture, shaking off any excess. Then dip into the egg wash, allowing any excess to drip off. Finally, coat again in the flour mixture, pressing gently to adhere. The double flour coating creates that signature double-layered crunch.
Fry to Golden Perfection
Heat 2 cups vegetable oil in a deep skillet or Dutch oven to 350°F—use a thermometer for accuracy. The oil should be hot enough that when you drop in a small piece of battered mushroom, it sizzles immediately and floats to the surface. Fry the mushrooms in batches for 3-4 minutes per side until they reach a deep golden brown color.
Here's the thing—don't rush this step. You're looking for that perfect balance between crispy exterior and tender interior. The mushrooms are done when they're uniformly golden and the internal temperature reaches 160°F at their thickest point. Transfer them to a paper towel-lined plate to drain excess oil while you finish the remaining batches.
Garnish and Serve with Classic Accompaniments
While the mushrooms are still hot, sprinkle them generously with 0.25 cup chopped fresh parsley for a pop of color and freshness. The parsley not only looks beautiful but also adds a bright contrast to the rich, savory flavors. Serve immediately with the 2 whole lemon wedges on the side for squeezing over the top—this cuts through the richness and adds a refreshing zing.
For the ultimate Outback experience, melt the 0.5 cup unsalted butter in a small saucepan over low heat until just melted, then serve it warm for dipping. The butter enhances the umami flavors while adding a luxurious richness. These mushrooms are best served while still crispy—every bite should deliver that satisfying crunch followed by tender mushroom and savory seasoning.
Pro Tips For Making Outback Fried Mushroom
- PAT THE MUSHROOMS DRY: I learned this the hard way—wet mushrooms steam instead of crisp. Grab paper towels and press each cap firmly for 10 seconds. Even just a little moisture left behind means a soggy, uneven crust, and nobody wants that.
- USE COLD BEER: Chill that light beer first—straight from the fridge works. Cold beer creates a better batter consistency and prevents the flour from absorbing too quickly, which saves you from a gummy coating. Trust me, your mushrooms will thank you with that perfect golden crunch.
- DON’T OVERCROWD THE PAN: I used to think more oil meant more mushrooms could fit, but that’s how you end up with greasy, unevenly cooked batches. Keep it to two layers max—this guarantees even browning and a crispy cornmeal crust every time. Your future self will thank you.
- SHIFT TO LOW HEAT FOR FINISHING: After the initial fry, drop the heat just a little and let them cook undisturbed for 2-3 minutes. This locks in the cornmeal crust without burning it, especially if you’re using a nonstick pan. Sounds counterintuitive, but it’s the thing that matters most for that restaurant-quality texture.
Pro cooking tips for outback fried mushroom
Oil Temperature Control
This is the single most critical factor for crispy fried mushrooms. Use a candy thermometer to maintain 350°F—any lower and you'll get greasy mushrooms, any higher and the exterior burns before the interior cooks.
I recommend Avocado oil or vegetable oil for their high smoke points. Test your oil by dropping in a small piece of battered mushroom—if it sizzles immediately and floats, it's ready. 🌡️
Double-Dredging Technique
The secret to that signature Outback crunch lies in the three-stage dredging: flour mixture, egg wash, then flour again. This creates a double-layered crust that stays crispy longer. Work in batches to avoid overcrowding the batter bowls, or your mushrooms will absorb too much moisture and turn soggy.
I like to use a wire cooling rack over a baking sheet to hold the coated mushrooms while I fry—this keeps them from sticking together.
Batch Frying Strategy
Never overcrowd your fryer—3-4 mushrooms at a time is ideal. Overcrowding lowers the oil temperature and steams the mushrooms instead of frying them. Use a slotted spoon to transfer them to a paper towel-lined plate immediately after frying.
The paper towels absorb excess oil while keeping the mushrooms warm. I keep my fried mushrooms in a 200°F oven between batches to maintain crispiness while I finish cooking.
Timing is Everything
Fry for exactly 3-4 minutes per side—any longer and the exterior burns while the interior stays raw. The mushrooms are done when they're deep golden brown and reach 160°F internal temperature at their thickest point.
Use a meat thermometer for accuracy. If you're frying a large batch, keep the oil temperature consistent by adding 1-2 tablespoons of oil between batches if it drops below 350°F.
Post-Fry Handling
Serve these mushrooms immediately while they're at their crispiest. If you need to hold them, place them on a wire rack in a 200°F oven for up to 15 minutes—this prevents them from getting soggy.
For extra crunch, I sometimes sprinkle the hot mushrooms with 1 teaspoon cornstarch right after frying. This adds an additional crispy layer that disappears as you eat, creating a delightful textural surprise. 💫
Equipment Upgrades
Invest in a deep-fat fryer if you're making these often—they maintain consistent oil temperatures automatically. My Cuisinart 4-Qt handles perfect batches every time. For home cooks, a Dutch oven works perfectly—just make sure it's deep enough to hold 2 cups of oil without overflowing.
A thermometer clip attached to the side of your pot gives you real-time temperature readings without having to guess. Never skip the thermometer—this is where most home cooks go wrong! ⚡
Nutrition facts
Frequently asked questions
Can I use oyster mushrooms instead of white mushrooms?
Oyster mushrooms work beautifully—they're more delicate and absorb the batter differently, creating a lighter texture. Just be sure to pat them very dry before coating, as they can be more moisture-sensitive. The cornmeal batter will still give you that signature crunch, though you may want to fry them for 2-3 minutes per side instead of 3-4 minutes to prevent overcooking.
How do I keep the batter from falling off while frying?
The key is working in small batches and not crowding the batter bowls. Press the coated mushrooms gently against the flour mixture to help it adhere, and let them rest on a wire rack for 1-2 minutes before frying. This allows the batter to set slightly, reducing the chance of it sliding off. Also, make sure your egg wash is at room temperature—cold eggs can make the batter too thick and prone to falling off.
What's the best way to reheat leftover fried mushrooms?
For best results, place them on a baking sheet and reheat in a 400°F oven for 5-7 minutes until crispy again. Microwaving will make them soggy, and air frying works but may not restore the same level of crunch. If you're short on time, a quick pan sear in 1/4 inch of oil over medium-high heat for 1-2 minutes per side can help revive the texture.
Can I make this recipe gluten-free?
Swap the all-purpose flour for a 1:1 gluten-free baking flour and use a cornmeal blend if possible. For extra binding power, add 1/4 cup cornstarch to the flour mixture. The beer can be omitted or replaced with gluten-free sparkling water, though you may need to adjust the batter consistency by adding 1 tbsp more liquid if it becomes too thick.
Why did my mushrooms turn out greasy instead of crispy?
Greasy mushrooms usually mean the oil wasn't hot enough or the mushrooms were overcrowded in the fryer. Always maintain 350°F oil temperature and fry in batches of 3-4 mushrooms at a time. If your oil temperature drops below 325°F, the mushrooms will absorb too much oil. For extra crispiness, pat the fried mushrooms dry on paper towels for 1-2 minutes after frying to remove excess surface oil.