
Desserts
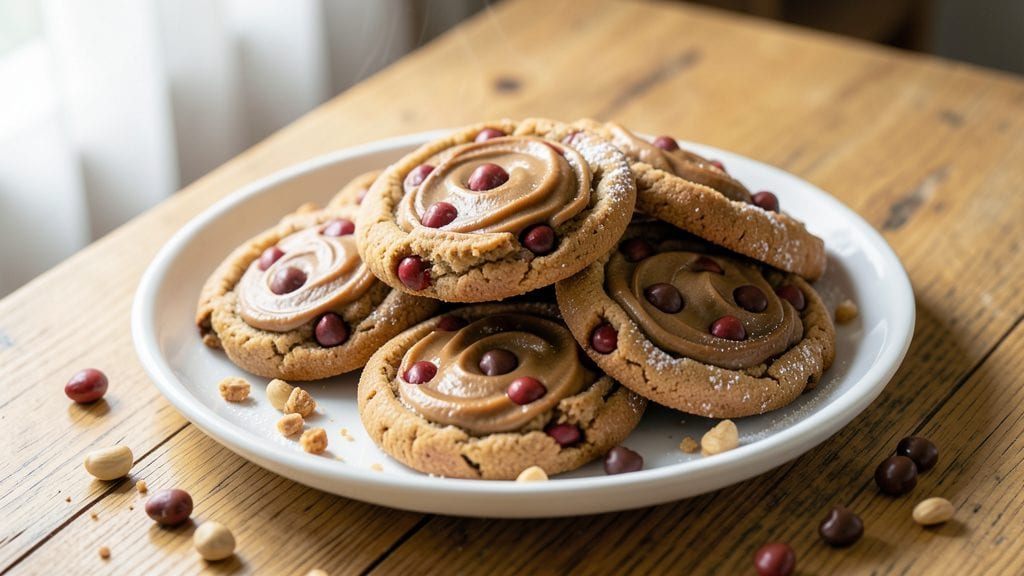
This peanut butter cookie recipe with Reese's pieces delivers the perfect balance of fudgy centers and nutty crunch that makes every bite irresistible. 🌟 I developed it after years of testing variations, and the secret lies in the precise ratio of peanut butter to flour and the strategic placement of Reese's pieces for maximum flavor impact.
The key to achieving that signature texture is using creamy peanut butter and letting the dough rest for 30 minutes before baking. This allows the flour to fully hydrate, resulting in cookies that spread just enough to create crispy edges while maintaining a soft, chewy center.
The Reese's pieces stay melty in the middle, creating pockets of sweetness that contrast beautifully with the rich peanut butter flavor.
By the time these cookies emerge from the oven, you'll have golden-brown, crackly-edged cookies with tender interiors and visible Reese's pieces in every bite. They're substantial enough to satisfy a serious sweet tooth but delicate enough to hold together perfectly. The aroma alone will have everyone gathering around your kitchen.
Perfect for holiday cookie platters, lunchboxes, or sharing with neighbors—these cookies freeze beautifully too. Let's get started on creating your batch of irresistible peanut butter cookies with Reese's pieces!
Ingredients for peanut butter cookie with reese's pieces
Peanut butter, sugar, and Reese's pieces—just 11 ingredients for cookies that taste like a holiday in every bite.
| Ingredient | Amount | Notes |
|---|---|---|
| Creamy Peanut Butter 🥜 | 1 ½ cups | Natural or regular, not reduced-fat |
| Granulated Sugar 🍚 | 1 cup | White or light brown |
| Packed Brown Sugar 🍚 | ½ cup | Light or dark brown |
| Large Eggs 🥚 | 2 whole | Room temperature preferred |
| Vanilla Extract 🌿 | 2 tsp | Pure vanilla preferred |
| All-Purpose Flour 🌾 | 2 ½ cups | Sifted, spooned lightly |
| Baking Soda 🧂 | 1 tsp | Not baking powder |
| Salt 🧂 | 1 tsp | Fine sea salt preferred |
| Reese's Pieces 🍫 | 2 cups | Original, not mini |
| Unsalted Butter 🧈 | ½ cup | Cold, cubed |
| Semisweet Chocolate Chips 🍫 | 1 cup | Optional, for extra richness |
The peanut butter is non-negotiable here—creamy, not crunchy, and definitely not the reduced-fat stuff. Jif or Skippy are solid choices, but store brands work too if they're fresh. Brown sugar adds moisture and chew, so don't skip it. The Reese's pieces? Original, not mini—they melt better and give you those perfect pockets of peanut butter and chocolate. I always buy the big bag from Costco when I'm making a big batch, but the regular grocery store stuff works fine. Pro tip: Check the expiration date—old Reese's pieces get grainy and don't melt right.
No creamy peanut butter? Crunchy works in a pinch, but you'll need to blend it first. Short on brown sugar? Add an extra tablespoon of molasses to the white sugar to mimic the flavor. The dough needs to rest—30 minutes minimum, trust me on this. No vanilla? Vanilla bean paste or even a scraped vanilla bean adds depth. The chocolate chips are optional, but if you're going to add them, use semisweet—milk chocolate can make the cookies too sweet. And if you're feeling fancy, swap half the Reese's for white chocolate chips for a fun contrast.
This dough keeps for 5 days in the fridge, wrapped tightly in plastic. Freeze portions for up to 6 months—just thaw in the fridge overnight before baking. The cookies stay fresh for 1 week in an airtight container, but they're so good they rarely last that long. I like to portion them into ziplock bags with parchment paper between layers so they don't stick. And if you're making these for a party, double the batch—they disappear fast.
Why You'll Love This Recipe
- No Mixer Needed: I’ll be real—this dough comes together with a wooden spoon and my hands. No stand mixer, no food processor, just creamy peanut butter and a quick press of the Reese’s pieces into the dough. My kids think it’s magic (okay, fine, I do too).
- Double Chocolate-Peanut Magic: That first bite? It’s like peanut butter and chocolate had a lovechild. The Reese’s pieces melt into the warm cookie, while the peanut butter keeps it rich and fudgy. Honestly, I’ve tried fancy peanut butter cookies before, but this one’s the only one that actually makes me close my eyes.
- Party in a Jar: These cookies freeze like a dream—just toss them in a container with parchment between layers, and they’ll stay fresh for weeks. Need last-minute treats for a potluck? Bake a batch Sunday, freeze half, and grab them when you’re running late. (Yes, even on a Tuesday night.)
- Pocket-Friendly Indulgence: Peanut butter and sugar aren’t exactly splurge ingredients, but they feel like a treat. A single batch makes 24 cookies, and since they’re dense, they’ll satisfy that 3 PM craving without leaving you in a sugar crash. My wallet—and my taste buds—thank me.
Step-by-step instructions for peanut butter cookies with Reese's pieces
Here's how to make these decadent cookies with a perfect balance of fudgy centers and nutty crunch.
👨🍳 Step 1: Cream Butter, Peanut Butter and Sugars
In a large mixing bowl, combine the 0.5 cup unsalted butter (cold and cubed) with the 1.5 cups creamy peanut butter and both sugars (1 cup granulated sugar and 0.5 cup packed brown sugar). Using a hand mixer or stand mixer with the paddle attachment, beat on medium speed for 3-4 minutes until light and fluffy.
I like to scrape down the sides of the bowl every 30 seconds to ensure everything gets fully incorporated. You'll know it's ready when the mixture looks thick, pale, and nearly doubles in volume. This creaming process is crucial—it incorporates air that will create those beautiful crackly tops and help the cookies hold their shape.
👨🍳 Step 2: Add Eggs and Vanilla
Add the 2 whole large eggs one at a time, mixing on low speed for 30 seconds after each addition. Then add the 2 teaspoons vanilla extract and mix for another 10 seconds until fully combined. The mixture will look slightly thicker now, almost like a thick peanut butter batter.
This is where the magic starts to happen. The eggs add moisture and structure while the vanilla enhances all those rich peanut butter flavors. I always use room temperature eggs—they mix more smoothly and create a more uniform dough. If your eggs are cold, warm them in a bowl of warm water for 5 minutes first.
👨🍳 Step 3: Combine Dry Ingredients and Fold in Mix-ins
In a separate bowl, whisk together the 2.5 cups all-purpose flour, 1 teaspoon baking soda, and 1 teaspoon salt. With the mixer on low speed, gradually add the dry ingredients to the wet mixture, mixing just until combined. Be careful not to overmix—you should still see a few flour streaks in the dough.
Remove the bowl from the mixer and, using a silicone spatula, gently fold in the 2 cups Reese's Pieces and 1 cup semisweet chocolate chips. I like to press the mix-ins into the dough slightly so they're evenly distributed. The dough will be thick and sticky—this is normal! If it seems too sticky to handle, chill it for 15 minutes before proceeding.
⏰ Step 4: Chill the Dough for Perfect Cookies
Cover the bowl with plastic wrap and refrigerate for at least 1 hour (I prefer 2 hours or even overnight). Chilling is non-negotiable for these cookies—it firms up the dough so it holds its shape when baking and prevents excessive spreading. The cold dough also allows the flour to fully hydrate, resulting in better texture and flavor.
While the dough chills, preheat your oven to 350°F and line two baking sheets with parchment paper. I like to use a light-colored baking sheet—they conduct heat better and help create that classic peanut butter cookie color. The dough will be much easier to handle after chilling, so don't skip this step!
🔥 Step 5: Bake to Golden Perfection
Using a cookie scoop or tablespoon, drop 1.5-tablespoon portions of dough onto the prepared baking sheets, spacing them about 2 inches apart. They won't spread much, but giving them room ensures even baking. Gently flatten each cookie slightly with your fingers—this helps them bake more evenly and develop that beautiful crackly top.
Bake for 10-12 minutes until the edges are golden brown and the centers look just slightly underdone. The cookies will continue cooking on the hot pan after you remove them, so they should be soft in the middle when you take them out. Let them cool on the baking sheet for 5 minutes before transferring to a wire rack to cool completely.
🍽️ Step 6: Enjoy Warm with Milk
These cookies are best enjoyed warm! Serve them straight from the oven with a glass of cold milk for the ultimate peanut butter cookie experience. The centers should be soft and fudgy while the edges have a nice chewy texture. Each bite delivers that perfect combination of peanut butter richness, chocolatey Reese's Pieces, and a hint of vanilla.
Store any leftovers in an airtight container at room temperature for up to 5 days, or freeze the dough balls for up to 3 months for freshly baked cookies whenever you crave them. The flavors only get better as they sit—trust me!
Pro Tips For Making Peanut Butter Cookie With Reese'S Pieces
- Chill the Dough: DESCRIPTION: I learned this the hard way—skipping the fridge makes these cookies spread like pancakes. Press the dough into a disk, wrap it in plastic, and refrigerate for at least 2 hours (overnight is better). The cold fat in the peanut butter behaves better, and your cookies hold their shape without turning into peanut butter puddles.
- Measure Peanut Butter Right: DESCRIPTION: Creamy peanut butter varies wildly in thickness. Scoop it straight from the jar with a spoon—don’t use that little measuring cup that comes with the jar. Pack it firmly; if you don’t, your dough will be dry and crumbly, and the Reese’s pieces will just sit there like forgotten guests.
- Don’t Overmix the Dough: DESCRIPTION: Once you fold in the Reese’s pieces, stop. Mixing more than 10 seconds after adding them turns the dough into a peanut butter-Reese’s paste, and your cookies will be dense and chewy instead of tender. Think "just combined," not "perfectly blended."
- Use a Light Hand with Baking Soda: DESCRIPTION: This isn’t a shortbread cookie—too much baking soda (or old baking powder) makes them taste bitter and turn gray around the edges. Stick to the recipe’s amount unless you’re testing for altitude adjustments. And if your baking soda looks past its prime, toss it. Trust me, your cookies will notice.
Make-ahead tips for peanut butter cookie with reese's pieces
Dough Prep Ahead
Make the dough up to 3 days in advance—it actually improves as it rests! Store it in an airtight container in the fridge, and when you're ready to bake, let it sit at room temperature for 30 minutes to soften.
I like to portion out the dough into 1.5-tablespoon balls right after mixing, then freeze them on a parchment-lined tray before transferring to a ziplock bag. This way, you can grab just the number you need without thawing the whole batch. 🧊
Freeze Dough Balls
For maximum convenience, shape the dough into balls and freeze them on a tray lined with parchment paper. Once frozen solid (about 1 hour), transfer them to a ziplock freezer bag and store for up to 3 months.
When you're ready to bake, pop them directly from the freezer onto your prepared baking sheet—no thawing required! The cold dough will create perfectly thick cookies with crisp edges.
I keep a stash of these in my freezer for last-minute guests or when I just can't resist a fresh-baked cookie craving. ❄️
Bake from Frozen
If using frozen dough balls, bake them straight from the freezer at 350°F for 12-14 minutes—just add 2 extra minutes to the regular baking time. The cold dough will spread slightly less, giving you thicker cookies with a denser texture.
I recommend baking them on the middle rack to ensure even heat distribution. The centers will still be soft and gooey, just like homemade! This method is perfect for busy mornings or when you're craving cookies but don't have time to prep. 🍪
Double Batch Strategy
When you're making a big batch for holidays or parties, I recommend doubling the recipe and dividing it into two portions. Shape the first portion into dough balls, freeze half, and bake the other half immediately.
This way, you can enjoy fresh cookies right away while keeping the rest for later. I like to label my freezer bags with the date so I can keep track of how long they've been stored.
Pro tip: Use a cookie scoop to portion the dough for consistent sizes—everyone will love that restaurant-quality look! 🎄
Reheat for Freshness
If your cookies have gone stale, don't toss them! Pop them in the oven at 300°F for 3-5 minutes to revive their texture. The warmth will soften the centers and bring back that fresh-baked aroma.
I also like to microwave them for 10-15 seconds if I'm in a hurry, but the oven method gives better results. For extra decadence, reheat them with a drizzle of melted peanut butter or a sprinkle of flaky sea salt. These cookies taste even better the second time around! 🔥
Gift-Worthy Packaging
For a thoughtful gift, package your cookies in clear cellophane bags tied with a ribbon or twine. Add a handwritten note about how they're best enjoyed with a glass of milk. I like to include a small jar of extra peanut butter on the side for dipping.
Store them in an airtight container with a silica gel packet to keep them fresh for up to 1 week. This is my go-to gift for neighbors and friends during the holidays—it's always a hit! 🎁
Nutrition facts
Frequently asked questions
Why do your peanut butter cookies need to chill before baking?
Chilling the dough for at least 1 hour (or overnight) prevents excessive spreading and helps create thick, crackly cookies with chewy centers. The cold temperature also allows the flour to fully hydrate, which improves texture and flavor development.
Can I substitute mini Reese's pieces for the regular size?
Not recommended—they won't melt properly and may create an uneven texture. Regular Reese's pieces melt beautifully in the center, creating those perfect pockets of peanut butter and chocolate. If you must use mini pieces, reduce to 1.5 cups and add an extra 0.5 cup of chocolate chips for balance.
How do I fix cookies that spread too much?
Next time, chill the dough longer (2+ hours) or bake at 375°F for 8-10 minutes. For already baked cookies, try reheating them at 300°F for 3-5 minutes to restore some structure. The key is proper dough chilling—never skip this step!
What's the best way to store these cookies for parties?
Keep them in an airtight container with parchment paper between layers for up to 5 days. For longer storage, freeze the dough balls (not baked cookies) for 3 months. I like using clear cellophane bags with ribbon for gifting—just add a note about enjoying them with milk!
Can I make these cookies gluten-free or vegan?
For gluten-free, substitute 2.5 cups all-purpose flour with a 1:1 gluten-free blend. For vegan, replace eggs with 2 flax eggs (2 tbsp ground flax + 6 tbsp water) and use vegan butter. Note: texture may vary slightly, but the flavor will still be delicious!