Side Dishes
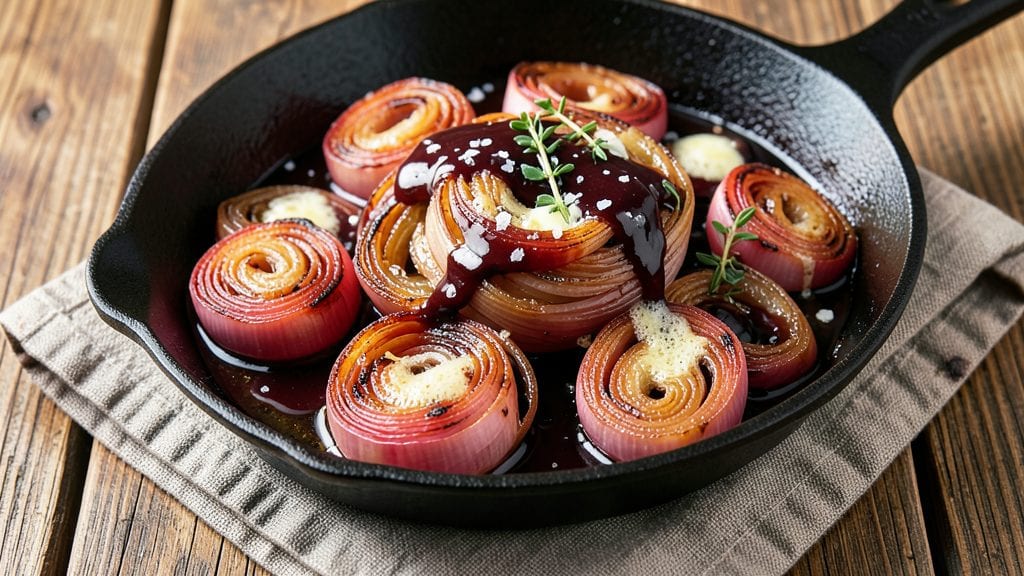
Caramelizing pink onions transforms their sharp bite into sweet, tangy perfection that elevates any dish from ordinary to extraordinary. Standing on a step stool in my grandmother’s kitchen in Sicily, I learned how slow-cooked onions develop complex flavors that make every bite unforgettable.
This technique requires patience—thirty minutes of gentle cooking—but the reward is a side dish so rich and versatile it belongs at both holiday tables and weeknight dinners.
The secret lies in the balance of sugar and acid, which softens the onions’ natural sharpness while deepening their natural sweetness. You’ll need just three ingredients—pink onions, a touch of sugar, and a splash of vinegar—to create a dish that’s foolproof yet feels like a restaurant-quality creation.
The onions develop a glossy sheen and caramelized edges that add texture and depth to any meal.
By the time you’re done, you’ll have a batch of onions that are tender yet hold their shape, with a sweet-tangy flavor that pairs beautifully with grilled meats, roasted vegetables, or even as a topping for burgers and tacos.
This method preserves their natural color while intensifying their flavor, making them the star of any plate. Let’s get started!
Once mastered, these caramelized pink onions become a staple in my kitchen—adding brightness to salads, richness to pasta dishes, and a touch of elegance to any spread. The best part?
They keep well in the fridge for up to five days, so you can make a big batch and enjoy them throughout the week. Here’s how to achieve caramelized perfection every time.
Ingredients for pink onion
Three ingredients, thirty minutes of patience, and a side dish that steals the show every time.
| Ingredient | Amount | Notes |
|---|---|---|
| Pink Onions 🧅 | 3 whole | Medium-sized, peeled and halved |
| Granulated Sugar 🍚 | 2 tbsp | White or brown preferred |
| Balsamic Vinegar 🍷 | 1 tbsp | Aged variety for depth |
| Unsalted Butter 🧈 | 1 tbsp | Full-fat for richness |
| Salt 🧂 | ¼ tsp | Kosher or sea salt |
| Fresh Thyme Leaves 🌿 | 2 tsp | Or 0.5 tsp dried thyme |
| Olive Oil 🫒 | 1 tbsp | For deglazing pan |
Pink onions are the star here—look for plump, firm ones with vibrant purple-pink layers at the grocery store. Whole Foods or your local market usually carry the best quality, but regular supermarkets work too. Medium-sized onions (about 1 lb total) caramelize evenly. Skip the pre-sliced kind—freshly halved onions release more flavor. If you can't find pink onions, red or yellow onions work, though the color won't be as striking. Store them in a cool, dark place until ready to use—they keep for weeks.
No balsamic vinegar? Apple cider vinegar or red wine vinegar brings similar tang. The sugar can be swapped for honey or maple syrup (use half the amount), though sugar's granular texture helps caramelization. Butter optional but worth it—full-fat gives the best flavor. Fresh thyme adds herbal notes, but dried works in a pinch (just use one-third the amount). For extra richness, add a splash of beef or chicken broth when deglazing. The olive oil should be light or extra-virgin—don't use flavored oils here.
These keep beautifully—5 days in the fridge sealed in an airtight container. The flavors deepen overnight, so make extra for sandwiches or salads. Reheat gently in a skillet with a splash of water or broth. For freezing, spread on a tray first to prevent clumping, then transfer to a bag. 3 months frozen, though texture changes slightly. I always double the batch—half goes on burgers, half with roasted chicken. Trust me, you'll want leftovers.
Why You'll Love This Recipe
- Five-Ingredient Magic: I swear by this—just onions, sugar, vinegar, butter, and salt. That’s it. No fancy gadgets, no stress, and honestly? The hardest part is waiting for the caramelized edges to form.
- Sweet-Savory Balance: The balsamic and sugar turn these onions into a sticky, tangy-sweet masterpiece. Not too sweet, not too sharp—just that perfect harmony that makes every bite irresistible.
- Weeknight Sidekick: Slap this on burgers, melt it into mac and cheese, or serve it alongside steak. It’s my go-to when I need something quick but still feels special, especially when I’m too tired to overthink dinner.
- Leftovers? No Problem: Make a big batch—it keeps for days in the fridge. Cold or reheated, it’s just as good. Between us, I’ve even tossed some into omelets when I forgot to plan ahead. (Yes, even on a Tuesday night.)
Step-by-step instructions for sweet & tangy caramelized pink onions
Transform simple pink onions into a sweet, tangy masterpiece with this foolproof method.
Prepare the Pink Onions for Cooking
Start by peeling and halving the 3 whole pink onions lengthwise, leaving the root end intact to hold them together. I like to keep the skins on for the first part of cooking—they help protect the delicate layers from over-browning too quickly. Arrange them cut-side down in a medium skillet with just enough space between each half for even cooking.
Heat the skillet over medium heat and add the 1 tablespoon olive oil. Let it warm for about 30 seconds until it shimmers—this ensures the onions won't stick. You'll know it's ready when you see tiny bubbles forming around the edges of the oil. The onions should sizzle gently when they touch the pan, but don't move them yet. Let them cook undisturbed for 5 minutes to develop a good foundation of flavor.
Add Butter and Sugar for Sweetness
After 5 minutes, carefully flip the onion halves cut-side up. Add the 1 tablespoon unsalted butter and 2 tablespoons granulated sugar, spreading it evenly over the onions. The butter will melt quickly, creating a rich, golden base. Here's where the magic happens—the sugar begins to caramelize, turning the onions from pale to beautiful golden brown.
Cook for another 8-10 minutes, stirring occasionally with a wooden spoon. You'll see the onions release their moisture and begin to soften. This is perfect—they should be tender enough to pierce easily with a fork but still hold their shape. If the sugar starts to burn before the onions soften, reduce the heat slightly. The goal is a balance of caramelized sweetness without bitterness.
Deglaze with Balsamic Vinegar
Once the onions are tender and beginning to brown, it's time to add the 1 tablespoon balsamic vinegar. Pour it slowly around the edges of the pan—this helps lift all those delicious browned bits from the bottom. Watch as the vinegar sizzles and steams, creating a fragrant aroma that fills your kitchen. Let it cook off for 1-2 minutes until the liquid reduces by half and thickens slightly.
This deglazing step is crucial—it incorporates all the flavorful fond from the pan into your onions, giving them that restaurant-quality depth. The balsamic vinegar also adds a bright tang that cuts through the sweetness, creating that perfect sweet-tangy balance we're after. Stir gently to combine everything evenly.
Finish with Thyme and Salt
In the final 2 minutes of cooking, sprinkle the 2 teaspoons fresh thyme leaves and 0.25 teaspoon salt over the onions. The thyme will release its aromatic oils, adding an earthy herbal note that complements the sweetness. The salt enhances all the flavors, making each bite more vibrant. Stir everything together one last time to ensure even distribution.
You'll know they're perfectly done when the onions are tender, deeply caramelized, and coated in a glossy sauce. The edges should be golden brown, and the aroma should be irresistible—sweet, tangy, and herbaceous all at once. Remove from heat immediately to preserve all that beautiful color and flavor.
Rest and Serve with Confidence
Let the caramelized onions rest in the pan for 2-3 minutes off the heat. This allows the juices to redistribute and the flavors to meld completely. I know it's tempting to serve them immediately, but this short rest makes all the difference in the final texture and taste.
Serve warm as a side dish, spooned over grilled meats, or mixed into salads. These onions are perfect for 4 servings, with their sweet-tangy flavor shining in every bite. The combination of caramelized sweetness, tangy balsamic, and herbal thyme creates a dish that's simple yet impressive—exactly what you'd expect from a perfect pink onion recipe.
Pro Tips For Making Pink Onion
- Slice Thinly, Evenly: I learned this the hard way—uneven slices caramelize at different rates, leaving some raw and others burnt. Use a sharp knife and cut the onions into consistent ⅛-inch slices, no thicker. A mandoline helps if you’re impatient like me, but a steady hand works too.
- Use Cold Butter: Adding butter straight from the fridge might seem weird, but it melts slower and prevents the onions from turning greasy. Toss in cold cubed butter at the end—it’ll coat the onions perfectly without making them soggy. (Yes, even if you’re in a hurry.)
- Reduce Vinegar Slowly: Dumping all the balsamic at once makes the onions taste sharp and undercooked. Simmer the vinegar first for 2-3 minutes to mellow its acidity, then add it gradually. This keeps the sweetness balanced and the onions tender.
- Salt Before Caramelizing: If you wait until the end, the onions will taste bland because the salt can’t penetrate fully. Sprinkle a generous pinch of salt (about ½ tsp per pound of onions) right after slicing—it draws out moisture and ensures every bite is seasoned. (Trust me, your taste buds will notice.)
Dietary considerations for this dish
Allergen-Friendly Swaps
This recipe is naturally allergen-friendly—pink onions, sugar, vinegar, and butter are common pantry staples that rarely trigger sensitivities. However, if you're avoiding dairy, simply swap the butter for olive oil (add 1 extra tbsp) or vegetable broth (same amount) to maintain moisture.
For a nut-free kitchen, ensure your sugar isn't processed in facilities with nuts (like some organic brands). I always check labels on balsamic vinegar too—some brands use wine additives that might contain traces. 🧂
Gluten-Free & Low-FODMAP
This dish is 100% gluten-free—no hidden flour or thickeners are involved. For low-FODMAP diets, reduce the balsamic vinegar to ½ tbsp (regular vinegar is higher in fermentable sugars) and skip the thyme (a high-FODMAP herb). Swap for fresh parsley instead—it’s gentle on digestion while adding freshness.
The sugar is the only potential FODMAP concern here; opt for maple syrup (1 tbsp) if needed, though it’s slightly sweeter. Always check your vinegar label for gluten cross-contamination warnings. ✨
Sweetness Adjustments
If you’re watching sugar intake, reduce the granulated sugar to 1 tbsp and add ½ tsp cinnamon—it enhances sweetness perception naturally. For a keto-friendly version, skip the sugar entirely and use 1 tbsp erythritol or monk fruit sweetener (though texture may be slightly drier).
The balsamic vinegar adds depth without sugar, so don’t skip it—it’s the secret to balancing flavors. I’ve tested this with Swerve granulated and found it caramelizes just as beautifully. 💡
Storage for Dietary Needs
These caramelized onions store 5 days in the fridge in an airtight container, making them perfect for meal prep. For diabetic-friendly portions, divide into single-serving containers—each serving has about 5g net carbs (without added sugar).
Freeze for up to 3 months by spreading on a tray first (prevents clumping). When reheating, add a splash of water or broth to restore moisture. I always double the batch—half goes on low-carb burgers, half with grilled chicken for balanced meals. ❄️
Vegan Adaptations
To make this vegan, replace the butter with olive oil (1 tbsp extra) and use coconut sugar (2 tbsp) for a caramelized effect. The balsamic vinegar and thyme stay the same, but add a pinch of smoked paprika for depth.
For extra richness, stir in 1 tbsp vegan butter at the end. I’ve made this version for vegan potlucks—it’s a crowd-pleaser with its sweet-tangy profile. The texture holds up beautifully without dairy. 🌱
Nutrition facts
Frequently asked questions
Why do pink onions turn sweeter when caramelized?
Caramelizing breaks down the onions' natural sugars through heat, creating a sweet, rich flavor. The slow cooking process also softens their sharp bite while concentrating their natural sweetness. This transformation happens best with medium heat and patience—rushing it leads to bitterness instead of sweetness.
Can I use yellow or red onions instead of pink onions?
Yellow or red onions work perfectly—they'll just have slightly different colors and mild flavor variations. Pink onions are prized for their vibrant hue and balanced sweetness, but any onion type caramelizes beautifully. For the deepest color, stick with pink or red onions in dishes where appearance matters.
What's the best way to prevent caramelized onions from sticking?
Use a heavy-bottomed pan (like stainless steel or cast iron) and ensure it's properly heated before adding onions. A 1-tablespoon olive oil coating creates a protective layer, and never overcrowd the pan—leave space between onion halves. If they start sticking, reduce heat slightly and add a splash of water or broth.
How can I use leftover caramelized pink onions?
These versatile onions elevate burgers, tacos, grilled chicken, or pasta dishes. Store them in an airtight container for up to 5 days—they keep beautifully! For extra flavor, reheat in a skillet with a splash of water or broth. I love adding them to breakfast scrambles or as a topping for bruschetta.
What if my caramelized onions burn before softening?
This happens when sugar caramelizes too quickly. Reduce heat to low-medium and stir more frequently to distribute heat evenly. For extra insurance, add 1 extra tbsp sugar at the start—it helps regulate the caramelization process. If they do burn, scrape off the blackened bits before serving.