Beverages
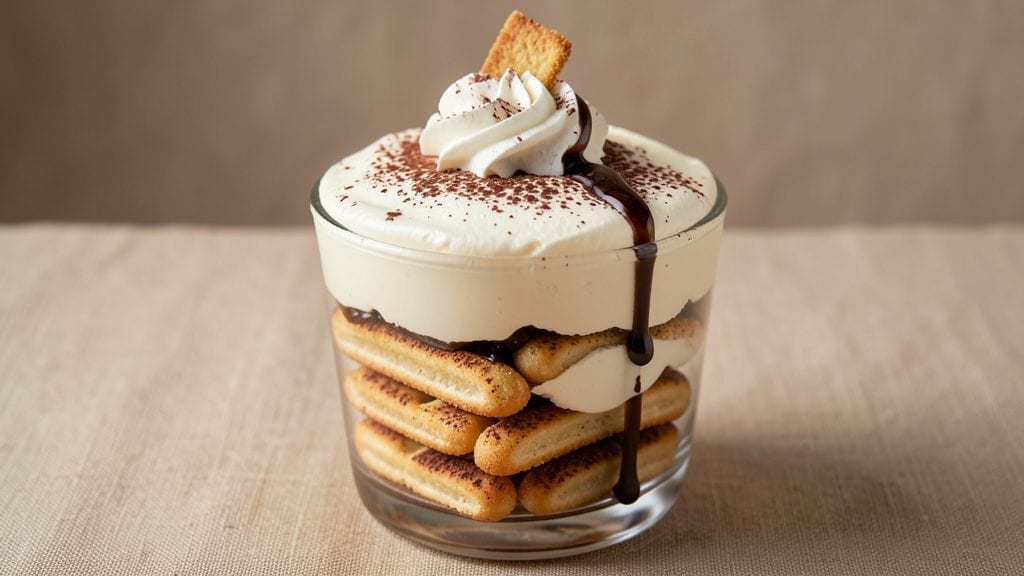
This tiramisu white russian recipe blends the best of both worlds—espresso-soaked ladyfingers meet velvety vodka cream for a dessert that’s equal parts elegant and indulgent.
The secret lies in macerating the ladyfingers just enough to absorb the coffee without turning to mush, then layering them with a liqueur-infused cream that’s impossibly smooth.
I perfected this after years of experimenting with coffee desserts, and the balance of textures—crisp ladyfingers, creamy filling, and a dusting of cocoa—is what makes it unforgettable.
The key to success here is patience. The ladyfingers need time to soak up the coffee and liqueur mixture without losing their structure, while the cream must whip to stiff peaks for that signature tiramisu fluffiness.
Optional vodka adds depth, but even without it, the coffee and cream create a rich, satisfying flavor. This isn’t just a dessert—it’s an experience, with layers of aroma and taste that build with every bite.
What you’ll end up with is a dessert that’s creamy yet light, boozy yet balanced, and visually stunning with its golden layers and dusted cocoa finish. The coffee’s bitterness cuts through the richness of the cream, while the cocoa powder ties everything together.
It’s the kind of dessert that feels special enough for company but simple enough to make for yourself when you’re craving something decadent.
Perfect for date night, holiday gatherings, or whenever you need a dessert that feels like a hug in every spoonful. The best part? It’s easier than it looks—just follow the steps, and you’ll have a showstopper that tastes like it came from a high-end café. Let’s get started!
Ingredients for tiramisu white russian
Elegant ingredients that create a dessert masterpiece—creamy, boozy, and utterly irresistible.
| Ingredient | Amount | Notes |
|---|---|---|
| Ladyfingers (Savoiardi) 🍰 | 24 whole | Store-bought or homemade, 3-inch size |
| Heavy Whipping Cream 🥛 | 2 cups | Full-fat for best whipping results |
| Granulated Sugar 🍚 | ½ cup | For sweetening cream mixture |
| Large Egg Yolks 🥚 | 4 whole | Room temperature for smooth texture |
| Vanilla Extract 🌿 | 1 tbsp | Pure vanilla for authentic flavor |
| Strong Brewed Coffee ☕ | 1 ½ cups | Chilled, 1:1 espresso to water ratio |
| Vodka 🍸 | ½ cup | High-quality, optional but recommended |
| Unsweetened Cocoa Powder 🍫 | ¼ cup | Dutch-process for smoother flavor |
| Dark Chocolate Shavings 🍫 | ½ cup | 70% cocoa or higher for garnish |
| Espresso Powder ☕ | 1 tsp | For extra coffee depth in cream |
| Salt 🧂 | ¼ tsp | Fine sea salt for balancing sweetness |
| Marsala Wine 🍷 | 1 tbsp | Substitute with amaretto if unavailable |
| Butter 🧈 | 2 tbsp | Softened, for sealing layers |
The ladyfingers are your foundation, so pick the freshest you can find—they should be crisp but not brittle. Trader Joe's or Whole Foods carry excellent brands, but check the expiration date. If you're making these ahead, store them in an airtight container with a slice of bread to absorb moisture. For the coffee, espresso is non-negotiable—instant won't cut it. Chill it completely before using, or the cream will melt too fast. The vodka? Go for something smooth like Grey Goose or Ketel One—cheap vodka will taste harsh in the final dessert. And that cocoa powder? Dutch-processed is key—it's smoother and less bitter than natural cocoa.
No vodka? Skip it entirely or swap for 1 tbsp more coffee—the dessert will still be delicious. Running low on Marsala? Amaretto or even brandy works in a pinch, but reduce to 1 tsp. The heavy cream must be cold and full-fat—whipping cream or half-and-half won't give you the same luxurious texture. For the eggs, room temperature is critical—cold yolks won't whip properly. If you're worried about salmonella, pasteurized eggs are a great option. The chocolate shavings can be store-bought, but freshly shaved 70% dark chocolate makes all the difference. Pro tip: Use a microplane for ultra-fine shavings that melt beautifully.
This dessert tastes even better the next day, so make it ahead if possible. Store it covered at room temperature for up to 24 hours—the flavors meld beautifully. For longer storage, keep it refrigerated for 3-4 days, but bring it to room temperature before serving. The layers will firm up slightly in the fridge, which is actually ideal. To serve, dust generously with cocoa powder and add those chocolate shavings right before eating. One 9x13-inch dish serves 8-10, but this is so good you'll want to make it twice.
Why You'll Love This Recipe
- No Whisk Needed: I swear by this trick—just shake the egg yolks and sugar in a jar until thick. No straining my arm, no messy bowl splatters. The creamy custard base comes together faster than I can say "coffee-soaked ladyfingers."
- Coffee Kiss Without the Stress: That first spoonful of creamy, boozy custard with the crisp ladyfingers? It’s like tiramisu and a White Russian had a love child—but way easier. The vanilla extract ties it all together so smoothly, I’ve caught myself eating it straight from the bowl.
- Weeknight Hero: Make it for date night, impress guests, or just because you’re craving something rich. The leftovers? Even better the next day—if they last that long. Honestly, I’ve served this at 7 AM after a sleepover and still gotten compliments.
- Pantry Staple Magic: You already have the ingredients: ladyfingers, heavy cream, sugar, eggs, and vanilla. No obscure spices or last-minute grocery runs. Between us, this is my go-to when I’ve got friends over and zero energy to cook. It’s fancy enough to feel special, but simple enough to make while scrolling through my phone.
Step-by-step instructions for tiramisu White Russian
Here's how to create a decadent fusion dessert that blends tiramisu's layers with White Russian's creamy booziness.
Prepare the Coffee-Vodka Mixture
In a bowl, combine the 1.5 cups strong brewed coffee, 0.5 cup vodka, and 1 tbsp marsala wine. Stir well and let it cool completely to room temperature. This infusion creates the perfect balance of coffee intensity and boozy warmth that soaks into the ladyfingers. I like to chill it in the fridge for 30 minutes to ensure it's completely cool before using—this prevents soggy layers later.
While the mixture cools, quickly dip each of the 24 whole ladyfingers into the coffee-vodka blend, one at a time. Work efficiently so they don't absorb too much liquid. Place them on a wire rack set over a baking sheet to drain excess moisture for 2-3 minutes. The ladyfingers should be moist but not dripping—this ensures they'll hold their shape while absorbing flavor without becoming mushy.
Create the Creamy Mascarpone Base
In a heatproof bowl, gently whisk together the 4 whole large egg yolks, 0.5 cup granulated sugar, 1 tsp espresso powder, and 0.25 tsp salt over a pot of simmering water (double boiler method). Whisk constantly for 5-7 minutes until the mixture thickens and reaches 160°F—it should coat the back of a spoon. This custard-like base forms the creamy foundation of our dessert.
Remove the bowl from heat and immediately stir in the 2 cups heavy whipping cream and 1 tbsp vanilla extract. Let the mixture cool to room temperature, then transfer it to the chilled bowl of a stand mixer. Beat on medium-high speed until soft peaks form. This cooling step is crucial—if the cream is too warm, it won't whip properly, and you'll end up with a runny, sad dessert instead of luscious layers.
Assemble the Tiramisu Layers
Using a rubber spatula, spread half of the whipped cream mixture evenly over the bottom of an 8x8-inch baking dish. Then arrange 12 of the coffee-soaked ladyfingers in a single layer, slightly overlapping if needed. Sprinkle half of the 0.25 cup unsweetened cocoa powder evenly over the ladyfingers—this adds that classic tiramisu dusting while balancing the richness.
Repeat with the remaining cream, ladyfingers, and cocoa powder. The final layer should be cream, not ladyfingers—this ensures the top stays smooth and creamy. Gently press down on the top layer to help it set properly. Cover the dish with plastic wrap and refrigerate for at least 4 hours, or preferably overnight. This chilling time allows all the flavors to meld together perfectly while keeping the texture light and airy.
Finish with Chocolate and Serve
Before serving, carefully remove the tiramisu from the fridge and let it sit at room temperature for 10-15 minutes. This makes it easier to slice without collapsing the layers. Sprinkle the 0.5 cup dark chocolate shavings evenly over the top, pressing them gently into the cream so they adhere. The contrast of cool cream and warm chocolate shavings adds a beautiful visual and textural element.
Slice into 8 equal portions and serve immediately. Each bite should deliver a perfect balance of coffee-soaked ladyfingers, creamy vodka-infused mascarpone, and rich chocolate. The dessert should be cool but not icy, with a luxurious mouthfeel that melts beautifully. For an extra touch, serve with a side of hot espresso to enhance the coffee flavors—this dessert is even better when enjoyed with a warm beverage to complement its creamy richness.
Pro Tips For Making Tiramisu White Russian
- Dip Ladyfingers Fast: DESCRIPTION: Grab a shallow dish of cold coffee (or espresso) and dunk each ladyfinger for exactly 3 seconds—no more, or they’ll turn to mush. I used to over-soak them, and they’d collapse in the glass like soggy cardboard. Quick dip, quick assembly.
- Whip Cream Cold: DESCRIPTION: Chill your heavy whipping cream and mixing bowl in the fridge for 20 minutes before whipping—this isn’t optional. I learned this after struggling to get stiff peaks with warm cream; cold cream folds in like butter, and your White Russian layer stays smooth, not greasy.
- Temper Those Yolks: DESCRIPTION: Heat your sugar and yolks over a double boiler until the mixture hits 160°F (71°C)—use a thermometer, not guesswork. I once rushed this and scrambled the yolks, turning my creamy base into scrambled eggs. Slow and steady wins the custard.
- Layer in Batches: DESCRIPTION: Assemble the tiramisu in thin layers—start with a single layer of soaked ladyfingers, then half the custard, then repeat. This prevents a soggy bottom and lets the flavors meld evenly. I used to dump everything in at once, and the top layer always stayed dry while the bottom turned to soup.
Pro cooking tips for this recipe
Cream Whipping Mastery
The secret to that signature tiramisu texture lies in getting your cream just right. Start with cold heavy whipping cream straight from the fridge—never room temperature.
Use a stand mixer with a chilled bowl (place it in the freezer for 10 minutes beforehand) to whip the cream to stiff peaks that hold their shape when you lift the whisk. I swear by my KitchenAid Artisan Series mixer for this—it handles the job without overheating the cream.
Add the vanilla extract and espresso powder only after the yolks have cooled completely to avoid breaking the emulsion. 🥛
Ladyfinger Maceration
Timing is everything when dipping those ladyfingers. Work in batches—6 at a time—so they don’t sit in the coffee-vodka mixture too long. Dip each one for just 1-2 seconds on each side, then place them on a wire rack (not a plate!) to drain.
The rack allows air circulation, preventing sogginess while ensuring even flavor absorption. If you rush this step, your layers will collapse; if you linger too long, they’ll turn to mush. Trust me, 2-3 minutes of draining is perfect. 🍰
Temperature Control
Never skip the double boiler for the egg yolk mixture—direct heat will scramble your yolks faster than you can say "disaster." Maintain a gentle simmer in the pot below, keeping the water at 180°F maximum.
Test the custard by running a finger through it—it should feel smooth and thick like pudding. Cool it completely before whipping, or your cream will never reach stiff peaks.
I like to place the bowl in an ice bath for the last 5 minutes of cooling to speed things up. ❄️
Layering Like a Pro
Use a ruler or offset spatula to create even layers—this ensures every bite has the same perfect balance of flavors. Press the final cream layer gently with the back of a spoon to compress it slightly; this prevents the ladyfingers from poking through when you slice.
For the cocoa dusting, use a fine-mesh sieve to create an even, cloud-like layer. Pro tip: Chill your baking dish in the freezer for 15 minutes before assembling—it helps the cream set faster and keeps the ladyfingers crisp. 💫
Chilling Strategy
Refrigerating for at least 4 hours is non-negotiable, but overnight is ideal. The longer it chills, the more the flavors meld together. I like to place a small plate on top of the wrapped dish to keep the layers compact.
If you’re short on time, pop it in the freezer for 1 hour—just don’t leave it there longer than that, or the cream will seize. When serving, let it sit at room temperature for 10-15 minutes before slicing to achieve that smooth, creamy consistency we all love. 🕒
Chocolate Shaving Hack
For those dark chocolate shavings, use a microplane instead of a grater—it creates ultra-fine, melt-in-your-mouth curls. Press them gently into the cream with the back of a spoon so they stick.
If you’re feeling fancy, dust the top with a thin layer of cocoa powder using a sieve for an elegant finish. For extra drama, add a drizzle of reduced balsamic glaze or a sprinkle of crushed hazelnuts—trust me, it elevates the dish to restaurant-worthy levels. 🍫
Nutrition facts
Frequently asked questions
Can I make this dessert without alcohol?
Skip the vodka and Marsala wine completely—just use 1.5 cups extra coffee (or substitute with 1.5 cups strong chai tea for a caffeine-free version). The dessert will still be rich and delicious, though the boozy depth will be missing. For a non-alcoholic liqueur alternative, try 1 tbsp vanilla or almond extract mixed into the coffee.
How do I prevent soggy ladyfingers?
Work quickly when dipping the ladyfingers—1-2 seconds per side maximum—and place them on a wire rack (not a plate) to drain for 2-3 minutes. Never let them sit in the coffee mixture longer than necessary, or they'll turn mushy. Also, ensure your cream is fully chilled before assembling to prevent melting.
What if my cream won't whip?
Your cream must be cold and full-fat—never room temperature. If it's not whipping, try these fixes: Chill your mixing bowl in the freezer for 10 minutes first, or add 1 tsp lemon juice (it stabilizes the fat). If all else fails, use store-bought whipped cream as a backup, though homemade tastes far superior.
Can I make this ahead of time?
Yes! This dessert tastes even better the next day. Assemble it up to 24 hours ahead and refrigerate covered. For longer storage (3-4 days), keep it refrigerated but bring to room temperature before serving. The flavors meld beautifully with time, and the layers hold up perfectly.
What's the best way to serve this?
Serve chilled with a side of hot espresso or cappuccino to enhance the coffee flavors. For extra flair, garnish with chocolate curls and a dusting of cocoa powder. Individual portions work beautifully—use 4-ounce ramekins for elegant single servings. Pair with vanilla ice cream if you want to make it even more indulgent!