
Desserts
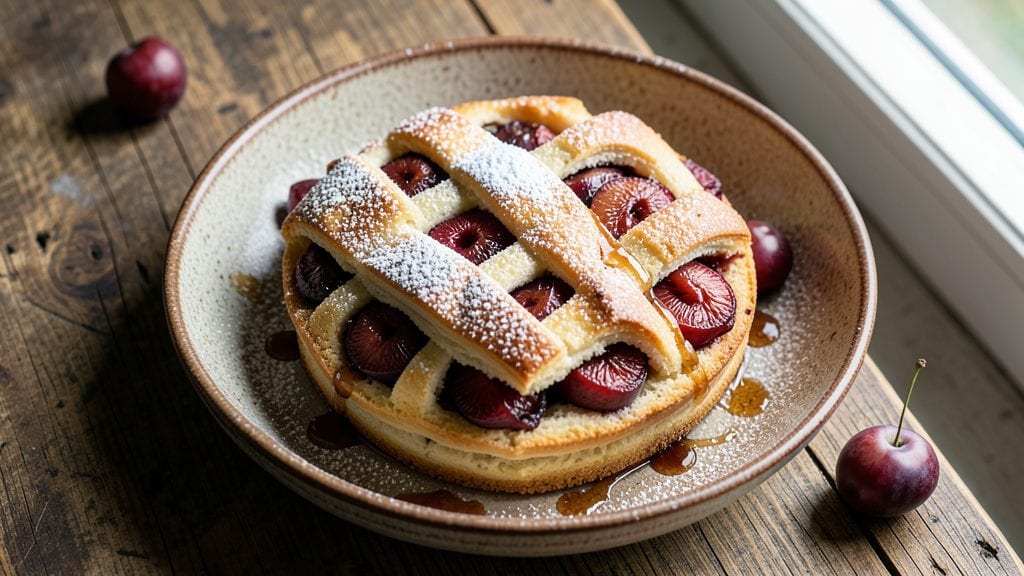
This traditional plum cake recipe brings the cozy, spiced aroma of European kitchens straight to your oven—where layers of buttery pastry and plump, boozy fruit swirls create a dessert that tastes like nostalgia in every bite.
The secret lies in a precise balance of flour, sugar, and brandy-soaked plums, baked until the crust turns golden and the filling achieves that perfect balance between tender and slightly caramelized.
I’ve perfected this recipe over years of baking, ensuring the texture stays moist without being soggy and the flavors develop richly during the slow bake.
The beauty of this plum cake is in its simplicity—just a few key ingredients transform into something extraordinary.
You’ll need ripe plums (or high-quality canned plums if fresh aren’t in season), a buttery pastry dough that’s both flaky and sturdy, and a touch of brandy or rum to elevate the fruit’s natural sweetness.
The dough wraps around the fruit filling, creating those signature swirls that make the cake visually stunning and irresistibly aromatic as it bakes. What you’ll end up with is a dessert that’s both rustic and refined, perfect for holidays or a special Sunday treat.
What sets this recipe apart is the foolproof technique for achieving the ideal texture—neither too dense nor too crumbly. The dough is rolled out just thin enough to create delicate layers, while the fruit filling is thickened with a touch of cornstarch to prevent a runny center.
The slow bake ensures even cooking, so every slice delivers that perfect harmony of buttery crust, tender pastry, and jammy, boozy fruit. This isn’t just a cake; it’s a centerpiece that will have everyone reaching for seconds.
Once baked, let the cake cool slightly before slicing—this ensures clean cuts and prevents the filling from oozing out. Serve it warm with a dusting of powdered sugar or a scoop of vanilla ice cream to balance the richness.
For a modern twist, you could add a layer of spiced whipped cream or a drizzle of caramel, but the traditional version stands strong on its own. Ready to bake something truly special?
Ingredients for traditional plum cake
Just 12 ingredients transform into layers of buttery magic and boozy plum swirls.
| Ingredient | Amount | Notes |
|---|---|---|
| All-Purpose Flour 🌾 | 3 ½ cups | Sifted for light texture |
| Unsalted Butter 🧈 | 1 ½ cups | Cold, cubed for pastry |
| Granulated Sugar 🍚 | 1 ½ cups | Superfine preferred for smoothness |
| Large Eggs 🥚 | 3 whole | Room temperature for blending |
| Ripe Plums 🍑 | 2 ½ lbs | Pitted, halved, or canned plums |
| Brandy 🍷 | ½ cup | Or rum for fruit soaking |
| Cornstarch 🍚 | 2 tbsp | For thickened filling |
| Powdered Sugar 🍚 | ½ cup | For dusting finished cake |
| Vanilla Extract 🍯 | 1 tsp | Pure for authentic flavor |
| Salt 🧂 | ½ tsp | Fine sea salt preferred |
| Baking Powder 🍞 | 1 tsp | For light, airy layers |
| Ground Cinnamon 🌿 | 1 tsp | For subtle spice warmth |
Plums are the heart of this cake—ripe but firm ones hold their shape best. Local farmers markets often have perfect ones in summer, but canned plums work too (drain and pat dry). The brandy? Korbel or E&J are classic choices, but any good-quality brandy or rum will do. For the dough, European-style butter like Plugrá or Land O'Lakes makes all the difference—it's higher in fat and gives that signature flakiness. If you can't find it, regular unsalted butter works, but chill it well before mixing.
No brandy? Apple juice or orange juice adds just enough moisture to keep the filling juicy. Short on cornstarch? All-purpose flour at double the amount works in a pinch, but the filling won't be quite as glossy. The cinnamon is optional but adds that cozy European touch—Penzeys or McCormick are my go-to brands for consistent quality. For a modern twist, swap half the plums for blueberries or cherries, but stick with the brandy for that classic flavor. The dough should be cold when rolling—wrap it in plastic and chill for 30 minutes if your kitchen's warm.
This cake keeps beautifully—3-4 days at room temperature wrapped in foil, or 1 week in the fridge. For longer storage, slice and freeze portions between parchment paper for up to 3 months. Reheat slices in a 350°F oven for 5-10 minutes to revive the buttery aroma. I always bake two cakes—one for serving, one for freezing. The flavors actually deepen overnight, so leftovers taste even better the next day.
Why You'll Love This Recipe
- I’ll be real: this recipe costs next to nothing to make, but it tastes like a bakery treat. Plums are often cheap in season, and the butter-egg ratio keeps it rich without breaking the bank. Plus, the leftovers? They disappear faster than I can say “second slice.”
- No-Fuss Fruit Layer: I swear by this recipe when I’m too tired to fuss—just halve those plums, toss them in sugar, and let them caramelize while you mix the batter. The butter and eggs make it tender, but the real magic? Those juicy plums sink into the crumb like a hug.
- Butter-Sugar Magic: Honestly, the flavor balance here is chef’s kiss—rich, buttery layers with just enough sweetness to make the plums sing. The sugar in the fruit melts into the cake, creating pockets of jammy goodness that’ll have you sneaking slices when no one’s looking.
- Weeknight or Sunday: Between us, this cake is my go-to for brunch, potlucks, or even a lazy afternoon. The batter’s simple enough for weeknights, but the presentation (dusting with powdered sugar, maybe a few fresh plums on top) makes it feel special enough for company. No stress, all reward.
Step-by-step instructions for traditional plum cake
Here's how to create an authentic plum cake with buttery layers and boozy fruit swirls that'll impress everyone.
Prepare the Plum Filling with Brandy Infusion
Start by pitting and halving the 2.5 lbs ripe plums, removing any tough stems. In a medium bowl, gently toss the plum halves with the 0.5 cup brandy and let them soak for 15 minutes. This infusion enhances the fruit's natural sweetness and adds that classic boozy depth traditional plum cakes are known for.
After soaking, transfer the plums to a saucepan and simmer gently for 5-7 minutes until they begin to soften. In a small bowl, whisk together the 2 tbsp cornstarch with 2 tablespoons of water to create a slurry. Slowly stir this into the simmering plums and cook for another 3-4 minutes until the mixture thickens into a glossy, jam-like consistency. You're aiming for a filling that coats the back of a spoon but isn't overly thick.
Create the Cake Batter with Perfect Texture
In a stand mixer fitted with the paddle attachment, cream together the 1.5 cups unsalted butter and 1.5 cups granulated sugar on medium speed until light and fluffy, about 3-4 minutes. This step is crucial for creating that signature tender crumb. Scrape down the sides of the bowl with a spatula to ensure even mixing.
Add the 3 whole large eggs, one at a time, mixing well after each addition. Then stir in the 1 tsp vanilla extract. In a separate bowl, whisk together the 3.5 cups all-purpose flour, 1 tsp baking powder, 1 tsp ground cinnamon, and 0.5 tsp salt. Gradually add the dry ingredients to the butter mixture, mixing on low speed just until combined. Be careful not to overmix—the batter should be smooth but still slightly streaked with flour.
Assemble the Cake with Fruit Layers
Preheat your oven to 350°F and grease two 9-inch round cake pans, lining the bottoms with parchment paper. Divide the prepared cake batter evenly between the two pans, spreading it out smoothly. Here's where the magic happens: spread half of the plum filling evenly over one of the cake layers, leaving a ½-inch border around the edges. Repeat with the remaining batter and filling for the second layer.
To create those beautiful swirls, use a sharp knife to cut through the center of each cake layer to the bottom of the pan. Gently twist the knife to create a swirl pattern, then carefully lift and fold the edges toward the center. This technique ensures the filling stays contained while creating that classic layered look. Bake for 30-35 minutes or until a toothpick inserted into the center comes out clean.
Dust with Powdered Sugar for Elegant Finish
Remove the cakes from the oven and let them cool in the pans for 10 minutes. Then transfer them to a wire rack to cool completely. While the cakes are still warm, dust the tops generously with 0.5 cup powdered sugar using a fine-mesh sieve. This step adds that professional finish and balances the rich flavors of the fruit and butter.
For serving, you can slice the cakes directly from the pans or carefully remove them using the parchment paper for a clean presentation. The combination of tender cake, sweet-tart plum filling, and that hint of brandy makes this traditional plum cake a showstopper for any occasion. Enjoy with a cup of tea or coffee to let all the flavors truly shine.
Pro Tips For Making Traditional Plum Cake
- Cream Butter Slowly: Beat the butter and sugar together until it’s pale and fluffy—this isn’t just about air, it’s about texture. I used to rush it, and the cake turned out dense. Take your time; it’s worth the extra 2 minutes.
- Pit Plums Thoroughly: A single missed pit in the plum filling can ruin everything. Use a sharp knife to slice the fruit in half, then tap the pit out with your finger—no guesswork. Trust me, you’ll feel the difference when you bite into a smooth, pit-free cake.
- Don’t Overmix the Batter: Once you fold in the flour, stop as soon as it’s just combined. Overmixing develops gluten, and that’s how you end up with a tough, chewy plum cake instead of a tender one. Think "dust it in," not "knead it."
- Bake Until Golden: The cake’s done when the top is deep golden, not just pale. I learned this the hard way—underbaking leaves it gummy. If the edges pull away from the pan, it’s ready. Let it cool in the pan for 10 minutes before slicing, or it’ll fall apart.
Essential equipment for great traditional plum cake
Must-Have Mixer
Your stand mixer is the workhorse of this recipe, especially for creaming the butter and sugar to perfection. I swear by a KitchenAid Artisan Series with the paddle attachment—it handles the dense dough without overheating.
For budget-friendly options, the Hamilton Beach 6-Speed works well for smaller batches. Avoid hand mixers here; the dough needs consistent power to reach that light, fluffy texture. 💡
Precision Pans
Two 9-inch round cake pans with removable bottoms are essential for even baking and easy release. I use Wilton Perfect Results Non-Stick pans—they distribute heat evenly and prevent sticking. If you don’t have removable bottoms, line the pans with parchment paper and grease lightly with butter.
Avoid dark-colored pans; they can cause uneven browning. The pans should be lightly greased but not overly oiled, or the dough will slide instead of forming proper layers.
Sharp Tools
A sharp chef’s knife (I recommend Wüsthof Classic) is critical for pitting plums and creating those signature swirls. Dull knives crush fruit and tear dough, ruining texture. For the swirl technique, a bench scraper helps smooth the dough edges before baking.
A fine-mesh sieve (like OXO Good Grips) ensures even powdered sugar dusting without clumps. Don’t skip these—precision matters for that restaurant-quality finish. ✨
Temperature Control
An oven thermometer (I use Thermoworks Oven Thermometer) is a game-changer—home ovens often run 25°F hotter or cooler than set. Preheat for 15 minutes before baking to ensure even heat distribution. For the 350°F bake, place pans on the middle rack to avoid hot spots.
If your oven has trouble with even baking, rotate the pans halfway through the 30-35 minutes bake time. 🌡️
Cooling Essentials
Let cakes cool in pans for 10 minutes before transferring to a wire rack—this prevents collapsing. I use a cooling rack with feet (like OXO Good Grips) to maximize airflow. For dusting powdered sugar, a fine-mesh sieve (not a shaker) distributes it evenly.
If you’re short on time, chill the pans on the rack for 5 minutes before removing cakes. Never skip cooling; rushing leads to soggy layers and messy slices.
Storage Containers
For leftovers, store slices in airtight containers (I love Rubbermaid Brilliance) with parchment paper between layers to prevent sticking. Label with dates—this cake keeps 3-4 days at room temp or 1 week refrigerated.
For freezing, wrap individual slices in plastic wrap and store in a freezer bag for up to 3 months. Thaw at room temp or reheat 5-10 minutes at 350°F to restore texture. ❄️
Nutrition facts
Frequently asked questions
What's the best way to prepare plums for this cake?
Use ripe but firm plums—they hold their shape better when baked. Pit and halve them, then remove stems. For even cooking, pat them dry with paper towels before soaking in brandy. If using canned plums, drain thoroughly and chop into ½-inch pieces for even distribution in the filling.
Can I substitute brandy with something else?
Yes! For a non-alcoholic version, use apple juice or orange juice (same amount). If you prefer a different spirit, rum or bourbon work well—they add unique depth. Just reduce the liquid slightly if your fruit is very juicy to maintain the right filling consistency.
Why does my cake turn out dense instead of fluffy?
Overmixing the batter or using warm butter are common culprits. Always cream butter and sugar until light and fluffy (3-4 minutes), and keep your ingredients cold. Also, don't overfill the pans—leave ½-inch borders around edges. Chill the dough for 30 minutes if your kitchen is warm.
How do I make this cake ahead of time?
This cake actually tastes better the next day! Bake it 1 day ahead and store wrapped at room temperature. For longer storage, refrigerate for up to 1 week or freeze slices for 3 months. Reheat individual portions at 350°F for 5-10 minutes to restore texture.
Can I use this recipe for a single-layer cake?
Simply use one 9-inch pan and spread all the batter in one layer. Top with half the filling, then swirl as directed. Bake for 25-30 minutes—check with a toothpick. The texture will be slightly denser but still delicious. Perfect for smaller gatherings!