
Beverages
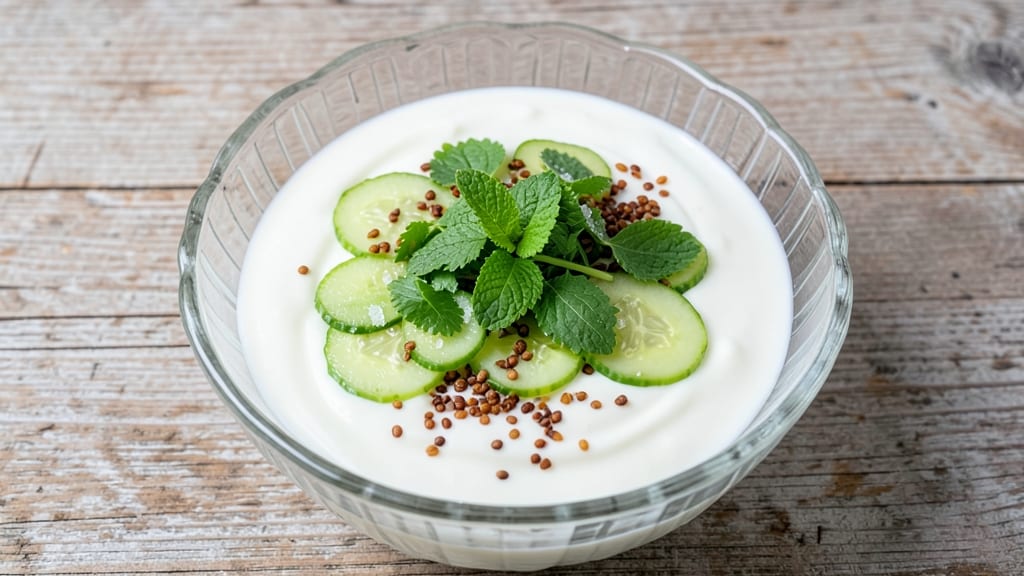
This white raita recipe delivers the perfect balance of cooling yogurt, crisp cucumber, and bright mint—an essential accompaniment to spicy Indian meals. The secret lies in straining the yogurt for a smooth texture and roasting cumin seeds to deepen their earthy aroma.
I’ve perfected this version over years of testing, ensuring every spoonful stays creamy and refreshing.
What makes this raita stand out is its simplicity: just five core ingredients transform into a vibrant, cooling dip that cuts through rich flavors. The cucumber adds a crisp contrast, while fresh mint and coriander bring a burst of freshness.
Roasting the cumin seeds enhances their warmth, creating a subtle depth that elevates the yogurt base.
By the time you finish blending, you’ll have a velvety white raita with a perfect balance of tangy, fresh, and slightly spiced notes. It’s ideal for pairing with grilled meats, dosas, or rice dishes, offering a refreshing counterpoint to bold flavors.
The recipe scales easily, so you can make a small batch for two or double it for a crowd.
For extra texture, add boiled potatoes or peas—these variations keep the raita hearty while maintaining its cooling essence. The key is patience: letting the yogurt strain properly ensures a smooth, restaurant-quality consistency. Ready to master this classic? Here’s how to make it.
Ingredients for white raita
Five simple ingredients transform into this velvety white raita, perfect for balancing spicy Indian flavors.
| Ingredient | Amount | Notes |
|---|---|---|
| Plain Whole Milk Yogurt 🧀 | 2 cups | Full-fat for creaminess, strained overnight |
| English Cucumber 🥒 | 1 medium | Peeled, seeded, finely diced |
| Fresh Mint Leaves 🍃 | ½ cup | Stems removed, loosely packed |
| Fresh Cilantro Leaves 🌿 | ¼ cup | Stems removed, loosely packed |
| Cumin Seeds 🌶️ | 1 tbsp | Toasted until fragrant |
| Rock Salt 🧂 | ½ tsp | Fine grain preferred |
| Fresh Lemon Juice 🍋 | 1 tbsp | From 1 small lemon |
| Cold Water 💧 | ½ cup | For thinning if needed |
| Ghee or Clarified Butter 🧈 | 1 tbsp | Optional for richness |
The yogurt is the foundation—opt for plain whole milk yogurt from brands like Fage or Siggi's for the creamiest texture. If using store-bought yogurt, strain it overnight in a cheesecloth-lined colander to remove excess liquid. For the cucumber, English cucumbers are ideal; their thin skin and seeds make them perfect for dicing. If unavailable, persian cucumbers work too, but remove all seeds. Fresh mint and cilantro should be vibrant green—buy from a trusted Indian grocery store like Patel Brothers for the brightest leaves. Toasting the cumin seeds in a dry pan for 30 seconds until fragrant unlocks their full earthy aroma, which is essential for depth.
No English cucumbers? Substitute with Kirby or lemon cucumbers, but peel and seed thoroughly. Fresh mint unavailable? Dried mint works at half the amount, but it lacks the bright freshness. For extra tang, add 1 extra tablespoon of lemon juice. The ghee is optional but recommended—store-bought ghee from brands like Ghari adds richness without altering the dish's vegetarian integrity. If you prefer a lighter version, omit it entirely. For storage, use airtight glass containers to preserve freshness. The raita tastes even better the next day as flavors meld.
This raita keeps well for up to 3 days in the refrigerator, though texture may slightly separate. For serving, stir in a splash of cold water if too thick. Freezing isn't recommended due to texture changes. To scale for a crowd, multiply ingredients by 2—this makes 8 servings—and store in individual containers for easy grab-and-go portions. Always taste before serving; adjust salt or lemon to preference. The key to restaurant-quality raita lies in the straining and fresh herbs—never skip these steps.
Why You'll Love This Recipe
- No-Chop Needed: I swear by this trick—just grate the cucumber, no peeling, no slicing. Five minutes of prep, and you’ve got that cool, creamy texture without the fuss.
- Cool Refreshment: That first bite? Crisp cucumber cuts through the richness of the yogurt, while the mint and cilantro add a zesty punch. It’s like summer in a bowl—honestly, I reach for it even when it’s 80 degrees outside.
- Meal Prep MVP: Make a big batch on Sunday, and you’ve got a side for naan, biryani, or even grilled chicken all week. The cumin seeds add warmth, so it never tastes stale—just transfer to a jar and grab as needed.
- Budget Bright Spot: Yogurt and cucumbers are cheap staples, and you’ll use every bit. My kids go for it straight, but I toss it into wraps or salads—zero waste, maximum flavor. (Yes, even on a Tuesday night.)
Step-by-step instructions for white raita recipe
Here's how to create a perfectly balanced white raita with vibrant flavors and ideal texture.
Toast the Cumin Seeds for Depth of Flavor
Heat a small dry skillet over medium heat. Add the 1 tablespoon cumin seeds and toast them for 30-45 seconds until they release their aroma and turn a light golden color. Watch closely—they darken quickly and can burn easily. Immediately transfer the toasted cumin seeds to a small bowl and let them cool for 2 minutes before grinding lightly with a mortar and pestle or in a spice grinder.
This toasting step is crucial for developing the cumin's nutty, earthy notes that will form the aromatic base of your raita. Don't skip cooling them first—the hot seeds will melt the ghee and create an unbalanced texture. The lightly ground cumin should still have some visible specks, not become a fine powder.
Prepare the Cucumber Mixture
Peel the 1 medium English cucumber using a vegetable peeler, then cut it in half lengthwise. Scoop out and discard the seeds using a spoon. Finely dice the cucumber flesh into small, even pieces—about ¼-inch cubes. Transfer to a colander and sprinkle with ½ teaspoon rock salt, then toss gently to distribute evenly. Let it sit for 10 minutes while you prepare the remaining ingredients.
The salting process draws out excess moisture from the cucumber, which prevents the raita from becoming watery. After 10 minutes, rinse the cucumber under cold water and drain thoroughly in a clean colander for 5 minutes. This step ensures your raita remains creamy rather than thin and watery. Press gently on the cucumber pieces with a paper towel to remove any remaining moisture.
Combine Yogurt and Herbs
In a large mixing bowl, combine the 2 cups plain whole milk yogurt, ½ cup fresh mint leaves, and ¼ cup fresh cilantro leaves. Using a clean spoon, gently fold everything together until the herbs are evenly distributed. Be careful not to overmix—the yogurt should maintain its creamy texture without becoming chunky. Add the lightly ground cumin seeds and mix again just until combined.
I like to use a silicone spatula for this step as it helps incorporate the herbs without breaking down the yogurt's structure. The herbs should be finely dispersed but still visible as small flecks throughout. This is where the freshness of your raita comes from—using high-quality herbs makes all the difference in the final flavor profile.
Incorporate Cucumber and Season
Add the drained cucumber pieces to the yogurt mixture and gently fold everything together. Stir in the 1 tablespoon fresh lemon juice and mix until fully combined. Taste the mixture and adjust the seasoning if needed—you may want to add a pinch more rock salt or lemon juice to balance the flavors. For extra richness, drizzle in the 1 tablespoon ghee or clarified butter and mix until evenly distributed.
The lemon juice brightens the flavors and cuts through the richness of the yogurt and ghee. At this stage, your raita should have a vibrant green color from the herbs and a smooth, creamy texture. If the mixture appears too thick, gradually add the ½ cup cold water one tablespoon at a time until you reach your desired consistency—it should be thick enough to coat the back of a spoon but still be spreadable.
Chill and Serve
Transfer the raita to a serving bowl or individual ramekins. Cover with plastic wrap and refrigerate for at least 2 hours before serving. This chilling time allows the flavors to meld together and the texture to become perfectly smooth and cool. For best results, serve the raita chilled alongside grilled meats, spicy dishes, or as a refreshing side with warm bread.
When ready to serve, give the raita one final gentle stir to redistribute any settled ingredients. The ideal white raita should be cool to the touch, creamy in texture, and bursting with fresh herb flavors. The cucumber should be discernible in small pieces throughout, adding a subtle crunch and refreshing contrast to the rich yogurt base. Enjoy immediately for the perfect balance of cooling and vibrant flavors.
Pro Tips For Making White Raita
- Strain the Yogurt: After mixing yogurt with salt and water, let it sit for 10 minutes, then strain it through a fine-mesh sieve or cheesecloth for 15-20 minutes. This removes excess liquid—my raita used to be watery until I learned this step. The texture becomes thick, creamy, and perfect for scooping.
- Salt the Cucumber: Toss cucumber slices with ½ teaspoon salt and let them sit for 10 minutes before rinsing and draining. This pulls out bitterness and excess water, so your raita stays fresh longer without turning soggy. I used to skip this and always ended up with a mushy mess.
- Toast the Cumin: Dry-toast cumin seeds in a small pan over medium heat for 30 seconds until fragrant, then grind them fresh. Pre-ground cumin loses its punch, and skipping the toasting makes the flavor taste flat. It’s a tiny effort for a big difference.
- Mix the Herbs Last: Add chopped mint and cilantro just before serving—this keeps their bright flavor from wilting or turning bitter in the yogurt. I used to chop them all in first, and after 30 minutes, the raita tasted dull. Freshness matters.
Storing and reheating this recipe
Refrigerator Storage
Store your white raita in an airtight glass container with a lid to maintain its creamy texture for up to 3 days. The flavors actually deepen overnight as the herbs infuse further into the yogurt base.
I recommend using Pyrex glass containers—they preserve freshness better than plastic. Always press plastic wrap directly onto the surface to prevent a skin from forming. 🧀
Freezer Considerations
While raita isn't ideal for freezing due to texture changes, you can freeze it for up to 1 month if needed. Portion into silicone molds or small containers for easy single servings.
Thaw overnight in the refrigerator and stir in 1 tablespoon cold water to restore creaminess. The cucumber pieces may soften slightly, but the yogurt base remains stable.
Reheating Methods
For best results, serve raita chilled—it was never meant to be reheated. However, if you must, gently rewarm in a microwave-safe bowl on low power (50%) for 20-30 seconds.
Stir immediately and add 1 teaspoon cold water to compensate for any separation. Never boil—this will curdle the yogurt and ruin the delicate texture. 🔥
Texture Restoration
If your raita separates after refrigeration, simply whisk in 1-2 tablespoons cold water until smooth. For extra richness, add ½ teaspoon ghee while whisking. The key is gradual reintegration—add liquid slowly to avoid thinning the mixture too much. This technique works particularly well for raita that's been stored overnight.
Portioning for Meals
Divide raita into small ramekins or airtight containers before storing for easy grab-and-go portions. This prevents overmixing when serving later. I like using 4-ounce portions—perfect for pairing with grilled meats or dosas.
Label containers with dates to track freshness. The raita's cooling properties make it ideal for meal prep alongside spicy dishes. ❄️
Herb Freshness Tip
To preserve herb freshness during storage, cover the raita surface with a thin layer of cold water before sealing. This creates a moisture barrier that prevents herbs from wilting.
When ready to serve, drain the excess water and stir gently. This simple trick keeps your raita vibrant even after 2 days of storage. 🌿
Nutrition facts
Frequently asked questions
Why should I strain the yogurt for this recipe?
Straining the yogurt for 4-6 hours (or overnight) removes excess liquid, creating a thick, creamy texture that's essential for authentic raita. This step prevents a watery consistency and gives you that perfect spoonable thickness.
Can I make white raita without cucumber?
For a milder flavor, substitute cucumber with ½ cup grated carrots or ½ cup finely diced boiled potatoes. Both add texture and sweetness that complement the yogurt beautifully. The raita will still be cooling and refreshing.
How do I fix raita that's too thick or too thin?
For thick raita, stir in 1-2 tablespoons cold water until smooth. If too thin, add 1 tablespoon plain yogurt and mix well. The key is gradual adjustments—add liquid or yogurt slowly to maintain balance. Always taste before serving!
What's the best way to serve white raita?
This cooling yogurt dip pairs perfectly with spicy dishes like biryani, grilled chicken, or dosas. Serve it chilled in small bowls at room temperature for the best texture contrast. For extra presentation, garnish with a sprinkle of toasted cumin or fresh mint leaves.
Can I use store-bought yogurt for this recipe?
Yes, but choose plain whole milk yogurt with live cultures for the best flavor. Brands like Fage or Siggi's work well. Avoid flavored or low-fat yogurts—they won't give you that rich, creamy texture. Always strain it first for optimal results.