
Breakfast & Brunch
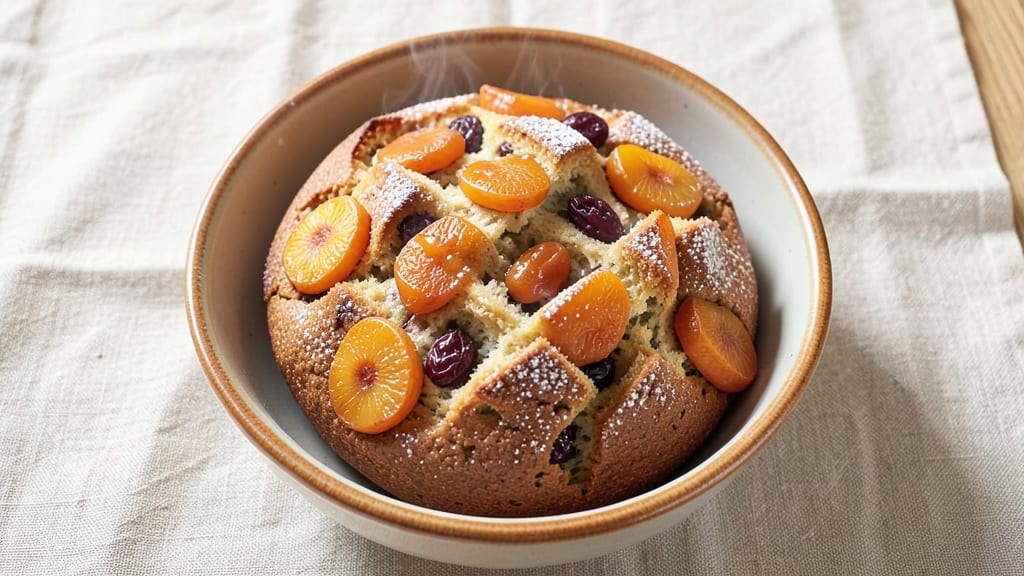
This apricot raisin bread recipe delivers the perfect balance of sweet, fruity swirls and a tender, moist crumb that makes every slice irresistible. The secret lies in a precise blend of warm spices and fruit that infuse the dough during proofing, creating layers of flavor in every bite.
I developed this recipe after years of testing—it’s the one that finally earned me compliments instead of "Is this store-bought?" questions.
The beauty of this bread is its foolproof technique: a simple yeast dough enriched with butter and eggs, then folded with plump apricots and raisins for natural sweetness. No fancy equipment needed—just a bowl, a dough scraper, and about 90 minutes of hands-off time (including rising).
The result? A loaf with a golden crust and a crumb so moist it stays fresh for days, even at room temperature.
What sets this recipe apart is the textural contrast—chewy edges, tender centers, and bursts of jammy apricot in every bite. The dough’s natural sweetness comes from the fruit, so you control how rich it tastes by adjusting the sugar.
Perfect for breakfast toast, afternoon snacks, or gifting to neighbors who’ll wonder how you made it so good.
For variations, swap raisins for dried cranberries or add orange zest to the dough for a citrus twist. The method scales easily for larger batches, and leftovers freeze beautifully. Here’s how to make it—step by step, with all the professional tips to ensure success.
Ingredients for apricot raisin bread
Sweet fruit, warm spices, and a tender crumb—this bread needs just 13 ingredients.
| Ingredient | Amount | Notes |
|---|---|---|
| Active Dry Yeast 🍞 | 2 ¼ tsp | Ensure freshness with expiration date check |
| Granulated Sugar 🍚 | ¼ cup | Adjust for desired sweetness level |
| Unsalted Butter 🧈 | ½ cup | Cold, cubed for easier mixing |
| Large Eggs 🥚 | 2 whole | Room temperature for best incorporation |
| All-Purpose Flour 🌾 | 4 cups | Sifted for light, airy texture |
| Whole Milk 🥛 | ½ cup | Warmed to 110°F for yeast activation |
| Dried Apricots 🍑 | 1 cup | Chopped into small pieces |
| Raisins 🍇 | 1 cup | Plump, no need for soaking |
| Ground Cinnamon 🌿 | 1 tsp | Freshly ground for optimal flavor |
| Ground Nutmeg 🌿 | ¼ tsp | Freshly grated preferred |
| Salt 🧂 | ½ tsp | Kosher or sea salt preferred |
| Granulated Sugar (for topping) 🍚 | 2 tbsp | For crust enhancement |
| Honey 🍯 | 1 tbsp | For egg wash and glaze |
The yeast is the foundation, so check the expiration date—old yeast won’t activate properly. For the best flavor, use King Arthur or Bob’s Red Mill flour, which have higher protein content for a better rise. The dried apricots should be plump, not shriveled—Trader Joe’s or Whole Foods carry great quality. If you can’t find fresh nutmeg, Penzeys Spices sells pre-ground nutmeg that’s far superior to the grocery store variety. The butter should be cold but not rock-hard—softened enough to cut with a knife.
No dried apricots? Dried mango or peaches work equally well, though the flavor will differ slightly. Raisins too dry? Soak them in warm water for 10 minutes to plump them up. Substitute dried cranberries for a tart twist, but reduce the sugar by 1 tablespoon to balance. The cinnamon and nutmeg are crucial for that warm, spiced flavor—don’t skip them, but if you’re sensitive to spices, you can reduce the nutmeg to 1/4 teaspoon. For a richer dough, add 1 tablespoon sour cream to the wet ingredients, but it’ll make the bread denser.
This dough needs time to rise—plan for at least 90 minutes, including proofing. Store any unused dried fruit in an airtight container in a cool, dark place for up to 6 months. The baked loaf keeps well at room temperature for 3 days or in the fridge for 1 week. For longer storage, freeze the loaf wrapped in plastic for up to 3 months. To reheat, wrap in foil and warm in a 300°F oven for 10 minutes—nothing like fresh bread from the oven.
Why You'll Love This Recipe
- No Yeast Fuss: I swear by the 5-minute soak method—just toss the dried apricots and raisins in warm water with a pinch of sugar while I mix the dough. No waiting around, no extra steps. The fruit plumps up perfectly while the yeast gets to work, and honestly? It’s the little things that make this bread feel like a win.
- Sweet Without Overdoing It: That balance of caramelized apricots and chewy raisins? It’s like a hug for your taste buds. The butter and sugar create this tender crumb, but the fruit keeps it from being too heavy—just enough sweetness to satisfy, not cloy. I’ll be real: my husband steals slices straight from the loaf.
- Breakfast or Snack Star: This bread is my go-to for toast in the morning (slathered with butter, obviously), but it’s also the star of my lunchbox. Pack a slice with a smear of cream cheese or peanut butter, and you’ve got a portable treat that kids actually eat. Between us, I’ve sent this to school bake sales—it disappears fast.
- Leftovers That Last: One loaf stretches my week—slice it, freeze half, and you’ve got a ready-to-toast breakfast for days. The fruit stays juicy even after reheating, and the crust? Still perfect for buttery toasts. Plus, it’s cheaper than buying specialty breads, and the ingredients are pantry staples. Win-win for my wallet and my morning routine.
Step-by-step instructions for apricot raisin bread
Here's the method to create tender, moist apricot raisin bread with perfect sweet swirls throughout.
Activate the Yeast and Prepare the Dough Base
In a small bowl, combine the 0.5 cup whole milk warmed to 110°F with the 0.25 cup granulated sugar and 2.25 tsp active dry yeast. Let it sit for 5-10 minutes until frothy—this indicates the yeast is active and ready to work. You'll see small bubbles forming on the surface and a slightly effervescent texture.
In a separate large bowl, whisk together the 4 cups all-purpose flour, 0.5 tsp salt, 1 tsp ground cinnamon, and 0.25 tsp ground nutmeg. This dry mixture creates the foundation for your bread's structure and flavor. Keep it ready for the next step while you prepare the wet ingredients.
Mix the Wet Ingredients and Combine
To the yeast mixture, add the 0.5 cup unsalted butter (softened but still cool) and 2 whole large eggs at room temperature. Mix until the butter is fully incorporated and the mixture is smooth. The butter should blend in without leaving any lumps, creating a creamy base for your dough.
Gradually pour the wet mixture into the dry ingredients while mixing on low speed with a hand mixer or kneading by hand. Once combined, add the 1 cup dried apricots (chopped into small pieces) and 1 cup raisins. Mix just until these fruit pieces are evenly distributed—overmixing can develop gluten and make the bread dense. The dough will be sticky but manageable at this stage.
Knead the Dough Until Elastic
Turn the dough onto a lightly floured surface and knead for 8-10 minutes until smooth and elastic. You'll know it's ready when it springs back slowly when gently pressed. This step develops the gluten structure that gives your bread its chewy texture and helps it rise properly.
Place the dough in a lightly greased bowl, cover with a damp towel, and let it rise in a warm place for 1-1.5 hours or until doubled in size. The dough should feel light and airy, with visible bubbles forming on the surface. If your kitchen isn't warm enough, place the bowl near a warm oven with the light on to help it rise more quickly.
Shape and Second Rise
Punch down the risen dough to release any air bubbles, then shape it into a loaf pan that's been lightly greased. For extra flavor, sprinkle 2 tbsp granulated sugar (for topping) evenly over the surface. Cover again and let it rise for another 30-45 minutes until it's just above the pan's rim.
Preheat your oven to 350°F while the dough rises. This temperature ensures even baking without burning the exterior before the interior is fully cooked. The second rise is crucial—it gives your bread that perfect light texture and helps the fruit pieces distribute evenly throughout.
Bake to Golden Perfection
Bake the bread for 45-50 minutes until it reaches an internal temperature of 190°F and the top is golden brown. For extra shine and sweetness, brush the top with 1 tbsp honey mixed with 1 tablespoon water after 20 minutes of baking. This creates a beautiful glaze that enhances the bread's flavor and appearance.
Let the bread cool in the pan for 10 minutes before transferring to a wire rack. This resting period allows the moisture to redistribute, preventing a gummy texture. The final result should be a moist, tender loaf with sweet apricot and raisin swirls throughout—perfect for slicing and serving warm with butter or jam.
Pro Tips For Making Apricot Raisin Bread
- Warm the butter first: I learned this the hard way—cold butter in dough makes mixing a nightmare and weakens the gluten. Microwave the unsalted butter in 10-second bursts until it’s soft but not melted, then let it cool just enough to press into the flour. The dough will come together smoother, and your bread will hold its shape better during baking.
- Chop apricots unevenly: Skip the food processor for this—toss those dried apricots into a knife first. Rough, irregular pieces stay juicier and distribute better in the dough. I used to slice them thin, and they’d turn to paste by the end. A quick chop (no smaller than ¼-inch chunks) keeps texture and flavor where they belong.
- Don’t overproof the dough: I was skeptical until I tried it: Let that dough rise until it’s just puffy, not doubled. Apricot raisin bread is dense by nature, and overproofing makes it gummy. Test by poking it gently—if the dimple stays, stop. For a 9x5-inch loaf, 45–60 minutes at room temp (75°F) is plenty.
- Use room-temperature eggs: Cold eggs in warm dough create a weird, sticky mess that fights you every step. Pop those eggs out of the fridge 30 minutes before mixing—just enough to let them soften. The batter will be silky, and the crumb will be lighter. (Yes, even if you’re impatient like me.)
Pro cooking tips for this recipe
Yeast Activation
I can’t stress enough how critical this step is—fresh, active yeast makes all the difference. Warm your 0.5 cup whole milk to 110°F (use a thermometer!) before mixing with sugar and yeast.
If the yeast doesn’t foam within 5-10 minutes, toss it and start fresh. Pro tip: I always test mine by dropping a pinch into warm water—if it bubbles immediately, it’s ready. 🌡️
Butter Temperature
The butter should be softened but still cool—think "room temp but not melted." If it’s too warm, the dough will become sticky and hard to handle. I like to cut it into small cubes and let it sit on the counter for 20-30 minutes before mixing.
This ensures it blends smoothly without melting into the milk. Too cold? The dough won’t come together properly.
Fruit Distribution
Don’t overmix after adding the dried apricots and raisins—just fold them in until evenly distributed. I use a dough scraper to gently press the fruit into the dough without overworking it.
Overmixing develops gluten too much, which can make the bread dense. For even distribution, I divide the fruit into 4 portions and fold each one in separately. 🍑
Kneading Like a Pro
Knead for 8-10 minutes until the dough is smooth and elastic. I use a stand mixer with a dough hook on medium speed for consistency—it’s less tiring than hand-kneading! If the dough sticks to your hands, lightly flour your surface, but don’t over-flour it or the bread will dry out.
The dough should spring back slowly when pressed—this is your cue it’s ready.
Rise Control
For consistent results, I place my dough in a lightly greased bowl, cover it with a damp towel, and let it rise in a warm spot (like near the oven light).
If your kitchen is cold, I’ve even used a proofing box (or a bowl of hot water under the dough) to speed things up. The dough should double in size—if it doesn’t, it might need more time or warmer conditions. 💡
Baking Tricks
Brush the top with honey glaze after 20 minutes of baking for a shiny crust. I also like to rotate the pan halfway through baking for even browning. Use an instant-read thermometer to check the internal temp—190°F is perfect.
If the top browns too fast, tent the bread with foil. The golden crust is worth the patience! 🍞
Nutrition facts
Frequently asked questions
Can I substitute raisins for another dried fruit?
Swap raisins for dried cranberries, chopped dates, or dried mango—just reduce the sugar by 1 tablespoon if using tart fruits like cranberries. For a tropical twist, try dried pineapple or chopped apricots only (skip raisins). The key is to maintain 1 cup total dried fruit for balanced sweetness and texture.
Why did my bread turn out dense instead of light?
Dense bread usually means overmixing the dough or underproofing. Knead only until smooth (8-10 minutes) and avoid developing too much gluten. Also, ensure your yeast is fresh (5-10 minutes activation test) and the dough doubles in size during rising. Cold kitchens slow fermentation—try placing the dough near a warm oven with the light on.
How do I store leftovers to keep them fresh?
Wrap cooled slices in plastic wrap or store in an airtight container at room temperature for 3 days. For longer storage, freeze the whole loaf (up to 3 months) or individual slices (up to 2 months). To reheat, wrap in foil and warm at 300°F for 10 minutes—this restores moisture without drying.
Can I make this bread without eggs?
Yes! Replace the 2 eggs with 2 tablespoons ground flaxseed + 6 tablespoons water (let sit for 5 minutes to thicken) for a vegan version. The texture will be slightly denser, but still delicious. For gluten-free, use a 1:1 GF flour blend and add 1/2 teaspoon xanthan gum to the dry ingredients.
What’s the best way to slice this bread for toast?
Use a serrated knife and slice the loaf 1/2-inch thick for perfect toast. For even slices, chill the bread for 10 minutes first—this firms up the crumb. Toast on medium-low heat until golden, then spread with butter or jam. Pro tip: Brush slices with a little honey before toasting for extra sweetness!