Snacks
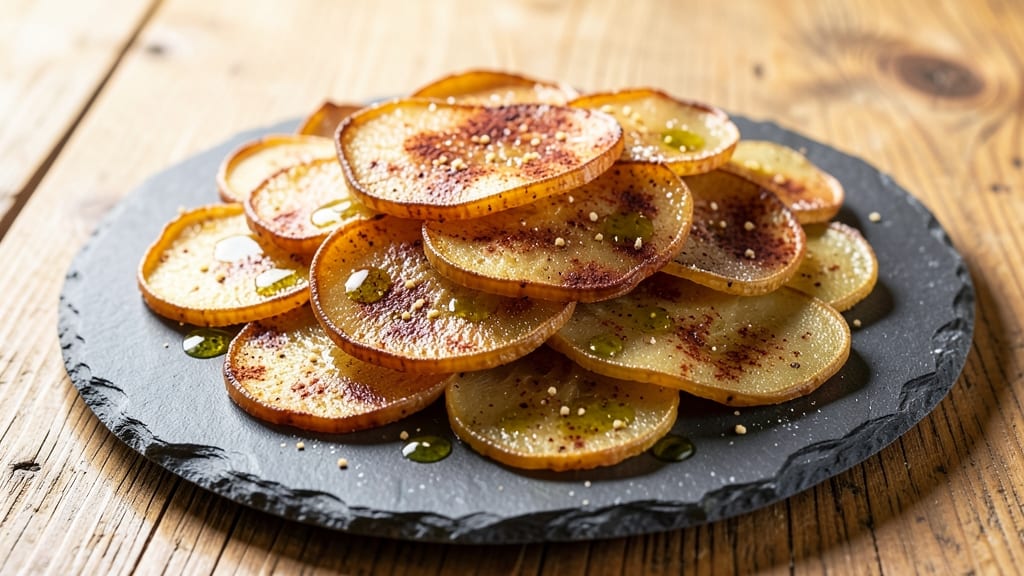
This baked pickle chips recipe transforms simple dill pickles into addictively crispy, vinegar-kissed snacks that disappear faster than store-bought versions. The secret lies in thin, even slices and a precise baking technique that delivers that perfect crunch without turning to rubber.
I perfected this method after years of snack cravings—no more soggy chips or bland aftertaste.
What makes these chips special is their bold flavor profile: tangy, slightly sweet, and with a satisfying snap. You’ll need just 15 minutes of active prep (plus baking time) and three core ingredients: pickles, a pinch of salt, and your choice of seasoning.
The high-heat baking ensures maximum crispiness while preserving that bright pickle tang that sets them apart from potato chips.
By the time they emerge from the oven, you’ll have a batch of golden, shatteringly crisp chips with a vinegar punch that lingers. These aren’t just a snack—they’re a flavor experience, perfect for game day, movie nights, or when you need a tangy crunch fix.
The best part? You can customize them with spices, cheese powder, or herbs to match any craving.
Serve them warm for maximum crunch or let them cool for a sharper contrast. This recipe is your gateway to restaurant-quality chips you can make at home—no fancy equipment required. Let’s get started!
Ingredients for baked pickle chips
Crispy, vinegar-kissed perfection needs just nine ingredients—plus patience for perfect slices.
| Ingredient | Amount | Notes |
|---|---|---|
| Dill Pickles 🥒 | 1 ½ lb | Kosher dill, thinly sliced |
| Extra-Virgin Olive Oil 🫒 | 1 tbsp | Light coating for crispiness |
| Diamond Crystal Kosher Salt 🧂 | 1 tsp | Fine grain, for seasoning |
| Garlic Powder 🧄 | ½ tsp | For subtle depth of flavor |
| Smoked Paprika 🌶️ | ¼ tsp | Adds smoky complexity (optional) |
| Cornstarch 🌾 | 1 tbsp | For ultra-crisp texture |
| Fresh Dill Leaves 🌿 | 1 tbsp | Chopped, for garnish (optional) |
| Baking Sheet 🍳 | 1 whole | Heavy-duty, parchment lined |
| Paper Towels 🧻 | 1 sheet | For drying slices thoroughly |
The pickles are your canvas—Kosher dill delivers that perfect tang, but garlic dill works too. Grab the thickest spears from the jar (skip the thin ones—they won’t hold shape). Trader Joe’s has the best selection of chunky dill pickles, but any jarred kosher dill will do. Pro tip: slice them paper-thin—use a mandoline if you’ve got one, or carefully hand-slice with a sharp knife. The thinner the slice, the crispier the chip. And dry them completely before baking—pat them with paper towels, then let them air-dry for 10 minutes. This is non-negotiable for that shatteringly crisp texture.
No cornstarch? Arrowroot powder works 1:1, but cornstarch gives that signature crunch. Smoked paprika giving you pause? Regular paprika or a pinch of cayenne for heat will work—just taste as you go. Want extra flavor? Toss the dried slices with a mix of garlic powder, onion powder, and a dash of cayenne before baking. The olive oil is key here—lightly coat each slice (about 1/2 tsp per batch), but don’t drown them. And if you’re feeling fancy, sprinkle those fresh dill leaves right after baking—they’ll add a bright, herby finish that cuts through the vinegar tang. Trust me, it’s worth the extra minute.
These chips are best served warm—that’s when the crunch peaks. Store leftovers in an airtight container at room temperature for up to 3 days, but honestly, they won’t last that long. For maximum crispiness, reheat in a 350°F oven for 2-3 minutes—they’ll lose crunch if microwaved. Freezing? Not ideal—they’ll get soggy, but if you must, freeze them unbaked on a tray, then bake straight from frozen at 400°F for 5 minutes. And if you’re planning a game day? Double the batch—they vanish faster than you can say ‘vinegar kick.’
Why You'll Love This Recipe
- I’ll be real: this recipe uses stuff you already have. A jar of pickles, some oil, and spices? You’re golden. And since they bake in 15 minutes, you’re not wasting time or money—just pure, salty satisfaction.
- No-Chop Needed: I swear, I’ve made these with just my hands—no knife, no fuss. Slice the pickles straight from the jar, toss them with olive oil and salt, and let the oven do the work. That’s it. Zero prep, zero stress.
- Umami Bomb: Between the garlic powder’s punch and that smoky paprika kiss, these aren’t just chips—they’re ridiculously good. The crispy edges? Perfection. The tangy crunch? Even better with a cold beer or a charcuterie board.
- Snack Attack Ready: Honestly, these disappear faster than I can say “leftovers.” Keep a batch in the pantry for game day, movie nights, or when you’re craving something salty but not greasy. They’re my go-to for parties because no one can resist them.
Step-by-step instructions for baked pickle chips recipe
Transform tangy dill pickles into addictive, vinegar-kissed chips with this foolproof method.
Prep the Pickles for Maximum Crispiness
Begin by slicing the 1.5 lb dill pickles into ¼-inch thick rounds using a sharp mandoline or chef's knife. The thinner the slices, the crispier the final chips. Arrange the slices on the 1 sheet paper towels in a single layer, overlapping slightly if needed. Pat them dry thoroughly—this is critical for achieving that perfect crunch. Any remaining moisture will steam the chips instead of crisping them.
While the pickles dry, line the 1 whole baking sheet with parchment paper for easy cleanup. Arrange the dried pickle slices in a single layer on the prepared baking sheet, leaving about ½-inch between each slice. This spacing ensures even cooking and prevents soggy spots where slices touch.
Season and Coat for Ultimate Flavor
In a small bowl, combine the 1 tbsp cornstarch, 1 tsp diamond crystal kosher salt, 0.5 tsp garlic powder, and 0.25 tsp smoked paprika. This blend creates the perfect balance of tangy, garlicky, and slightly smoky flavor while ensuring that ultra-crisp texture. Lightly toss the arranged pickle slices with this seasoning mixture, making sure each slice is evenly coated.
Next, drizzle the 1 tbsp extra-virgin olive oil evenly over the seasoned pickles. Use a brush or your fingers to spread the oil lightly across all surfaces. The oil helps create a golden, crispy exterior while preventing the edges from burning during baking. Avoid over-saturating the pickles—just enough to coat them lightly.
Bake to Golden Perfection
Preheat your oven to 425°F for 10 minutes to ensure it reaches the ideal temperature before baking. Once preheated, slide the baking sheet into the oven and bake the pickle chips for 12-15 minutes, or until the edges turn deep golden brown and the centers are still slightly pliable. Watch them closely during the last few minutes to prevent over-browning.
For even crispiness, rotate the baking sheet halfway through the baking time. This ensures that all slices receive equal heat exposure. The chips are done when they sound crisp when tapped together and have a rich, caramelized color. Remove the baking sheet from the oven immediately to prevent them from becoming soggy.
Finish and Serve Immediately
Let the baked pickle chips cool on the baking sheet for 3-5 minutes before transferring them to a serving platter. This brief cooling period allows them to firm up slightly while retaining their crisp texture. While still warm, sprinkle the 1 tbsp chopped fresh dill leaves over the top for a vibrant pop of color and an extra layer of fresh, herbal flavor.
Serve the chips immediately while they're at their crispest. These vinegar-kissed delights pair perfectly with beer, cheese platters, or even as a tangy snack on their own. Store any leftovers in an airtight container at room temperature for up to 2 days, though they're best enjoyed fresh from the oven.
Pro Tips For Making Baked Pickle Chips
- DRY THE SLICES: Pat those pickles thoroughly with paper towels before baking—no wet spots, no soggy chips. I learned this the hard way when my first batch turned out chewy instead of crisp. A quick towel rub makes all the difference.
- USE HIGH HEAT: Crank your oven to 425°F (220°C) and don’t skimp on time—these need 20-25 minutes for a proper crunch. I used to bake them at 375°F and ended up with sad, limp chips. Trust the heat.
- SALT AFTER BAKING: Skip the pre-salting—sprinkle Diamond Crystal kosher salt right after they come out of the oven. The heat will help it stick, and you won’t end up with a salty brine soaking into the chips. (Yes, even if you’re impatient like me.)
- TOSS IN SPICES: Mix the garlic powder and smoked paprika directly into the olive oil before tossing the pickles—it coats them evenly. I used to sprinkle it on top, and half the seasoning just fell off. A little extra effort means way more flavor.
Storing and reheating your baked pickle chips
Room Temp Storage
Store your baked pickle chips in an airtight container at room temperature for up to 3 days. The key is keeping them completely dry—any moisture will turn them soggy. I transfer them to a glass container with a tight-sealing lid (like Pyrex) to maintain crispiness.
Leave a little space at the top since they expand slightly when cooling. 🧂
Reheating for Crunch
If your chips lose their crunch after sitting, revive them in the oven. Spread them on a baking sheet and heat at 350°F for 2-3 minutes—just enough to crisp them up without burning.
Microwaving is a no-go; it’ll make them rubbery. For extra flavor, sprinkle a pinch of smoked paprika before reheating. 🔥
Freezing Unbaked Slices
Want to prep ahead? Freeze your unbaked pickle slices on a parchment-lined tray for 1 hour, then transfer to a freezer bag. Bake straight from frozen at 400°F for 5 minutes—they’ll still turn out crispy!
This trick saves time when you’re craving chips on short notice. Just be sure to dry them thoroughly before freezing. ❄️
Game Day Prep
Double the batch if you’re hosting! These chips disappear fast—especially during football season. I like to arrange them on a wooden board with a side of blue cheese dip for maximum appeal. Keep them warm in a 200°F oven while serving to maintain that perfect crunch. 🏈
Flavor Revival Tips
If your chips taste flat after storage, sprinkle a little lemon zest or extra garlic powder before eating. The acidity brightens the vinegar flavor, making them taste fresh again. For a smoky kick, add a dash of cayenne—it’s like a flavor reset! 🌶️
Leftovers Hack
Turn stale chips into pickle chip dip mix! Crush them in a food processor, then blend with shredded cheese and sour cream for a tangy, crunchy dip. This is my go-to way to use up leftovers without wasting a bite. 💡
Nutrition facts
Frequently asked questions
Can I use any type of pickle for these chips?
Kosher dill pickles work best for their thick spears and balanced tang. Garlic dill or bread-and-butter pickles will also work, but avoid sweet or breaded varieties—they won’t hold up well during baking. For extra flavor, try using pickles with dill spears still attached (like Trader Joe’s chunky dill).
Why did my chips turn out soggy instead of crispy?
Moisture is the enemy! Skip drying the slices thoroughly with paper towels, then let them air-dry for 10 minutes before baking. Also, avoid overcrowding on the baking sheet—leave ½-inch between slices. If your oven runs hot, reduce the temperature to 400°F for more even cooking.
What’s the best way to season these chips beyond the basic recipe?
Get creative! Try Cajun seasoning for heat, everything bagel seasoning for savory crunch, or parmesan cheese powder for umami depth. For a sweet-savory twist, sprinkle with a pinch of brown sugar before baking. Just remember: start with the base recipe, then layer flavors.
Can I make these chips in an air fryer?
Arrange dried pickle slices in a single layer in your air fryer basket, leaving space between them. Cook at 400°F for 8-10 minutes, shaking the basket halfway through. The air fryer gives them a slightly different texture—more like potato chips—but still deliciously crispy. Watch closely to avoid burning.
How do I know when the chips are fully cooked?
Look for deep golden brown edges and a slightly pliable center—like a perfect chip should be. Tap two slices together: if they make a crisp sound, they’re done! Overbaking by even 1 minute** can turn them bitter. Remove them immediately when they reach this stage.