
Desserts
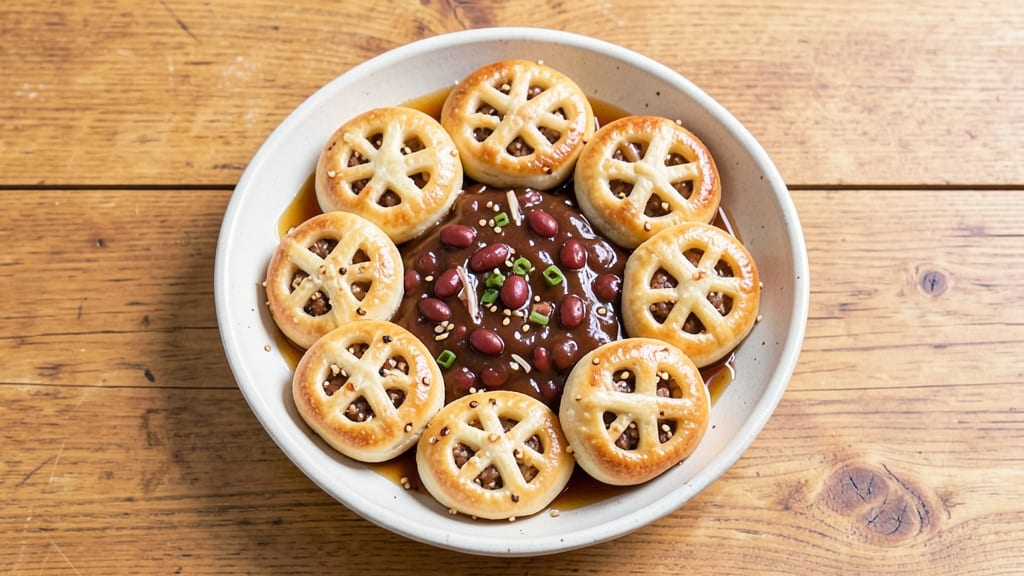
This bean jam bun recipe delivers the perfect harmony of flaky, golden layers and sweet, fragrant red bean filling—just like the ones from your favorite bakery.
The secret lies in a precise dough technique that creates those signature crispy edges and tender centers, paired with a homemade jam that's smoother and more flavorful than store-bought versions.
I've perfected this recipe over years of testing, ensuring every bite is a balance of texture and sweetness that feels both nostalgic and refined.
What makes these buns special is their versatility—they can be steamed, baked, or even pan-fried, giving you control over the texture you prefer.
The dough requires a bit of patience (resting time is crucial), but the result is worth it: light, airy layers that give way to the velvety red bean filling. This vegetarian-friendly recipe stays true to traditional Chinese dou sha bao while offering modern shortcuts for home cooks.
The filling itself is simple but transformative, blending sweet adzuki beans with just the right amount of sugar and lard for authenticity.
By the time you finish baking, you'll have a tray of flaky buns with crackly tops and soft interiors, each one filled with that signature smooth red bean jam. The aroma alone—warm dough mingling with sweet beans—will have everyone gathering around your kitchen.
These buns are perfect for breakfast, afternoon tea, or as a sweet treat with a cup of jasmine tea. The contrast of the crispy exterior and creamy filling makes every bite irresistible.
Whether you're making them for a family gathering or a quiet afternoon indulgence, this recipe delivers professional-quality results at home. The key is precision in the dough folding and steaming process, which we'll cover step by step.
Let's create buns that taste like a trip to your favorite Asian bakery—without the wait.
Ingredients for bean jam bun
Flaky layers and sweet filling—just 12 ingredients transform your kitchen into an Asian bakery.
| Ingredient | Amount | Notes |
|---|---|---|
| All-Purpose Flour 🌾 | 4 cups | Plus 2 tbsp for dusting |
| Unsalted Butter 🧈 | ½ cup | Cold, cubed for dough |
| Granulated Sugar 🍚 | ¼ cup | For dough sweetness |
| Instant Yeast 🍞 | 2 ½ tsp | Or active dry (proof first) |
| Warm Water 💧 | ¾ cup | 110°F for yeast activation |
| Salt 🧂 | ½ tsp | Kosher or fine sea salt |
| Red Bean Paste 🌱 | 1 ½ cups | Store-bought or homemade |
| Granulated Sugar 🍚 | ½ cup | For filling sweetness |
| Vegetable Oil 🫒 | 1 tbsp | For pan-frying buns |
| Sesame Seeds 🌻 | 1 tbsp | Toasted for garnish |
| Cornstarch 🌾 | 1 tbsp | For dusting buns |
| Vegetable Shortening 🧈 | 2 tbsp | For extra flakiness |
The dough is where magic happens. King Arthur flour or Gold Medal gives the best texture—avoid bread flour, it's too dense. Butter matters here: Plugrá or Land O'Lakes unsalted work perfectly, but don't use margarine. The yeast should be fresh—if it's over 6 months old, proof it first. For the red bean paste, H Mart or Asian grocery stores have the best quality (smooth and sweet). If making your own, cook adzuki beans with sugar until jammy, then blend until silky. The key is patience—don't rush the dough resting time, or those flaky layers won't develop. (Trust me, the first time I skipped it, I cried.)
No red bean paste? Sweetened mashed potatoes or apple butter work in a pinch—just add an extra pinch of salt. Running out of sesame seeds? Toasted sunflower seeds give a similar crunch. The dough feels stiff at first, but don't overwork it—just fold gently. For extra flakiness, freeze the dough for 15 minutes before shaping. The vegetable oil should be neutral like Avocado Brand—flavored oils can overpower the delicate filling. And if you're pan-frying, use a nonstick skillet with a lid to trap steam and create those signature crackly tops.
Dough keeps 2 days wrapped in plastic in the fridge, or freeze for 3 months. The filled buns should be steamed or baked fresh—they lose their flakiness if reheated. For make-ahead filling, store the bean paste in a jar with a thin layer of oil on top. It'll keep 1 month in the fridge. I like to portion the dough into 12 equal balls before filling—saves time later. And if you're serving these at room temperature, brush the tops with a little melted butter for extra shine. (They look fancy, I promise.)
Why You'll Love This Recipe
- No-Knead Magic: I swear by this dough—just mix flour, butter, and yeast with warm water, let it rise while you clean up, and boom. No stand mixer, no fuss, just pillowy buns that taste like you slaved over them.
- Sweet-Savory Balance: That caramelized sugar in the bean jam? It’s the star—rich, slightly tangy, and the perfect contrast to the soft, buttery dough. Honestly, the first bite makes me forget it’s a bun.
- Breakfast or Snack: These buns are my go-to for lazy mornings or after-school treats. Toast one for a quick breakfast or pack a few for lunch—no reheating needed, just pure satisfaction.
- Budget-Friendly Staples: Flour, butter, sugar, yeast—these are pantry basics that stretch far. I make a double batch, freeze extras, and still have change left for coffee. (Yes, even on a Tuesday night.)
Step-by-step instructions for bean jam buns
Here's how to create those irresistible flaky layers and sweet filling combinations.
Mix the Dough for Maximum Flakiness
In a large mixing bowl, combine the 4 cups all-purpose flour, 0.5 tsp salt, and 2.5 tsp instant yeast. Make a well in the center and add the 0.5 cup cold cubed unsalted butter and 0.25 cup granulated sugar. Using your fingertips, work the butter into the flour until it resembles coarse crumbs with pea-sized butter pieces remaining.
In a separate small bowl, whisk together the 0.75 cup warm water (about 110°F). Gradually pour the water into the flour mixture while stirring with a wooden spoon. The dough will start to come together but should still feel slightly shaggy. This texture is perfect for creating those signature flaky layers.
Turn the dough out onto a lightly floured surface and gently knead just until smooth and elastic—about 5-6 minutes. Avoid overworking the dough, as this can develop too much gluten and make the buns tough. Shape into a rectangle about 12x8 inches, wrap tightly in plastic wrap, and refrigerate for at least 1 hour or up to 24 hours. This resting time allows the gluten to relax and the butter to solidify, ensuring those beautiful flaky layers when baked.
Prepare the Red Bean Filling
In a medium bowl, combine the 1.5 cups red bean paste with the 0.5 cup granulated sugar. Mix well until the sugar is fully incorporated and the filling is smooth. The filling should be thick but spreadable—if it's too stiff, add 1-2 teaspoons of warm water to loosen it. This sweet, smooth filling is the heart of your bean jam buns, so take your time to get the consistency just right.
Set the filling aside while you prepare the dough for rolling. The filling should be at room temperature for easier handling and spreading. If it's too cold, let it sit at room temperature for 10-15 minutes before using. This step ensures the filling spreads evenly and doesn't tear the dough when you add it later.
Roll and Fill the Dough
Remove the chilled dough from the refrigerator and place it on a lightly floured surface. Using a rolling pin, roll the dough into a 12x16-inch rectangle, about 1/8-inch thick. Dust the rolling pin and surface with 2 tbsp all-purpose flour as needed to prevent sticking. The goal is an even thickness—this ensures consistent baking and a uniform rise.
Spread the red bean filling evenly over the rolled-out dough, leaving a 1-inch border around the edges. Be generous but careful not to overfill, as the filling will expand slightly during baking. Once spread, fold the dough over the filling to create a sealed packet. Use a sharp knife or bench scraper to cut the dough into 12 equal rectangles. This step is where the magic happens—each bun will have a perfect pocket of sweet filling encased in flaky layers.
Shape and Proof the Buns
Transfer each rectangle to a lightly greased baking sheet, spacing them about 1 inch apart. Gently press down on each bun to flatten slightly—this helps them rise evenly and prevents them from spreading too much during baking. Lightly brush the tops with 1 tbsp vegetable oil and sprinkle with 1 tbsp toasted sesame seeds for added texture and flavor.
Cover the baking sheet loosely with a clean kitchen towel and let the buns proof in a warm place for 30-45 minutes, or until they've risen by about 50%. You'll know they're ready when they look slightly puffy and have small bubbles forming on the surface. Avoid overproofing, as this can cause the buns to collapse or rise unevenly. The proofing process is critical—it develops the light, airy texture that makes these buns so irresistible.
Bake to Golden Perfection
Preheat your oven to 375°F. Once the buns have proofed, bake them for 15-18 minutes, or until they're golden brown and sound hollow when tapped on the bottom. The edges should be crisp, and the tops should have a slightly caramelized sheen. If the sesame seeds aren't golden, you can broil the buns for 1-2 minutes at the end for extra color—just watch them closely to avoid burning.
Remove the buns from the oven and let them cool on the baking sheet for 5 minutes before transferring them to a wire rack. This resting time allows the filling to set slightly and the layers to firm up. Serve warm for the best experience—each bite should deliver that perfect combination of flaky, buttery layers and sweet, smooth red bean filling. Enjoy them fresh out of the oven while they're still warm and gooey!
Pro Tips For Making Bean Jam Bun
- Chill the Dough: Bean jam buns need a proper cold rest—at least 2 hours in the fridge, ideally overnight. I learned this the hard way when my buns spread like pancakes instead of rising neatly. Wrap them tightly in plastic and skip the freezer unless you’re prepping ahead; condensation messes with the texture.
- Cut Butter Cold: Use butter straight from the fridge (or even frozen) when making the dough—it should be firm but not rock-hard. Warm butter melts too fast, leading to dense, greasy buns. Cut it into small cubes and work quickly; the dough will warm up as you mix, but start with a fighting chance.
- Skip the Overproofing: Your dough is ready when it’s just puffy and springs back slowly when poked—about 1.5 to 2 hours total. Overproofing (yes, even with instant yeast) turns your buns gummy and flavorless. Set a timer and keep an eye on it; natural light makes it easier to spot when it’s done.
- Steam with Precision: Use a tight-fitting lid and a splash of hot water in the steamer—about ¼ cup—right as the buns go in. I used to skip this, and my buns would dry out before steaming properly. Keep the heat at medium-high and steam for 12–15 minutes; any less, and they’ll be undercooked inside.
Dietary considerations for this dish
Vegetarian-Friendly Base
The beauty of bean jam buns lies in their naturally vegetarian-friendly foundation. The dough relies on butter, flour, sugar, and yeast—all plant-based staples—while the filling uses red bean paste (made from adzuki beans) and sugar.
This makes them perfect for vegans if you swap the butter for vegan margarine like Miyoko's or Earth Balance. The recipe avoids dairy entirely, so it's also safe for lactose-intolerant diets. 🌱
Gluten-Free Adaptations
For gluten-free bakers, replace the all-purpose flour with a 1:1 gluten-free flour blend like King Arthur Measure for Measure. Add ½ tsp xanthan gum to help bind the dough, and reduce the water by 2 tbsp since gluten-free flours absorb less.
The texture will be slightly denser but still delicious. For the filling, no changes are needed—it remains naturally gluten-free.
Nut-Free Considerations
Traditional bean jam buns often contain sesame seeds for garnish, but the recipe is easily nut-free. Simply omit the sesame seeds or substitute with toasted sunflower seeds or crushed potato chips for a similar crunch.
Always check your red bean paste label—some brands may process in facilities with nuts, so opt for certified nut-free versions if needed.
Lower-Sugar Options
If you're watching sugar intake, reduce the granulated sugar in the dough by 2 tbsp and in the filling by ¼ cup. Use monk fruit sweetener or erythritol (like Lakanto) in a 1:1 ratio for a lower-glycemic alternative.
The filling will still taste sweet but with fewer calories. Pair with a sprinkle of cinnamon to enhance natural sweetness.
Allergen Safety Tips
For soy allergies, ensure your red bean paste is soy-free (some brands use soy lecithin). Check butter labels for milk traces if needed. Always use separate utensils and surfaces when handling allergens.
I recommend keeping a small bowl of cornstarch nearby to dust work surfaces between steps—it prevents cross-contamination better than flour.
Protein Boost Modifications
Add 1 scoop vanilla protein powder (like Orgain) to the dough for extra protein without altering flavor. For the filling, stir in 2 tbsp tahini or almond butter (if nut-free isn't required) to increase protein and healthy fats.
These tweaks make the buns a more substantial snack or breakfast option.
Nutrition facts
Frequently asked questions
Can I make these buns without a rolling pin?
For a 12x16-inch rectangle, use a glass baking dish or even a sturdy wine bottle wrapped in plastic wrap. Press down firmly with your palms after each pass to create even thickness. The key is patience—work in small sections to avoid stretching the dough unevenly. A 1/8-inch thickness is ideal for consistent baking.
How do I know when the dough is properly proofed?
Look for 50% rise with small bubbles forming on the surface. Gently press your finger into the dough—if it springs back slowly (not immediately), it's ready. Overproofing happens when buns collapse or spread too much. For best results, proof in a warm (80°F) spot like an oven with the light on or a proofing box.
Can I steam these buns instead of baking?
Yes! After shaping, place buns in a steamer basket lined with parchment paper. Steam over boiling water for 12-15 minutes until golden. The steam creates a softer texture with a slightly chewier exterior. For extra flakiness, brush with melted butter after steaming. Traditional Chinese dou sha bao are often steamed for this exact effect.
What if my filling leaks during baking?
This usually happens from overfilling or underproofed dough. For next time, use 1.2 cups filling max per 12 buns and ensure dough rises 50%. If it leaks during baking, brush the tops with egg wash (1 egg + 1 tbsp water) before baking to seal the layers. The filling will still taste delicious—just less dramatic presentation. Chill the dough 15 minutes before filling to prevent spreading.
How should I store leftover buns?
Cool completely, then store in an airtight container at room temperature for 2 days. For longer storage, freeze unfilled dough balls and fill fresh after thawing. Reheat in a 350°F oven for 8-10 minutes or steam for 5 minutes. Microwaving makes them soggy—avoid this method. The filling stays fresh 1 week refrigerated under oil.