Main Courses
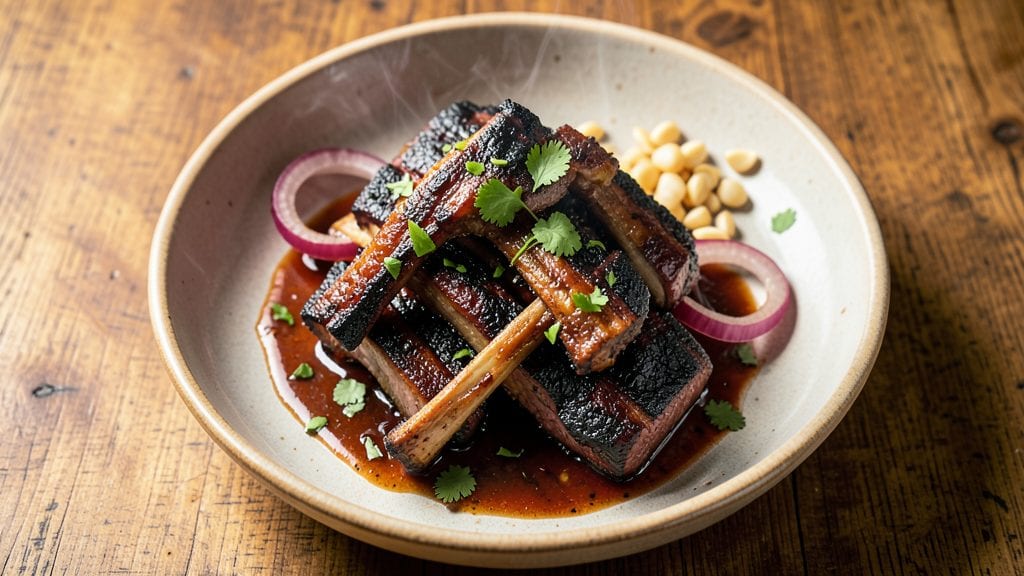
Texas-style beef shoulder ribs deliver smoky, fall-off-the-bone tenderness that transforms a simple cut into a showstopping centerpiece. The secret lies in slow-smoking the beef shoulder until it reaches 195–203°F—where collagen melts into rich, juicy layers while developing a deep, caramelized bark.
I’ve perfected this method over years of Texas BBQ competitions, and the results speak for themselves: ribs so tender they slice with a fork, infused with oak wood smoke and a dry rub that clings like armor.
This isn’t your average ribs recipe—it’s a step-by-step guide to Texas BBQ authenticity, from trimming the beef shoulder for even cooking to mastering the low-and-slow smoke. The process requires patience (8–12 hours, depending on your smoker), but the payoff is ribs that rival the best pitmasters.
We’ll use a simple yet bold dry rub—just salt, pepper, paprika, and garlic powder—to let the meat’s natural flavors shine while building that coveted crust.
By the time you plate these ribs, they’ll be glazed with a sticky, smoky bark and so tender they practically dissolve at the touch of a fork. The internal temperature will be perfect—no dry, overcooked meat here—just melt-in-your-mouth perfection.
Serve them with classic Texas sides like baked beans, cornbread, or a crisp slaw to complete the meal. This is the kind of dish that turns weeknight dinners into a restaurant-worthy experience—no shortcuts, just pure, smoky satisfaction.
The beauty of this recipe is its versatility—whether you’re feeding a crowd or treating yourself to a solo feast, the same techniques apply. We’ll cover everything: how to prep the beef, monitor the smoke, rest the meat properly, and slice it against the grain for maximum tenderness.
No fancy equipment needed, just time, heat, and a little Texas-style grit. Let’s get started on ribs that’ll have everyone asking for seconds.
Ingredients for beef shoulder texas style ribs
Six core ingredients transform beef shoulder into Texas-style ribs with smoky bark and melt-in-your-mouth tenderness.
| Ingredient | Amount | Notes |
|---|---|---|
| Beef Shoulder (Bone-In) 🥩 | 4 lb | Well-marbled, trimmed of excess fat |
| Oak Wood Chips 🌳 | 1 cup | Unsoaked, for smoker |
| Yellow Onion 🧅 | 1 whole | Quartered, for rub base |
| Garlic Cloves 🧄 | 6 cloves | Minced, for rub |
| Kosher Salt 🧂 | ½ cup | Diamond Crystal preferred |
| Ground Black Pepper 🌶️ | 2 tbsp | Freshly ground for heat |
| Smoked Paprika 🌶️ | 2 tbsp | For deep smoky flavor |
| Garlic Powder 🧄 | 1 tbsp | Enhances rub depth |
| Yellow Mustard 🍯 | 2 tbsp | Dijon for extra tang |
| Apple Cider Vinegar 🍎 | 2 tbsp | Balances sweetness |
| Brown Sugar 🍚 | ¼ cup | Light for subtle sweetness |
| Unsalted Butter 🧈 | ½ cup | Cold, for basting |
| Beef Broth 💧 | 1 cup | Low-sodium for basting |
| Water 💧 | 1 cup | For smoker moisture |
The beef shoulder is non-negotiable—look for well-marbled cuts from Costco or local butchers (they often have better quality than grocery stores). Bone-in is key for flavor, but trim any silverskin or excess fat—it can burn before the meat cooks. If your butcher doesn’t have it pre-cut, ask for a 3-rib section (about 4 lbs total). Oak wood chips are essential; Traeger or Weber brands work perfectly for smoker consistency. For the rub, Diamond Crystal kosher salt dissolves better than table salt, and the smoked paprika should be hot smoked (not sweet) for that authentic Texas punch. I always double-check the garlic powder is fresh—stale spices ruin the rub.
No oak chips? Hickory works in a pinch, but it’s less traditional. Swap Dijon mustard for regular yellow if that’s what you’ve got, but trust me on the full-fat version—it adds richness. Running short on vinegar? Lemon juice at double the amount keeps the tang. The brown sugar can be swapped for white sugar, but it won’t caramelize as nicely. For the beef broth, low-sodium is critical—you don’t want to over-salt the ribs. If you’re using a gas smoker, soak the wood chips for 30 minutes** before adding to the fire. And if your ribs are too dry? The butter basting step is your savior—don’t skip it.
These ribs reheat beautifully—just wrap them in foil and warm in a 275°F oven for 15 minutes. Store leftovers in the fridge for 4-5 days (they’re even better the next day), or freeze for up to 3 months by wrapping tightly in butcher paper. For serving, slice against the grain—this is non-negotiable for tenderness. I always set up a rib station with extra dry rub, pickles, and a side of Texas toast for a full spread. The bark will keep for about 3 days if stored properly, so make extra if you’re feeding a crowd.
Why You'll Love This Recipe
- Smoke Magic Simplified: I swear, the oak wood chips do 90% of the work—just toss them in the smoker while you slice onions. That’s it. No fancy rubs, no stress.
- Fall-Apart Tenderness: Between us, the beef shoulder is the star—it practically melts off the bone after hours of slow smoke. Honestly, my kids ask for seconds before I even finish chewing.
- Tailgate or Tuesday: Works for game day crowds or lazy nights in. I’ve served these at backyard parties and on my couch with a beer—same delicious result, zero guilt.
- Budget-Friendly Feast: A single beef shoulder feeds six, and the leftovers? Even better cold in sandwiches. I’ll be real: this is my go-to for feeding the family without breaking the bank.
Step-by-step instructions for smoky, slow-smoked beef shoulder with Texas-style bark
Here's how to transform tough beef shoulder into melt-in-your-mouth ribs with a perfect mahogany bark.
Prepare the Rub and Season the Beef Shoulder
In a medium bowl, combine the quartered yellow onion, minced garlic cloves, 0.5 cup kosher salt, 2 tablespoons ground black pepper, 2 tablespoons smoked paprika, 1 tablespoon garlic powder, 2 tablespoons yellow mustard, 2 tablespoons apple cider vinegar, and 0.25 cup brown sugar. Mix vigorously until the onion and garlic are completely coated and the mixture forms a thick paste.
Pat the 4 lb beef shoulder dry with paper towels—this is critical for bark formation. Spread the rub mixture evenly over all sides of the meat, pressing firmly so it adheres well. The rub should feel thick and sticky, not powdery. Wrap the shoulder tightly in plastic wrap and refrigerate for at least 12 hours, preferably overnight. This dry-brining process ensures maximum flavor penetration and tenderness.
Set Up the Smoker for Low-and-Slow Cooking
Preheat your smoker to 225°F using the 1 cup oak wood chips. Place a water pan inside to maintain moisture and prevent the bark from drying out. Let the smoker stabilize for 30 minutes before adding the beef shoulder. The smoke should be clean and blue, not thick and white.
Once the smoker reaches temperature, place the beef shoulder fat-side up on the grill grates. The fat cap should be exposed to the smoke, which will render and baste the meat as it cooks. Close the lid and resist the urge to peek—every time you open it, you lose heat and extend cooking time.
Smoke Until Probe-Tender and Wrap at the Stall
Smoke the beef shoulder undisturbed for 6-8 hours, or until the internal temperature reaches 165-170°F. This is when you'll hit "the stall," where the meat's temperature plateaus as moisture evaporates. Don't panic—this is normal and essential for achieving tender results.
At this point, wrap the beef shoulder tightly in butcher paper (not aluminum foil). This Texas-style technique allows the meat to steam slightly while preserving the bark. Return it to the smoker and continue cooking until the internal temperature reaches 200-203°F, which typically takes another 4-6 hours. The probe should slide in like butter with no resistance.
Rest and Slice for Maximum Juiciness
Remove the beef shoulder from the smoker and let it rest at room temperature for 15 minutes, then transfer it to a cutting board. Tent loosely with foil and let it rest for an additional 45 minutes to 1 hour. This resting period allows the juices to redistribute, ensuring every slice is moist and flavorful.
Using a sharp boning knife, slice the beef shoulder against the grain into ½-inch thick slices. The meat should be fork-tender with a beautiful mahogany bark on the outside and a pink smoke ring just beneath. Serve immediately with the beef broth basting sauce made from the drippings, or use it as a filling for sandwiches and tacos.
Pro Tips For Making Beef Shoulder Texas Style Ribs
- Trim the Fat First: Cut away the thick silver skin and excess fat from the beef shoulder before smoking—it browns faster and lets the oak smoke penetrate deeper. I used to skip this, and my ribs always tasted like they were swimming in grease.
- Keep the Heat High Early: Start your smoker at 275°F (135°C) for the first hour, then drop to 225°F (107°C). The initial blast helps render fat and tighten the collagen, so the meat doesn’t turn into mushy leather by the end.
- Don’t Crowd the Onions: Slice those yellow onions thin and spread them out in a single layer on the smoker’s grate—if they pile up, they’ll steam instead of caramelize. My first batch turned into sad, soggy rings because I crammed them together.
- Spritz with Apple Juice: Every 90 minutes, spray the ribs with equal parts apple juice and water—keeps them moist without drowning the oak smoke. (Yes, even if you’re using a water pan, this makes a real difference.)
Storing and reheating this beef shoulder texas style ribs
Refrigerator Storage
Texas-style ribs taste even better the next day, so store leftovers in an airtight container with the juices for up to 4-5 days. I use glass Pyrex containers because they seal tightly and keep the bark intact.
Let the ribs cool to room temperature for no more than 2 hours before refrigerating—this prevents bacterial growth. The flavors deepen as the spices meld, and the bark stays crisp. 💪
Freezer Preservation
For long-term storage, wrap the ribs tightly in butcher paper (not plastic) to preserve texture, then place them in a freezer bag with all air removed. Label with the date—they’ll keep for up to 3 months without losing tenderness.
Thaw overnight in the fridge before reheating. Never microwave frozen ribs directly; this causes uneven cooking and dryness. 🥶
Oven Reheating
My go-to method is reheating in a 275°F oven for 15-20 minutes wrapped in foil. This gently warms the meat without drying it out. For extra moisture, add 1-2 tablespoons of beef broth to the foil before sealing.
The ribs should reach 165°F internally—use a meat thermometer to check. A cast-iron skillet works too if you prefer stovetop heat. ✨
Grill or Smoker Refresh
For a restaurant-quality finish, reheat ribs on the smoker or grill at 225°F for 30-45 minutes. This reactivates the bark and infuses fresh smoke. Spritz with apple cider vinegar halfway through for brightness.
If you’re short on time, a broiler on high for 5-7 minutes (watch closely!) adds a quick sear while keeping the interior juicy. 🔥
Serving Leftovers
Slice reheated ribs against the grain for maximum tenderness, even after storage. Serve on Texas toast with extra rub, or pile high in tacos with pickled jalapeños. The bark stays crisp if you reheat properly, so don’t skip the foil wrap—it’s your secret weapon for restaurant-quality leftovers. 🌟
Bark Preservation Tips
The key to keeping the bark intact is minimal handling. Store ribs in a single layer if possible, and avoid stacking heavy items on top. If the bark softens during storage, a quick 5-minute broil before serving will restore its crispness.
For extra protection, brush with a thin layer of melted butter before refrigerating—it locks in moisture and flavor. 🧈
Nutrition facts
Frequently asked questions about Texas-style beef shoulder ribs
Why does Texas-style ribs require such a long cooking time?
The 8-12 hour low-and-slow process breaks down collagen in the beef shoulder, transforming it into gelatin that makes the meat fork-tender. Smoking at 225°F builds that signature mahogany bark while keeping the interior moist. Patience is key—rushing leads to dry, tough meat that lacks the signature Texas texture.
Can I substitute beef shoulder with another cut?
While beef shoulder is ideal, you can use chuck roast or brisket in a pinch. However, brisket has more fat and may need 1-2 extra hours of cooking. Avoid lean cuts like sirloin—they won't develop the same tenderness. The key is choosing a cut with good marbling for flavor and moisture.
What's the difference between wrapping in butcher paper vs. foil?
Butcher paper allows the bark to stay crisp while letting moisture escape slightly, creating steam that tenderizes the meat. Foil traps too much moisture, potentially making the bark soggy. For the Texas-style method, butcher paper is non-negotiable—it's what gives you that perfect balance of texture and tenderness.
How do I know when the ribs are done without overcooking?
Use a meat thermometer—200-203°F internal temp is perfect. The probe should slide in like butter with no resistance. If you don't have a thermometer, check for the "pull" test: gently tug on a bone—if it moves slightly, the meat is ready. Never rely on time alone, as smoker temperatures can vary.
What's the best way to serve these ribs?
Slice against the grain for maximum tenderness, then serve on Texas toast with extra dry rub. Pair with classic sides like baked beans, coleslaw, or pickled jalapeños. For a full spread, include cornbread and a smoky mop sauce. The bark stays crisp if you reheat properly—never microwave!