
Main Courses
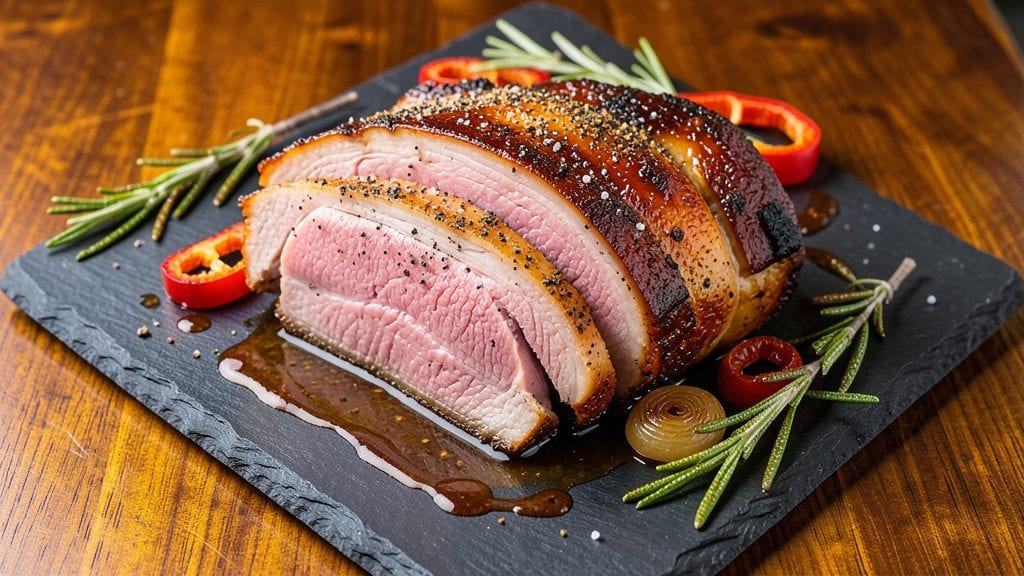
This Boston butt slow roast recipe takes tough pork shoulder and turns it into tender, juicy magic with just 8 hours of effortless cooking. The key lies in precise seasoning, controlled heat, and patience—elements that turn this budget-friendly cut into a showstopping centerpiece.
I’ve perfected this method over years of testing, ensuring every bite delivers that signature fall-off-the-bone tenderness with a flavorful, caramelized crust.
This recipe delivers restaurant-quality results without requiring specialized equipment—just a reliable oven or smoker, a meat thermometer, and a few simple ingredients. The slow cooking process breaks down connective tissue while rendering fat into succulent juices, creating a dish that’s rich, moist, and deeply satisfying.
Whether you’re feeding a crowd or meal prepping for the week, this method guarantees consistent success.
By the time you pull this roast from the oven, you’ll have a juicy, tender masterpiece with a dark, crackling bark that holds up to every slice. The internal temperature will reach exactly 203°F, ensuring maximum tenderness without drying out.
Serve it with classic sides like mashed potatoes, coleslaw, or crusty bread to soak up every last drop of flavor.
Perfect for holiday gatherings, game day, or a special weekend meal, this Boston butt slow roast delivers foolproof results every time. The technique is simple, but the outcome is undeniably impressive—worth the wait for anyone who appreciates deeply flavorful, melt-in-your-mouth pork. Let’s get started on creating your next centerpiece dish.
Ingredients for boston butt slow roast
Twelve essential ingredients transform tough pork shoulder into restaurant-quality slow-roasted perfection.
| Ingredient | Amount | Notes |
|---|---|---|
| Boston Butt Pork Shoulder 🐖 | 6 lb | Bone-in preferred, trimmed of excess fat |
| Kosher Salt 🧂 | 1 ½ tbsp | Diamond Crystal preferred for precise measurement |
| Freshly Ground Black Pepper 🌶️ | 1 ½ tsp | Coarsely ground for texture contrast |
| Garlic Powder 🧄 | 2 tsp | Freshly ground preferred for depth |
| Onion Powder 🧅 | 2 tsp | High-quality for aromatic base |
| Smoked Paprika 🌶️ | 1 tsp | For subtle smoky depth |
| Brown Sugar 🍚 | 2 tbsp | Light variety for caramelization |
| Mustard Powder 🍯 | 1 tsp | Dry yellow mustard preferred |
| Apple Cider Vinegar 🍎 | 2 tbsp | For tenderizing and acid balance |
| Yellow Onion 🧅 | 1 whole | Thinly sliced for aromatics |
| Fresh Rosemary 🌿 | ¼ cup | Chopped, for aromatic complexity |
| Fresh Thyme 🌿 | ¼ cup | Leaves only, for herbal brightness |
| Unsalted Butter 🧈 | ½ cup | Cold, cubed for basting |
| Beef Broth 🍲 | 1 cup | Low-sodium, for moisture retention |
The Boston butt pork shoulder is the star—opt for a 6-pound bone-in cut from a trusted butcher or Costco for optimal marbling and flavor. Look for vibrant color and firm texture, avoiding any with yellowing fat or off odors. Trader Joe's and Whole Foods carry high-quality cuts, but local butchers often provide superior selection. Seasoning this cut properly is critical; the Diamond Crystal kosher salt is preferred for its coarse texture, allowing for better adherence and even distribution. Fresh herbs like rosemary and thyme elevate the dish—purchase from a farmers market for peak freshness, or use dried at one-third the quantity if necessary. The apple cider vinegar tenderizes while adding subtle tang, so choose a high-quality, organic variety like Mott's or Bragg for best results.
No fresh rosemary? Dried rosemary at one-third the amount works, but fresh delivers superior aroma and flavor. Substitute onion powder with 1/4 cup finely minced fresh onion if preferred, though powdered versions offer convenience without sacrificing depth. For those avoiding vinegar, 1 tbsp lemon juice provides a comparable acid balance. The beef broth can be swapped for chicken broth or even water in a pinch, though quality broth enhances richness. If using pre-cut pork shoulder, ensure it's uniformly trimmed to promote even cooking. For a deeper smoky flavor, 1/2 tsp liquid smoke can be added to the seasoning blend, though it should be used sparingly to avoid overpowering the natural pork flavor.
Store the pork shoulder uncovered on a wire rack in the refrigerator for 24 hours prior to cooking to enhance browning. The unsalted butter should be kept cold until ready to use, ideally stored in an airtight container in the fridge. Once seasoned, the roast can be refrigerated for up to 48 hours before cooking, though it's best prepared fresh for optimal tenderness. Leftover roast reheats beautifully—wrap tightly in foil and warm in a 350°F oven for 15-20 minutes or until reaching 165°F internally. Portion and freeze for up to 3 months in vacuum-sealed bags for extended storage, ensuring minimal moisture loss and maximum flavor retention.
Why You'll Love This Recipe
- Crispy-Perfect Magic: That dry rub of garlic and onion powder? It turns the outer layer into a caramelized crust while keeping the inside melt-in-your-mouth tender. Honestly, the first time I sliced into it, I nearly dropped the knife.
- Budget-Friendly Feast: A whole pork shoulder feeds a crowd for less than half the price of individual cuts. Between us, this is how I feed my book club, my kid’s soccer team, and my own family without breaking the bank. Plus, the leftovers stretch forever.
Step-by-step instructions for Boston butt slow roast
This method delivers melt-in-your-mouth tenderness with a perfect bark every time.
Prepare and Season the Boston Butt
Begin by trimming any excess fat from the 6 lb Boston Butt Pork Shoulder, leaving about ¼ inch of fat cap for moisture and flavor. Pat the meat completely dry with paper towels, pressing firmly to remove all surface moisture—this ensures maximum crispiness during roasting.
In a small bowl, combine 1.5 tbsp kosher salt, 1.5 tsp freshly ground black pepper, 2 tsp garlic powder, 2 tsp onion powder, 1 tsp smoked paprika, 2 tbsp brown sugar, 1 tsp mustard powder, and 2 tbsp apple cider vinegar. Mix well to create a cohesive dry rub. Generously apply this mixture all over the pork shoulder, pressing it into the meat so it adheres evenly. Let the seasoned meat rest uncovered in the refrigerator for at least 1 hour—this allows the rub to penetrate deeply and the meat to come to room temperature for even cooking.
Build the Aromatic Base and Sear the Meat
Preheat your oven to 275°F. In a small skillet, melt 0.5 cup unsalted butter over medium heat. Add 1 whole yellow onion (thinly sliced), 0.25 cup chopped fresh rosemary, and 0.25 cup fresh thyme leaves. Cook for 3-4 minutes until the onions soften and the herbs release their aromatic oils. Remove from heat and set aside.
Heat a large Dutch oven or roasting pan over medium-high heat. Add the seasoned pork shoulder and sear on all sides until deeply browned, about 5-7 minutes per side. This step develops a flavorful crust and jumpstarts the cooking process. Transfer the seared pork to a plate and tent loosely with foil to keep warm.
Slow Roast with Moisture and Aromatics
Return the Dutch oven or roasting pan to the oven. Place the seared pork shoulder back in, fat-side up. Pour 1 cup beef broth into the bottom of the pan, then add the butter-onion-herb mixture. Cover tightly with a lid or heavy-duty aluminum foil, sealing it completely to trap moisture.
Roast at 275°F for 6 hours. After 6 hours, remove the lid and increase the oven temperature to 325°F. Continue roasting uncovered for an additional 2 hours, or until the internal temperature reaches 195-203°F at the thickest part of the shoulder. The meat should be fork-tender with a deep mahogany crust. If the pan drippings reduce too much, add a splash of water or broth to maintain moisture.
Rest and Shred for Maximum Tenderness
Remove the pork shoulder from the oven and transfer it to a cutting board. Tent loosely with foil and let it rest for at least 30 minutes—this allows the juices to redistribute throughout the meat, ensuring each bite is moist and flavorful. During this time, skim any excess fat from the pan drippings and reserve the flavorful juices for serving.
Using two forks or a meat claw, shred the pork shoulder against the grain into bite-sized pieces. The meat should pull apart easily, with no resistance. Taste and adjust seasoning if needed, adding a pinch more salt or black pepper as necessary. Serve immediately with the reserved pan juices spooned over the top, or use the juices to make a quick gravy by whisking in a cornstarch slurry.
Pro Tips For Making Boston Butt Slow Roast
- Use a Meat Thermometer: Skip guessing—bury that probe in the thickest part of the shoulder. It’s done at 203°F internal temp (yes, that high), not when it looks "right." I learned this the hard way when my first pull-apart roast was still tough as boot leather.
- Salt the Night Before: Toss the pork with salt, pepper, and powders 12–24 hours ahead—it seasons deeper and keeps the meat juicy. I used to salt it right before cooking, and the crust always tasted like it was playing second fiddle to the flavor underneath.
- Sear It Hot: Get that roast screaming hot in a dry skillet or grill for 3–4 minutes per side before slow-roasting. The crust locks in moisture and adds texture that dry-rubbing alone can’t match. (Yes, even if you’re impatient like me.)
- Rest Under Foil: After pulling it off heat, tent the roast with foil and let it sit for 30–45 minutes. This redistributes juices—no one wants to slice into a dry mess. I skipped this once and served it immediately. Regretted it instantly.
Storing and reheating this recipe
Refrigerator Storage
Store your cooked Boston butt in an airtight container with a splash of its own juices to maintain moisture. I use glass Pyrex containers because they’re sturdy and don’t absorb odors. Keep it refrigerated at 40°F or below for up to 4 days—the flavors deepen as the meat rests.
For best results, let it cool to room temperature before refrigerating to prevent condensation. 🥶
Freezer Storage
For long-term storage, portion the shredded pork into freezer-safe bags or vacuum-sealed containers, leaving ½ inch of headspace for expansion. Freeze for up to 3 months—the fat cap helps protect the meat from freezer burn.
Thaw overnight in the fridge before reheating for even cooking. I recommend quart-sized freezer bags for individual servings. ❄️
Oven Reheating
Preheat your oven to 325°F and place the wrapped pork in a baking dish. Add 2-3 tablespoons of beef broth or pan juices to the dish to keep it moist.
Cover with foil and reheat for 15-20 minutes, or until the internal temperature reaches 165°F. This gentle method preserves tenderness without drying it out. 🔥
Slow Cooker Method
For a hands-off approach, transfer the pork to a 6-quart slow cooker with ½ cup of broth or juices. Cook on low for 3-4 hours, stirring occasionally, until heated through. This keeps the meat incredibly juicy and is perfect for large gatherings. 🍲
Microwave Safety
If you’re in a hurry, microwave individual portions in a microwave-safe dish covered with a damp paper towel. Heat on 50% power for 2-3 minutes, stirring halfway, until reaching 165°F. Avoid overcooking—microwaves can dry out pork quickly. Add a splash of broth if needed. ⚡
Gravy Revival
Save the pan drippings from your original roast and freeze them in ice cube trays for later use. When reheating, whisk these drippings into a cornstarch slurry (1 tbsp cornstarch + 2 tbsp water) and simmer until thickened. This creates a rich, flavorful gravy that elevates every bite. 💫
Nutrition facts
Frequently asked questions
How long does it take to cook a 6 lb Boston butt to perfection?
This recipe requires a total of 8 hours at low and slow temperatures. Start with 6 hours at 275°F covered, then finish with 2 hours at 325°F uncovered to develop that signature mahogany bark. A meat thermometer is essential—aim for 203°F at the thickest part for maximum tenderness.
Can I use a smoker instead of an oven for this recipe?
For a smoker, maintain 225-250°F with your favorite wood (hickory or apple works beautifully). Smoke for 5-6 hours until the internal temperature hits 195°F, then wrap in butcher paper and increase heat to 275°F for 1-2 hours to finish. The bark will be even more pronounced with this method.
What's the best way to tell when the pork shoulder is done?
Use a meat thermometer to check the thickest part of the shoulder—it should read 203°F. The meat should also pull apart easily with two forks when tested. If you're unsure, look for a deep mahogany color and fork-tender texture. Never rely on time alone, as oven temperatures can vary.
Why does my Boston butt come out dry when I cook it?
Dryness usually happens from overcooking or not resting the meat properly. Always cook to 203°F (not higher) and let it rest for 30 minutes before slicing. Also ensure your oven isn't running too hot—use an oven thermometer to verify it's maintaining the correct temperature. The fat cap helps retain moisture, so don't trim it too aggressively.
Can I make this recipe in a slow cooker instead?
Yes, but with adjustments. Brown the pork first, then cook on low for 8-10 hours with ½ cup broth and your seasoning blend. The texture will be more pulled pork-style than roast-style, but still delicious. For best results, use a 6-quart slow cooker and monitor the temperature—it should reach 195°F before serving.