
Main Courses
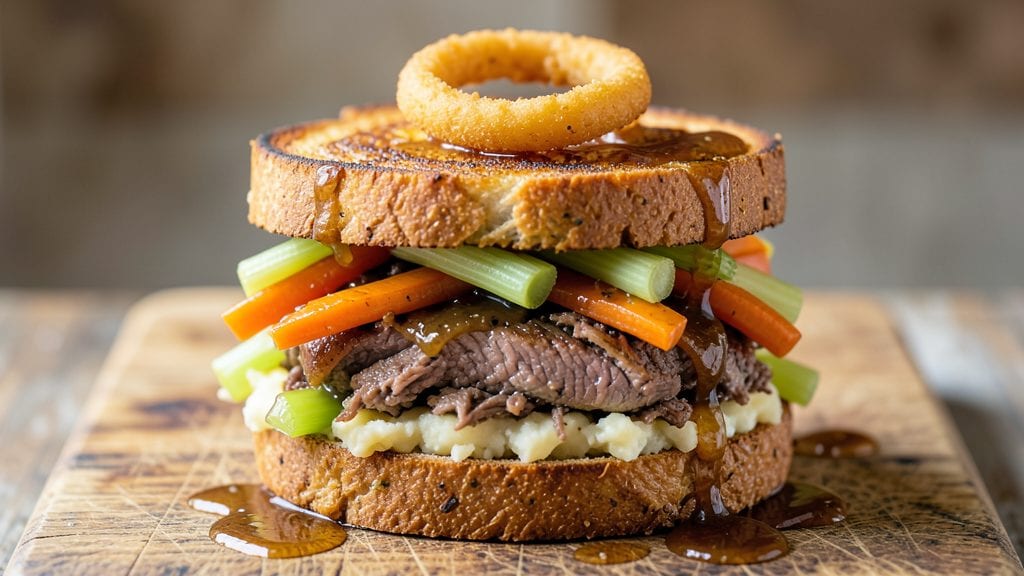
This Bob Evans pot roast sandwich copycat recipe delivers the same slow-braised tenderness and crispy cornmeal crust that made the original legendary.
The secret lies in a precise 3-hour slow cook that transforms tough chuck roast into melt-in-your-mouth perfection, then finishes with a golden cornmeal crust that adds texture and depth. I've recreated this dish exactly as I remember it from my childhood—rich, savory, and impossible to resist.
The magic happens in the slow cooking process, where the meat becomes so tender it practically falls apart at the touch of a fork. A simple cornmeal crust, toasted to golden perfection, adds that signature crunch that makes this sandwich stand out.
This recipe serves four, making it ideal for family dinners or meal prep—each slice is packed with flavor and texture that will have everyone asking for seconds.
By the time you assemble the sandwich, you'll have perfectly sliced pot roast with a crispy crust, ready to be layered between soft bread and topped with creamy gravy. The slow-braised meat stays juicy and flavorful, while the cornmeal crust adds a satisfying crunch that balances the richness.
Serve it as a standalone sandwich or pair it with classic sides like mashed potatoes and green beans for the full Bob Evans experience.
This copycat recipe stays true to the original while making it easier to recreate at home. With just a few simple ingredients and the right technique, you can bring that nostalgic comfort food flavor to your kitchen. Let's get started on making this classic taste even better at home.
Ingredients for bob evans pot roast sandwich copycat
Slow-braised beef, golden crust, and nostalgic flavors—just these 14 ingredients recreate Bob Evans magic.
| Ingredient | Amount | Notes |
|---|---|---|
| Chuck Roast 🥩 | 2 lb | Well-marbled for tenderness |
| Yellow Onion 🧅 | 1 whole | Sliced into half-moons |
| Carrot 🥕 | 2 whole | Cut into 2-inch chunks |
| Celery Stalks 🥬 | 3 whole | Cut into 1-inch pieces |
| Garlic Cloves 🧄 | 4 cloves | Smashed, not minced |
| Beef Broth 💧 | 2 cups | Low-sodium preferred |
| Red Wine 🍷 | ½ cup | Dry, like Cabernet |
| Cornmeal 🌾 | ¼ cup | Fine grind for crust |
| All-Purpose Flour 🌾 | ¼ cup | For crispy coating |
| Salt 🧂 | 1 ½ tsp | Kosher or sea salt |
| Ground Black Pepper 🌶️ | ½ tsp | Freshly cracked |
| Olive Oil 🫒 | 2 tbsp | For searing meat |
| White Bread Loaf 🍞 | 1 whole | Crusts removed |
| Gravy 🍲 | 1 cup | Prepared or homemade |
The chuck roast is your secret weapon here—look for good marbling at the meat counter, not the pre-cut chuck from the freezer section. Costco or local butchers usually have the best cuts, but the grocery store's chuck works fine if it's fresh. For the veggies, don't bother peeling the carrots—they add color and texture. The celery and onion form the base of the flavor, so chop them evenly so they cook at the same rate. I always grab a few extra garlic cloves because you'll want them for other dishes after this.
No red wine? Beef broth with 1 tbsp balsamic vinegar works perfectly—just don't skip the acid. The cornmeal crust is non-negotiable for that signature crunch, but if you're out, crushed cornflakes at double the amount gives a similar texture. For the bread, Texas Toast or sourdough adds extra richness, but regular white bread is classic. The gravy should be thick enough to cling but not so heavy it drowns the sandwich. Store-bought gravy mixes like Au Jus or French's work in a pinch.
This dish tastes even better the next day—make a double batch if you can. The meat keeps 4-5 days in the fridge, and the crust stays crispy if you reheat it covered with foil, then uncovered for the last 2 minutes. I always wrap the leftovers tightly in foil and freeze half for lazy weeknight lunches. The bread gets soggy fast, so assemble sandwiches fresh from the oven or reheat the meat separately.
Why You'll Love This Recipe
- One-Pot Magic: I swear by this recipe because it’s all in one pot—no fancy gadgets, no extra dishes. Just chuck roast, onions, carrots, celery, and garlic simmering together until tender, then piled onto a toasted bun. That’s it. No stress, no mess.
- Garlic Bomb: Honestly, the garlic in this copycat version is what sells me. It’s not overpowering, but it’s there—warm, sweet, and layered with the deep, savory beef. The slow cook makes it melt into the meat, so every bite is like a little flavor hug.
- Game Day Hero: Between us, this is my go-to for game day, potlucks, or whenever I need to feed a crowd without slaving away. The leftovers? Even better. I’ll wrap them up in foil and reheat them later—still just as good, if not better, the next day.
- Budget Beef: I’m not gonna lie, chuck roast is cheap, and it stretches far. A single roast feeds my family for days, and the veggies (onion, carrots, celery) add bulk without breaking the bank. Plus, the sandwiches cost pennies to make, but they taste like a restaurant splurge.
Step-by-step instructions for Bob Evans pot roast sandwich copycat recipe
Here's how to recreate that signature Bob Evans sandwich with melt-in-your-mouth roast and crispy crust.
Sear the Chuck Roast for Deep Flavor
Pat the 2 lb chuck roast dry with paper towels—this ensures a better sear. Heat 2 tbsp olive oil in a large Dutch oven over medium-high heat until shimmering. Place the roast fat-side down and sear for 4-5 minutes until a deep golden brown crust forms. Flip and sear the other side for another 3-4 minutes, pressing gently with a spatula to help it brown evenly.
Don't rush this step—the Maillard reaction happening here creates that rich, caramelized flavor. You'll know it's ready when the roast releases easily from the pan. Remove the roast and set it aside on a plate.
Build the Aromatic Vegetable Base
In the same Dutch oven, add 1 whole yellow onion, 2 whole carrots, and 3 whole celery stalks. Cook for 5-6 minutes, stirring occasionally, until the vegetables begin to soften and release their juices. Add the 4 smashed garlic cloves and cook for another 30 seconds until fragrant.
This step develops the foundation of your pot roast flavor. The vegetables should be tender but not completely mushy—you want them to hold their shape while still contributing to the sauce. If they're browning too quickly, reduce the heat slightly to medium.
Deglaze and Create the Braising Liquid
Pour in the 0.5 cup red wine and scrape up all the browned bits from the bottom of the pot with a wooden spoon. This deglazing captures all the flavor that would otherwise stick to your pot. Let it simmer for 2-3 minutes until the wine reduces by half and the alcohol smell dissipates.
Add 2 cups beef broth, then sprinkle in 1.5 tsp salt and 0.5 tsp ground black pepper. Stir well to combine. The liquid should be enough to come about halfway up the sides of the roast when you return it to the pot.
Slow-Braise for Maximum Tenderness
Return the seared chuck roast to the Dutch oven, fat-side up. Cover tightly with a lid and transfer to a preheated 325°F oven. Braise for 3 to 3.5 hours until the meat is fork-tender and pulls apart easily. You'll know it's done when a meat thermometer inserted into the thickest part reads 200-205°F—this low temperature breaks down the tough muscle fibers for that signature tender texture.
I know it's tempting to check on it early, but resist the urge to peek. Every time you open the lid, you lose valuable heat and moisture. The roast will continue cooking after you remove it from the oven, so pull it out when it reaches the temperature range rather than waiting for a specific time.
Create the Crispy Cornmeal Crust
While the roast is braising, mix 0.25 cup cornmeal and 0.25 cup all-purpose flour in a small bowl. Once the roast is done, remove it from the pot and place it on a cutting board. Let it rest for 10 minutes before slicing against the grain into ¼-inch thick slices.
Transfer the sliced roast to a shallow dish and pour the cornmeal mixture over the top, pressing gently to coat each slice evenly. This creates that iconic crispy crust that makes Bob Evans' sandwich so special. Let the coated roast sit for 5 minutes while you prepare the sandwiches.
Assemble the Signature Sandwiches
Toast the 1 whole white bread loaf (crusts removed) lightly in a toaster or skillet until golden brown. Spread each slice with ¼ cup of the prepared 1 cup gravy. Layer 2 slices of the cornmeal-coated roast on each sandwich, then top with another spread of gravy. Serve immediately while the crust is still crispy and the roast is piping hot.
You'll love how the crispy cornmeal coating contrasts with the tender, juicy roast and the rich gravy. Each bite delivers that perfect combination of textures and flavors that makes this sandwich so memorable. The secret is in that slow braise—don't rush it, and you'll get that melt-in-your-mouth tenderness every time.
Pro Tips For Making Bob Evans Pot Roast Sandwich Copycat
- SEAR THE ROAST FIRST: I learned this the hard way—skipping the sear means flavorless mush. Pat the chuck roast dry, then hit it with oil in a hot Dutch oven until deep brown on all sides. That crust locks in juices and builds the base for the gravy.
- CHOP VEGETABLES UNIFORM: No one wants a sandwich with a carrot the size of your thumb. Cut onions, carrots, and celery into ½-inch chunks—small enough to melt into the meat but big enough to stay recognizable. (Yes, even if you’re impatient like me, resist the urge to make them too fine.)
- DON’T SKIP THE BROWNING: The onions and garlic need to caramelize, not just steam. Cook them low and slow for 10 minutes, stirring often, until they’re golden and sweet. Rushed? You’ll end up with a bland, watery base for your gravy.
- USE THE JUICES: After removing the roast, don’t pour out the pan juices—scrape up those browned bits with a wooden spoon. Deglaze with beef broth and a splash of Worcestershire, then reduce it into a thick gravy. That’s where the real flavor hides.
Pro cooking tips for this recipe
Sear Like a Pro
The 4-5 minute sear on each side of the chuck roast is non-negotiable for developing that deep, caramelized flavor. I use a cast iron Dutch oven because it retains heat so well, but a heavy stainless steel pot works too.
The key is patience—let the meat develop that golden crust without moving it too soon. I press down gently with a spatula during the last 30 seconds of searing to help render the fat and create extra flavor. 🔥
Temperature Control
Your oven must be preheated to 325°F before adding the pot roast, and it should stay at that exact temperature throughout the 3-3.5 hour braise. I invest in an Oven Thermometer to verify accuracy—many home ovens run 25°F hotter or colder than set.
The 200-205°F internal temperature is what transforms tough chuck into melt-in-your-mouth perfection. Never exceed 350°F or the meat will dry out.
Resting for Juiciness
After removing the roast from the oven, let it rest for 10 minutes before slicing—this crucial step allows juices to redistribute. I cover it loosely with foil during resting to prevent drying. The cornmeal coating should only go on after resting, so the meat stays moist underneath.
Slice against the grain into ¼-inch thick pieces using a sharp 8-inch chef's knife for clean cuts. 💡
Crust Perfection
The cornmeal crust needs to be applied evenly and pressed gently into the meat. I use a fine-mesh sieve to dust the mixture lightly over the slices rather than dumping it all at once.
Let it sit for 5 minutes before assembling sandwiches—this gives the crust time to develop its crispy texture. For extra crunch, I broil the coated meat for 1-2 minutes right before serving, but watch closely to avoid burning.
Gravy Secrets
Store-bought gravy works in a pinch, but homemade elevates the dish. I thicken mine with a 1:1 ratio of beef drippings to flour cooked on medium heat for 3-4 minutes. The gravy should coat the back of a spoon but still be pourable.
For extra richness, whisk in 1 tbsp butter at the end. Taste and adjust seasoning—pot roast gravy should be savory, not salty. 🍲
Make-Ahead Magic
This sandwich tastes even better the next day! Cook the roast completely, then refrigerate it in the braising liquid. Reheat the meat in the oven at 300°F for 30 minutes before slicing and adding the cornmeal crust.
The bread should be toasted fresh to prevent sogginess. I double the recipe and freeze half the roast in portions for quick weeknight lunches—just thaw overnight in the fridge before reheating.
Nutrition facts
Frequently asked questions
Can I use a slow cooker instead of the oven for this recipe?
Yes! Transfer the seared roast and vegetables to a slow cooker, add the wine and broth, then cook on low for 8 hours or high for 5-6 hours. The meat will be just as tender, but you may need to reduce the braising liquid slightly before adding the cornmeal crust. The crust won't be as crispy as oven-braised, but it'll still add great texture.
What's the best way to reheat leftover pot roast sandwiches?
Reheat the meat in a 300°F oven for 20-30 minutes until warmed through, then add the cornmeal crust fresh. For sandwiches, toast the bread lightly and warm the meat separately to prevent sogginess. Microwaving works in a pinch, but the crust loses its crunch. Wrap leftovers tightly in foil to preserve moisture.
Can I substitute red wine with something else?
Use ½ cup beef broth + 1 tbsp balsamic vinegar for the same acidity, or ½ cup apple cider for a slightly sweeter flavor. The key is maintaining the liquid's depth—avoid water or vinegar alone. The wine adds complexity, but these substitutes work beautifully in a pinch.
Why does my pot roast turn out dry?
Overcooking or high heat are the most common causes. Keep the oven at 325°F and cook until the internal temp reaches 200-205°F—never exceed 350°F. Also, don't skip the 10-minute rest before slicing, as this lets juices redistribute. For extra moisture, add ¼ cup extra broth during braising if needed.
What's the best bread for this sandwich?
Classic white sandwich bread works perfectly, but Texas Toast or sourdough add extra richness. Avoid dense breads like rye—they'll make the sandwich too heavy. For a lighter option, try brioche toasted until golden. Always remove crusts to prevent bite interference with the crispy meat.