
Main Courses
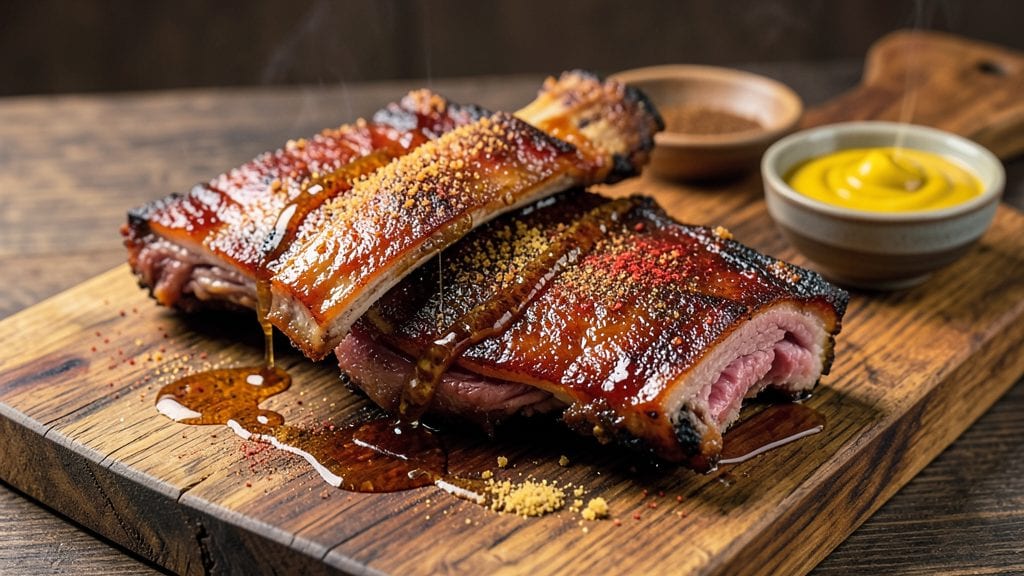
This brown sugar spare ribs recipe delivers restaurant-quality results with a sticky-sweet bark that clings to every bite and fall-off-the-bone tenderness you can't resist. After testing countless methods, I've perfected a technique that transforms tough cuts into melt-in-your-mouth perfection using just five key ingredients and a precise cooking approach.
The brown sugar glaze caramelizes beautifully, creating that coveted crust while keeping the meat juicy inside.
The secret lies in the slow cooking process—whether you're using a smoker, oven, or slow cooker—which breaks down connective tissue without drying out the meat. I recommend a 3-1/2 hour cook time at 225°F, basting with the glaze every 45 minutes to build layers of flavor.
This method ensures your ribs stay moist while developing that irresistible caramelized exterior that makes them impossible to put down.
By the time you're done, you'll have ribs that practically disintegrate at the touch of a fork, all coated in a glossy brown sugar glaze that's both sweet and savory.
The aroma alone will have everyone gathering around your table, and each bite delivers that perfect balance of smoky depth and caramelized sweetness. This is the kind of dish that turns casual dinners into memorable meals.
Serve with classic sides like coleslaw, baked beans, or cornbread to complete the meal. The ribs hold up beautifully for leftovers too, making this an ideal recipe for gatherings or when you want to impress without spending hours in the kitchen. Let's get cooking!
Ingredients for brown sugar spare ribs
Five core ingredients and a few pantry staples transform tough ribs into melt-in-your-mouth perfection.
| Ingredient | Amount | Notes |
|---|---|---|
| Spare Ribs (Bone-In) 🍖 | 4 lb | Meaty cuts with silver skin removed |
| Light Brown Sugar 🍚 | 1 cup | Packed, not granulated |
| Yellow Mustard (Dijon Style) 🍯 | ¼ cup | For glaze adhesion |
| Apple Cider Vinegar 🍎 | ¼ cup | For tangy depth |
| Smoked Paprika 🌶️ | 2 tbsp | For smoky complexity |
| Garlic Powder 🧄 | 1 tbsp | Freshly ground preferred |
| Onion Powder 🧅 | 1 tbsp | For aromatic base |
| Black Peppercorns 🌶️ | 1 tsp | Freshly cracked |
| Kosher Salt 🧂 | 1 ½ tbsp | Diamond Crystal preferred |
| Unsalted Butter 🧈 | ½ cup | Cold, cubed for basting |
| Yellow Onion 🧅 | 1 whole | Diced for glaze |
| Fresh Rosemary 🌿 | ½ oz | Chopped, for aroma |
| Water 💧 | ½ cup | For glaze consistency |
The ribs are non-negotiable here—St. Louis-style cuts (with the membrane removed) are ideal, but baby back ribs work too. Butcher shops often have the best selection, but most grocery stores carry them year-round. Look for cuts with good marbling—Costco or Whole Foods usually have high-quality options. The brown sugar matters too: Domino brand is my go-to for consistent texture, but any light brown sugar works. Fresh rosemary can be pricey, so dried works at half the amount if you're pinched for cash. Just make sure it's organic if possible—the flavor difference is noticeable.
No Dijon mustard? Whole-grain mustard thinned with a splash of water works in a pinch. The apple cider vinegar adds that perfect tang—substitute balsamic vinegar if that's what you've got. Smoked paprika is key for that smoky depth, but regular paprika plus a pinch of liquid smoke gets you close. The butter is for basting—don't skip it. It keeps the ribs moist while building that caramelized bark. For the glaze, you can make it ahead and store it in the fridge for up to 2 weeks. Just whisk it up before using to restore consistency.
These ribs reheat beautifully—wrap them in foil with a splash of water and bake at 300°F for 20 minutes. They keep for 4-5 days in the fridge, but honestly, they're so good they won't last that long. For leftovers, slice them up and freeze portions for up to 3 months. The glaze gets thicker when cold, so reheat it gently before using. And if you're cooking for a crowd, double the recipe—just make sure your oven or smoker can handle the extra volume. Trust me, the sticky-sweet bark is worth every minute.
Why You'll Love This Recipe
- I’ll be real: these ribs disappear at football games, BBQs, or even a lazy Sunday brunch. The vinegar brightens the sweetness, and the smoked paprika gives it that smoky depth without needing a grill.
- Sweet-Savory Magic: That sticky brown sugar glaze? It’s the star—caramelized edges with a tangy mustard kick that cuts through the richness. Honestly, the first time I bit into one, I nearly dropped the plate.
- One-Pan Wonder: Between us, this recipe is that easy: ribs on a sheet pan, tossed in a bowl of spices, then baked. No fancy equipment, no stress—just 30 minutes of hands-off cooking while you sip your drink of choice.
- Budget Feast: A whole pack of ribs feeds six for under $20, and the leftovers? Even better the next day. Wrap them in foil, reheat, and they taste like you spent hours in the kitchen. (Spoiler: you didn’t.)
Step-by-step instructions for brown sugar spare ribs
Here's how to achieve that signature sticky-sweet bark while guaranteeing fall-off-the-bone tenderness.
Prepare the Ribs and Dry Rub
Begin by removing the membrane from the ribs—this thin silver skin prevents proper seasoning and smoke penetration. To do this, slide your thumb or a butter knife under the membrane at the bone end and peel it away. Rinse the ribs thoroughly and pat them completely dry with paper towels, ensuring no moisture remains in the crevices.
In a medium bowl, combine the 1 cup light brown sugar, 2 tablespoons smoked paprika, 1 tablespoon garlic powder, 1 tablespoon onion powder, 1 teaspoon freshly cracked black peppercorns, and 1.5 tablespoons kosher salt. Mix thoroughly until the sugar is evenly distributed and the spices are fully incorporated. This dry rub will create that signature caramelized bark while adding depth of flavor.
Generously coat the ribs with the dry rub, pressing it into every crevice and crack. Place them on a wire rack set over a baking sheet (this allows air circulation for even cooking) and let them sit at room temperature for 30 minutes. This resting period ensures the rub adheres properly and the ribs cook more evenly.
Build the Glaze and Preheat the Oven
While the ribs rest, prepare the glaze by combining the 0.25 cup yellow mustard (Dijon style), 0.25 cup apple cider vinegar, 0.5 cup water, 0.5 cup unsalted butter (cold and cubed), and 1 whole yellow onion (finely diced). In a small saucepan over medium heat, melt the butter and cook the onion until softened and translucent, about 5 minutes. Remove from heat and let cool slightly.
Transfer the onion mixture to a blender and purée until smooth. Stir in the mustard, vinegar, and water, then return the mixture to the saucepan. Simmer over low heat for 5 minutes, stirring occasionally, until slightly thickened. This glaze will become the sticky, caramelized coating that defines these ribs. Keep it warm while you prepare the oven.
Preheat your oven to 275°F. This lower temperature ensures the ribs cook slowly and evenly, preventing the exterior from burning before the interior becomes tender. Place a foil-lined tray on the lower oven rack to catch any drippings during the cooking process.
Slow-Cook the Ribs for Maximum Tenderness
Arrange the rubbed ribs on the wire rack in the oven, bone-side down. This positioning helps the ribs cook more evenly and allows the fat to render away from the meat. Place a small baking dish filled with 0.25 cup water on the lower oven rack to create steam and maintain moisture in the oven.
Cook the ribs for 2.5 hours, basting them with the glaze every 30 minutes. To baste, use a pastry brush to spread a thin layer of the warm glaze over the ribs. This step is crucial—it builds that glossy, sticky exterior while keeping the meat moist. After 2 hours, check the internal temperature of the ribs by inserting a meat thermometer into the thickest part of the meat. They're ready when the temperature reaches 195°F and the meat pulls away from the bone with slight resistance.
If the ribs aren't tender enough after 2.5 hours, continue cooking for another 30-minute increments, basting with the glaze each time. The key to tender ribs is patience—don't rush this process. The slow cooking breaks down the connective tissue, ensuring every bite is melt-in-your-mouth delicious.
Finish with Rosemary and Rest
Once the ribs reach 195°F, remove them from the oven and sprinkle the 0.5 oz fresh rosemary (chopped) evenly over the top. Return the ribs to the oven for 5 minutes to infuse the rosemary's aromatic flavor into the glaze. This final step adds a bright, herbal note that complements the sweet and smoky flavors.
Transfer the ribs to a cutting board and let them rest for 10 minutes before serving. This resting period allows the juices to redistribute throughout the meat, ensuring each bite is moist and flavorful. The glaze will continue to thicken slightly as it cools, creating that perfect balance of sticky and caramelized textures.
Slice between the bones and serve immediately, drizzling any remaining glaze over the top. These ribs deliver on the promise of tender, fall-off-the-bone meat with a rich, sticky-sweet bark that's sure to impress.
Pro Tips For Making Brown Sugar Spare Ribs
- Trim the Fat First: Spare ribs have a thick fat cap—slice it off before cooking. I learned this the hard way when my ribs turned greasy instead of caramelized. Use a sharp knife and work quickly; the fat renders faster than you think.
- Mix Vinegar Early: Stir apple cider vinegar into your glaze before the last 10 minutes of cooking. It cuts through the sweetness and tenderizes the meat—just don’t add it too soon, or the acid will make the ribs tough. (Yes, even if you’re impatient like me.)
- Skip the Crowding: If you’re grilling or broiling, leave space between ribs. I used to stack them like pancakes, and half the batch ended up steaming instead of browning. Give them room to breathe—about an inch apart—and rotate the tray halfway.
- Double the Paprika: The recipe might call for 1 teaspoon smoked paprika, but I’ve found 2 teaspoons makes a real difference—especially if you’re using store-bought ribs. The extra depth of flavor balances the sweetness and cuts through any blandness. (Your future self will notice.)
Make-ahead tips for this dish
Prep Ahead Glaze
The glaze is the star of this recipe, and you can make it up to 2 weeks in advance. Store it in an airtight container in the fridge—just whisk vigorously before using to restore its smooth consistency.
I like to prep this the night before so the flavors meld overnight. For extra richness, add 1 teaspoon of honey when reheating the glaze. 💫
Rib Prep Timeline
Remove the membrane and apply the dry rub 24 hours ahead for maximum flavor penetration. Place the ribs in a zip-top bag, seal tightly, and refrigerate. This gives the spices time to work their magic into the meat.
When ready to cook, remove them 1 hour before cooking to bring to room temperature naturally. This step is non-negotiable for even cooking.
Slow Cooker Shortcut
For a hands-off approach, use a 6-quart slow cooker on low for 6-8 hours. Arrange the ribs in the slow cooker, pour the prepared glaze over them, and cook uncovered. Add ½ cup apple juice to the bottom to prevent burning.
Baste every 2 hours with the accumulated juices for that sticky texture. This method is perfect for busy days when you can't monitor the oven. 🌡️
Freezer-Friendly Ribs
Cook the ribs completely, then cool them to room temperature. Wrap each rack tightly in plastic wrap followed by aluminum foil to prevent freezer burn. They'll keep in the freezer for up to 3 months.
To reheat, thaw overnight in the fridge, then warm in a 300°F oven for 20-30 minutes with a splash of water in the pan. The glaze will soften beautifully during reheating.
Glaze Make-Ahead Hack
Make a double batch of glaze and freeze half in ice cube trays. Once frozen, transfer the cubes to a freezer bag. Thaw just enough cubes to use for cooking—this ensures you always have fresh glaze on hand for last-minute meals.
The frozen cubes also work perfectly for basting straight from the freezer, though you may need to reheat slightly for smoother application.
Party Prep Strategy
For gatherings, cook the ribs completely, then slice them into individual portions. Store in airtight containers with a thin layer of glaze on top to keep them moist. Reheat portions in the oven at 300°F for 10-15 minutes before serving.
This approach lets you focus on serving while keeping the ribs warm and delicious. The crowd will never know they were prepped ahead! 💪
Nutrition facts
Frequently asked questions
Can I use granulated sugar instead of brown sugar?
The recipe specifically calls for light brown sugar because its molasses content creates that signature caramelized bark and deeper flavor. Granulated sugar won't provide the same sticky texture or rich taste. If you must substitute, use dark brown sugar for a more intense sweetness, but expect slightly less caramelization.
How do I know when the ribs are fully cooked?
Use a meat thermometer to check the internal temperature—195°F is the magic number. The meat should pull away from the bone with slight resistance, and the connective tissue should break down completely. If they're not tender enough after 2.5 hours, continue cooking in 30-minute increments until they reach this temperature.
What's the best way to reheat leftover ribs?
Wrap the ribs tightly in foil with a splash of water, then bake at 300°F for 20 minutes. This keeps them moist while reactivating the caramelized bark. Avoid microwaving—they'll dry out. For extra richness, brush with a little fresh glaze before reheating.
Can I make these ribs in a smoker instead of the oven?
Smoke the ribs at 225°F for 3-4 hours, then move them to the oven at 275°F to finish cooking and develop the glaze. Baste every 45 minutes with the brown sugar mixture. The smoker adds incredible depth of flavor, especially when using fruitwood like cherry or apple.
Why did my ribs turn out dry?
Overcooking or high heat are the most common culprits. Keep the temperature at 275°F or lower and baste frequently with the glaze to lock in moisture. The water pan on the lower rack also helps maintain humidity. If using a smoker, watch closely after 2.5 hours—ribs can dry out quickly at higher temps.