Snacks
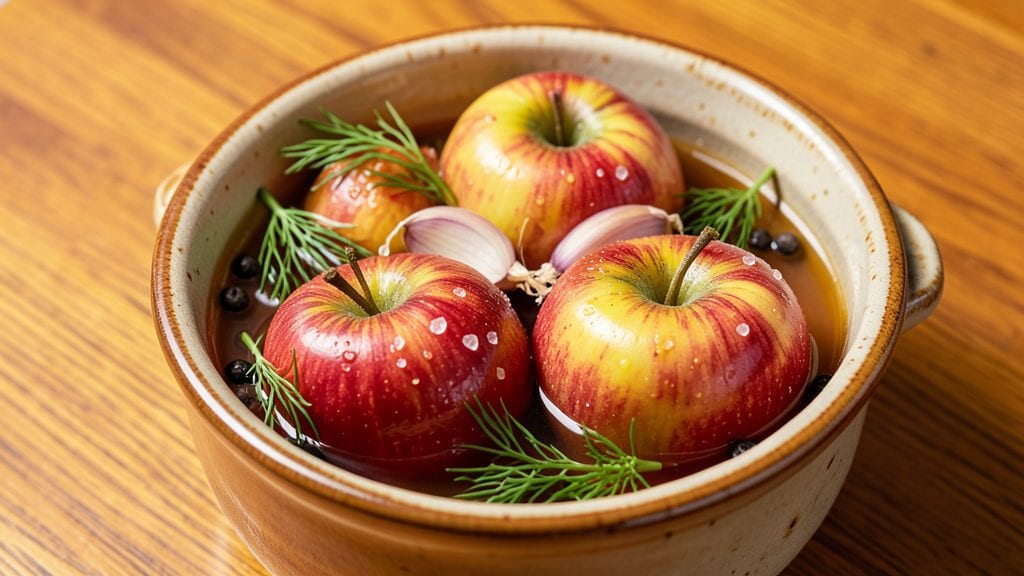
Fermented whole apples transform ordinary fruit into a probiotic powerhouse that supports gut health while adding tangy crunch to meals. The process is straightforward—simply pack apples in a saltwater brine and let beneficial bacteria work their magic over 10 days, creating a snack that’s both nutritious and delicious.
I discovered this method while exploring traditional preservation techniques, and the results are nothing short of impressive.
The beauty of fermented apples lies in their versatility. Use them as a tangy snack straight from the jar, or chop them into salads for an extra layer of flavor. They pair beautifully with sharp cheeses, crusty bread, or even as a topping for roasted meats.
The fermentation process not only enhances digestibility but also preserves the apples naturally, making them a sustainable choice for any kitchen.
What makes this recipe stand out is its simplicity—no special equipment is needed, just a clean jar and a well-balanced brine. The probiotics develop naturally over time, creating a snack that’s both gut-friendly and packed with flavor.
Each bite delivers a satisfying crunch and a subtle tang that makes them irresistible. Perfect for health-conscious snackers or anyone looking to incorporate more fermented foods into their diet.
Safety is key with fermentation, so I’ll share my foolproof tips for preventing mold and ensuring a successful batch. Whether you’re new to fermenting or a seasoned pro, this recipe delivers results that are both rewarding and delicious. Let’s get started on your probiotic-packed crunch!
Ingredients for fermented whole apples
Four whole apples, a pinch of salt, and time create a probiotic snack that’s both nourishing and delicious.
| Ingredient | Amount | Notes |
|---|---|---|
| Organic Honeycrisp Apples 🍎 | 4 whole | Firm, unpeeled, washed thoroughly |
| Non-Iodized Sea Salt 🧂 | 1 ½ tbsp | Diamond Crystal preferred |
| Filtered Water 💧 | 4 cups | Room temperature preferred |
| Garlic Cloves 🧄 | 2 cloves | Crushed for flavor infusion |
| Fresh Dill Sprigs 🌿 | 2 whole | Optional for extra flavor |
| Black Peppercorns 🌶️ | 10 whole | Lightly crushed |
| Glass Mason Jars 🍶 | 1 jar | Quart-sized with airtight lid |
| Organic Apple Cider Vinegar 🍶 | 1 tbsp | For pH balance |
| Non-GMO Cane Sugar 🍯 | 1 tbsp | Optional for sweetness |
| Fermentation Weights 🪨 | 1 piece | Glass or ceramic, 1 lb |
The apples are the star here—Honeycrisp or Fuji work best because they hold their shape during fermentation. Organic is ideal to avoid pesticide residues, but conventional works too if washed thoroughly. I always buy from local farmers markets in season, but grocery store apples in the organic section are fine. Look for firm fruit without bruises—those soft spots turn mushy during fermentation. The quart-sized mason jars are essential; they’re the gold standard for fermentation. Ball or Le Parfait brands are my go-to—they seal tightly and keep out contaminants.
No sea salt? Kosher salt works at a 1:1 ratio, but avoid iodized table salt—it can inhibit fermentation. Fresh dill and peppercorns are optional but add depth. Skip them if you prefer a cleaner apple flavor. The apple cider vinegar is non-negotiable—it helps lower the pH quickly, preventing mold. Bragg or Eden brands are my top picks for organic quality. For the sugar, I use non-GMO cane sugar because it’s less processed, but any granulated sugar works in a pinch. The fermentation weights keep the apples submerged in brine, which is critical for safety and flavor development.
Store your fermented apples in a cool, dark place—55-75°F is ideal. They’ll be ready in 10-14 days, but taste them daily after the first week. Once opened, keep them refrigerated and consume within 2 weeks. The flavor deepens over time, so don’t rush it! I always make a double batch—one for immediate snacking and one to gift. The brine can be reused for up to 3 batches if strained and stored properly.
Why You'll Love This Recipe
- No-Core Work: I slice the apples whole, not even peeling them—just a quick rinse and a chop. That’s it. No fancy prep, no peeling, no pitting. Honestly, the hardest part is waiting for the garlic and dill to infuse.
- Tangy Crunch: The Honeycrisp stays crisp even after fermenting, with that bright, almost effervescent bite. Add the garlic and dill? It’s like a savory apple chip—sweet, funky, and impossible to stop eating.
- Potluck Hero: Bring a jar to a picnic or holiday spread, and you’ll be the one everyone asks for seconds from. It’s portable, doesn’t need reheating, and pairs with everything—cheese, charcuterie, even just a cold beer.
- Lasts All Week: A single batch keeps for weeks in the fridge, so I make one and forget it. No wilting, no spoilage—just that same perfect crunch every time. My lazy-Sunday-morning secret weapon.
Step-by-step instructions for fermented whole apples
Transform these crisp apples into probiotic-rich, tangy treats with this precise fermentation method.
Prepare the Apples and Brine Solution
Start by thoroughly washing the 4 whole organic honeycrisp apples under cool running water to remove any surface contaminants. I like to use a vegetable brush for the stems and crevices—this ensures no dirt remains trapped. Pat them completely dry with clean kitchen towels, as moisture can interfere with fermentation.
In a separate bowl, combine the 4 cups filtered water with the 1.5 tablespoons non-iodized sea salt and stir until fully dissolved. Add the 1 tablespoon organic apple cider vinegar and 1 tablespoon non-gmo cane sugar, mixing well. This creates an ideal brine environment that promotes beneficial bacteria while preserving the apples' natural crunch. The vinegar also helps lower the pH slightly, preventing unwanted mold growth during fermentation.
Sterilize and Pack the Mason Jar
Run the quart-sized glass mason jar and fermentation weights through a hot cycle in your dishwasher or boil them in water for 10 minutes to sterilize completely. This critical step prevents contamination from bacteria or yeast that could spoil your ferment. While still hot, carefully pack the apples into the jar, standing them upright so they don't break.
Add the 2 crushed garlic cloves, 2 whole fresh dill sprigs, and 10 lightly crushed black peppercorns around the apples. These aromatics will infuse flavor while supporting beneficial microbial activity. Pour the prepared brine solution over the apples until they're completely submerged—this prevents mold growth and ensures even fermentation. Leave about 1 inch of headspace at the top of the jar.
Seal and Begin Fermentation
Place the fermentation weights on top of the submerged apples to keep them fully submerged as gases are released. Secure the lid tightly and remove any air bubbles by gently pressing down on the jar's sides. Store the jar at room temperature in a dark place—direct light can cause unwanted reactions and affect flavor development.
Let the apples ferment for 5-7 days, checking daily for proper submersion. You'll notice bubbles forming and the liquid may become slightly cloudy—this is normal and indicates active fermentation. After 3 days, taste one apple by piercing it with a sterilized knife. When it develops a pleasant tang and slight softness around the edges (but remains crisp in the center), it's ready. If not, continue fermenting for up to 2 more days.
Store and Enjoy Your Probiotic Apples
Once fermented to your preferred tang level, transfer the jar to the refrigerator where the fermentation process slows dramatically. The cold temperature preserves the beneficial probiotics while maintaining the apples' texture. These fermented apples will keep in the fridge for up to 3 months, developing deeper flavor with time.
To serve, simply remove an apple from the jar and rinse it briefly under cool water to remove any brine residue. The flavor profile should be a perfect balance of sweet, tangy, and slightly herbal from the dill and garlic. I like to slice them thinly for salads or enjoy them whole as a probiotic snack. Each bite delivers not just crunch but a dose of gut-friendly bacteria that supports digestion—nature's perfect probiotic powerhouse.
Pro Tips For Making Fermented Whole Apples
- CORE TWICE: Honeycrisp apples have a dense core—cutting them straight down the middle leaves stubborn bits behind. Instead, slice from the blossom end toward the stem, then twist the halves apart. You’ll save 10 minutes of scrubbing and frustration.
- BRINE COLD: I used to dump salted water over apples at room temp, and they’d start fermenting unevenly. Now I chill the brine (filtered water + salt) for at least 30 minutes before adding apples. Keeps the pH stable and prevents surface mold.
- SALT THE GARLIC: Whole garlic cloves ferment slowly and can turn bitter. Crush them lightly with a pinch of sea salt before adding to the jar—this jumpstarts their breakdown and infuses flavor faster. (Yes, even if the recipe says “whole.”)
- WEIGH THE DILL: Fresh dill sprigs float, and if you eyeball it, you’ll either drown your apples in greens or leave them flavorless. Use 1 sprig per 2 apples by weight—chop the stems into ½-inch pieces so they distribute evenly. No guesswork.
Perfect pairings for this recipe
Cheese Pairings
Fermented whole apples shine with sharp cheeses that complement their tangy depth. I love pairing them with aged Gouda (like Beemster or Vermont Sharp Cheddar)—the caramelized notes balance the apple’s acidity.
For a creamy contrast, try brie or Camembert, especially when both are slightly warmed. The probiotics in the apples even enhance the cheese’s digestibility, making it a gut-friendly combo. 🧀
Bread and Charcuterie
Crusty sourdough or ciabatta soaks up the fermented apple’s juices beautifully. I recommend toasting slices lightly and pairing with prosciutto di Parma or genoa salami for a sweet-savory balance.
Add a drizzle of honey (like Buckwheat) to elevate the flavors. For a vegetarian spread, try whipped goat cheese with a sprinkle of flaky sea salt.
Salad Enhancements
Slice fermented apples thinly and toss into arugula salads with walnuts, shaved fennel, and a lemon-Dijon vinaigrette. The tangy crunch cuts through rich ingredients like avocado or grilled chicken.
For a heartier salad, mix with kale, roasted butternut squash, and pecans. The probiotics add a digestive boost while keeping the dish light.
Savory Dishes
Use fermented apple slices as a topping for roasted pork tenderloin or duck breast—the acidity tenderizes the meat while adding complexity. I also love them on grilled lamb chops with a mint-yogurt sauce.
For vegetarian dishes, try them in stuffed bell peppers or mushroom risotto for a bright, umami-rich contrast.
Sweet Applications
While fermented apples are tangy, they work surprisingly well in desserts. Toss them into oatmeal with cinnamon and maple syrup for a gut-friendly breakfast. For baking, add them to apple crisp or galette dough—their tang enhances the caramelization.
Pair with vanilla ice cream or whipped cream for a probiotic dessert twist.
Beverage Pairings
A crisp dry Riesling or Sauvignon Blanc complements the apple’s acidity, while a hoppy IPA balances the tang with bitterness. For non-alcoholic options, try sparkling apple cider or ginger beer. The effervescence cleanses the palate, making each bite of fermented apple feel fresh and vibrant. 🍷
Nutrition facts
Frequently asked questions
Can I use any type of apple for fermenting?
Firm, crisp varieties like Honeycrisp, Fuji, or Granny Smith work best—they hold their shape during fermentation. Avoid soft apples like McIntosh or overripe ones, as they'll turn mushy. Organic apples are ideal to minimize pesticide residues, but thoroughly washed conventional apples work too.
How do I know when the fermented apples are ready?
After 3 days, pierce an apple with a sterilized knife—it should develop a pleasant tang and slight softness around the edges (but stay crisp in the center). Continue fermenting for 5-7 days total, checking daily. The liquid may become cloudy or fizzy, which is normal. Taste test frequently to avoid over-fermenting!
What if mold appears during fermentation?
Mold is rare if apples stay submerged, but if you spot fuzzy spots, discard the batch immediately. To prevent this, always use iodized-free salt, keep apples fully submerged with weights, and store in a dark place. A splash of apple cider vinegar in the brine also helps lower pH and deter mold.
Can I ferment apples without vinegar?
Technically yes, but vinegar lowers the pH quickly, preventing mold and speeding up fermentation. Without it, use 2 tbsp lemon juice instead or extend fermentation time to 10-14 days while monitoring closely. The flavor will be slightly less tangy, but still safe if properly submerged.
How long do fermented apples last in the fridge?
Once refrigerated, they’ll keep for 3 months with flavors deepening over time. The probiotics remain active in cold storage, though fermentation slows dramatically. For best quality, consume within 2 months—after that, they’ll still be safe but may soften further.