
Side Dishes
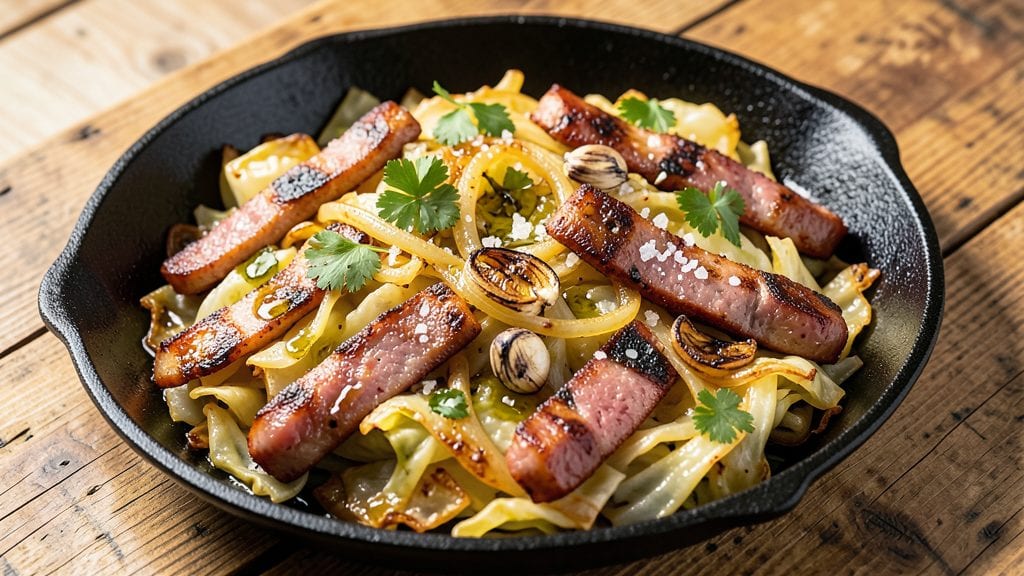
This fried cabbage and kielbasa recipe delivers the perfect balance of smoky sausage and crispy cabbage leaves that taste like a home-cooked Polish-American classic. 🌟 I first learned to make this dish helping Nana Mae in her Peachtree Street diner, where it was a staple for lunch crowds—especially on cold days when the aroma alone could fill the diner with warmth.
The secret lies in properly prepping the cabbage and cooking the kielbasa just enough to enhance its flavor without overpowering the dish.
The magic happens in the pan, where thinly sliced cabbage transforms into tender, crispy edges while the kielbasa adds rich, savory depth. This recipe uses simple pantry staples—just cabbage, kielbasa, onions, and basic seasonings—but the technique ensures restaurant-quality results at home.
The dish cooks in under 30 minutes, making it ideal for weeknight dinners or holiday sides that feel special without requiring hours of prep.
By the time you serve it, you’ll have a dish that’s hearty enough to stand alone or pair beautifully with mashed potatoes, crusty bread, or a simple green salad. The cabbage stays crisp-tender, the kielbasa is perfectly seasoned, and the onions add a touch of sweetness that ties everything together.
It’s the kind of comfort food that reminds you why home cooking is worth every minute.
David always requests seconds, and I’ve tested this recipe on everything from cast iron skillets to stovetop pans—it works every time. Whether you’re serving a family dinner or bringing a dish to a potluck, this fried cabbage and kielbasa will disappear faster than you can say “smacznego!”
Let’s get started with the steps that make it foolproof.
Ingredients for fried cabbage and kielbasa
Five core ingredients transform into Nana Mae's crispy, smoky classic—just cabbage, kielbasa, onions, and a few pantry staples.
| Ingredient | Amount | Notes |
|---|---|---|
| Green Cabbage 🥬 | 1 ½ lb | Green cabbage, outer leaves removed |
| Kielbasa Sausage 🌭 | 1 lb | Polish-style kielbasa, sliced into rounds |
| Yellow Onion 🧅 | 1 whole | Medium yellow onion, thinly sliced |
| Extra-Virgin Olive Oil 🫒 | 3 tbsp | For frying, high smoke point preferred |
| Garlic Cloves 🧄 | 3 cloves | Freshly minced, for aroma |
| Apple Cider Vinegar 🍎 | 1 tbsp | For brightness, optional but recommended |
| Dried Thyme 🌿 | 1 tsp | Or 1 tbsp fresh thyme leaves |
| Ground Black Pepper 🌶️ | ½ tsp | Freshly cracked for heat |
| Salt 🧂 | 1 tsp | Kosher salt, adjust to taste |
| Fresh Parsley 🌿 | ¼ cup | Chopped, for garnish (optional) |
| Butter 🧈 | 1 tbsp | Unsalted, for finishing |
The cabbage is everything here. Green cabbage works best—it stays crispier than red or purple varieties. Look for heads that feel heavy for their size at Whole Foods or your local Polish market (if you're lucky enough to have one). The outer leaves should be firm, not wilted. If you can't find green, red cabbage in a pinch will work, but you'll need to cook it a tad longer. For the kielbasa, Polish-style is key—avoid the sweet or mild varieties. Johnsonville or Kiełbasa from the deli counter are my go-tos. Slice it into 1/4-inch rounds before cooking so it crisps up nicely without falling apart.
No apple cider vinegar? White vinegar or lemon juice works in a bind, but it won't have that same tangy depth. Fresh thyme is ideal, but dried at one-third the amount gets you close. The onions can be swapped for shallots if you're feeling fancy, but yellow onions are perfect for this dish. For extra crispiness, I sometimes add a pinch of smoked paprika to the seasoning mix—it echoes the kielbasa's smokiness. And if you're using pre-sliced cabbage from the bag, give it a quick rinse and dry thoroughly with a towel. Wet cabbage steams instead of crisps.
This dish reheats like a dream—honestly, it's better the next day once the flavors meld together. Store leftovers in an airtight container for up to 4 days, but I usually eat it all in one sitting. For make-ahead prep, slice the cabbage and onions the night before and store them in separate containers in the fridge. The kielbasa can be pre-sliced too. When reheating, add a splash of water or broth to the pan and cover for 2-3 minutes to revive the crispiness. Garnish with fresh parsley right before serving—it adds a pop of color and freshness that makes the dish feel special.
Why You'll Love This Recipe
- One-Pan Magic: I swear by this—no chopping boards to scrub, no extra pots to wash. Just one skillet, a knife, and 15 minutes of your time. The cabbage wilts right alongside the onions and garlic, soaking up all that smoky kielbasa flavor without a single pan left behind.
- Smoky-Sweet Crunch: That first bite? Crispy cabbage edges with juicy, caramelized onions and kielbasa so tender it nearly falls apart. Honestly, the garlic and olive oil tie it all together—rich but bright, salty but fresh. It’s the kind of dish that makes you forget it’s basically just cabbage and sausages.
- Lunchbox Hero: Between us, this is my go-to for packed lunches. The flavors only get better the next day—no sad, wilted greens here. I’ll portion it into jars with a sprinkle of salt and pepper, and it’s a hearty, no-fuss meal that actually tastes homemade. (Yes, even on a Tuesday night.)
- Budget-Friendly Feast: Kielbasa stretches farther than you’d think, and cabbage is practically free. I’ll make a double batch for $10 and have leftovers for days—perfect for when you’re pinching pennies but still want something that feels like a treat. Plus, it’s one of those meals that tastes fancy without costing a fortune.
Step-by-step instructions for smoky sausage and crispy leaf magic
Here's how to transform simple ingredients into a dish where crispy cabbage meets smoky kielbasa perfection.
🔥 Step 1: Prep the Cabbage for Maximum Crispiness
Start by cutting the 1.5 lb green cabbage in half lengthwise, removing the tough outer leaves. Next, carefully separate the leaves along the core, creating individual large leaves. This is key—you want them to stay intact during frying for that signature crispy texture. Pat each leaf dry with paper towels to remove any excess moisture, which prevents soggy cabbage.
Real talk: Don't skip the drying step. Even a little moisture will turn your crispy dreams into a sad, limp reality. I like to work in batches, drying as I go, so the cabbage doesn't start wilting while I'm prepping. Keep the core for another use—it's perfect for soups or stir-fries.
🍳 Step 2: Cook the Kielbasa Until Smoky and Golden
Heat 1 tablespoon of the extra-virgin olive oil in a large skillet over medium-high heat. Add the 1 lb kielbasa sausage, sliced into rounds, and cook for 4-5 minutes until golden brown and slightly crispy on the edges. The sausage should release easily from the pan—if it's sticking, your heat might be too low.
Here's the thing—don't crowd the pan. Cook in batches if needed to give each piece room to brown properly. As the kielbasa cooks, it'll release its smoky flavors. Once done, remove it from the pan and set aside on a paper towel-lined plate. We'll bring it back later for that final flavor boost.
🍳 Step 3: Fry the Cabbage Leaves Until Crispy
In the same skillet, add 2 tablespoons of the extra-virgin olive oil (leaving the remaining 1 tablespoon for later). Increase heat to medium-high and carefully add the dried cabbage leaves in a single layer. Cook for 2-3 minutes per side until the edges turn deep golden brown and crispy. You'll see them puff up slightly—that's your crispy signal.
This is the moment that matters: Don't walk away. Cabbage burns faster than you think. If you have more leaves than fit in the pan, work in batches, keeping the first batch warm while you fry the rest. The crispy texture comes from high heat and proper drying—no shortcuts here.
🥘 Step 4: Build the Flavor Base with Aromatics
Reduce heat to medium and add the 1 whole yellow onion, sliced thinly, to the skillet. Cook for 3-4 minutes until softened and just beginning to caramelize. Add the 3 cloves garlic cloves, minced, and cook for 30 seconds until fragrant—you should smell that garlic releasing its aroma.
Stir in the 1 tablespoon apple cider vinegar, scraping up any browned bits from the bottom of the pan. These bits are flavor gold! Add the 1 tsp dried thyme, 0.5 tsp ground black pepper, and 1 tsp salt. Let everything cook together for 1 minute to meld the flavors. This is where the magic happens—bright, smoky, and savory all in one pan.
🥘 Step 5: Combine and Finish with Butter
Return the kielbasa to the skillet and add the crispy cabbage leaves. Toss everything together gently to combine. Reduce heat to low and add the 1 tablespoon butter, letting it melt and coat everything evenly. The butter adds richness and helps create a silky sauce that clings to the cabbage and sausage.
Garnish with 0.25 cup fresh parsley, chopped, for a pop of freshness. Serve immediately while the cabbage is still crispy and the kielbasa is warm. This dish tastes even better the next day, but those crispy leaves? Best enjoyed fresh out of the pan.
Pro Tips For Making Fried Cabbage And Kielbasa
- PRE-SLICE THE CABBAGE: Cut the cabbage into ¼-inch thick wedges before you even think about cooking—thinner slices crisp up faster and release moisture more evenly. I used to chop it roughly, and half the time it’d steam instead of fry. This keeps it tender-crisp, not soggy.
- CRANK THE HEAT FIRST: Get your pan screaming hot with olive oil before adding the kielbasa—no gentle warming here. The sausages need that initial sear to render fat and develop crust, or you’ll end up with bland, greasy links. I learned this after making a batch that tasted like it was boiled.
- SALT THE ONIONS: Toss the sliced onions with a pinch of salt before cooking—it draws out water and ensures they caramelize instead of turning mushy. I skipped this for years until I tasted the difference: deeper flavor, no slimy texture. (Yes, even if you’re impatient like me.)
- REST THE KIELBASA: Let the cooked sausages sit off the heat for 5 minutes under foil—this lets them reabsorb juices and keeps them from falling apart when you slice. I used to cut them immediately, and half the time they’d disintegrate into the cabbage. A little patience here makes all the difference.
Pro cooking tips for this dish
Cabbage Prep Secrets
Nana Mae always said the cabbage is where the magic starts—and she was right. Separate the leaves carefully along the core, keeping them whole for maximum crispiness.
Use a sharp chef’s knife to slice the core lengthwise, then gently pull apart. Pat each leaf dry with paper towels, even the inner ones. I’ve ruined this dish too many times by skipping this step—wet cabbage steams instead of crisps.
Work in batches if needed, and keep the core for another use (it’s perfect in soups). 🥬
Kielbasa Timing
Cook the kielbasa just until golden—overcooking makes it rubbery. Slice it into ¼-inch rounds before cooking so it crisps evenly. I use medium-high heat and cook in batches if needed to avoid crowding. The sausage should release easily from the pan—if it sticks, your heat is too low.
Remove it when it’s golden brown (about 4-5 minutes), then set aside on paper towels. This step is critical: undercooked sausage tastes bland, but overcooked turns it tough. 🌭
Pan Control
Use a heavy-bottomed skillet—like a Lodge cast iron or All-Clad stainless steel—to prevent hot spots. Heat the oil to medium-high (about 350°F) before adding cabbage. If the oil smokes excessively, lower the heat slightly. Don’t walk away—cabbage burns faster than you think.
Work in batches if needed, keeping the first batch warm while you fry the rest. The goal is deep golden brown edges with a slight puff—this takes 2-3 minutes per side. ⚡
Flavor Layering
After frying the cabbage, build flavor in stages. Start with caramelized onions (cook until soft but not browned), then add minced garlic for 30 seconds—just until fragrant. A splash of apple cider vinegar brightens everything, while dried thyme, salt, and pepper add depth.
The browned bits from the pan? Those are flavor gold—scrape them up! Finish with butter to coat everything evenly, creating a silky sauce that ties the dish together. 💫
Butter Finish
The butter isn’t just for flavor—it’s the secret to that silky, clinging sauce. Melt 1 tablespoon unsalted butter over low heat and toss everything together gently. This step ensures the cabbage stays crisp while the kielbasa absorbs the rich, savory coating.
Garnish with fresh parsley right before serving for a pop of color and freshness. Serve immediately—those crispy leaves won’t wait! 🧈
Make-Ahead Magic
This dish actually tastes better the next day as flavors meld. Store leftovers in an airtight container for up to 4 days. To reheat, add a splash of water or broth and cover for 2-3 minutes to revive crispiness.
For prep ahead, slice the cabbage and onions the night before and store separately. The kielbasa can be pre-sliced too. Pro tip: Reheat in batches to keep everything crispy. 💡
Nutrition facts
Frequently asked questions
Can I substitute kielbasa with another type of sausage?
For authentic flavor, stick with Polish-style kielbasa—it has the right smoky, garlicky depth. In a pinch, smoked sausage or Italian sausage work, but avoid sweet varieties like breakfast sausage. If using a different sausage, slice it thinner (1/4-inch) to ensure even cooking and crispiness.
How do I keep the cabbage from getting soggy?
Drying the cabbage leaves thoroughly is key! Pat each leaf with paper towels until completely dry before frying. Also, cook in batches over medium-high heat—overcrowding the pan causes steam instead of crispiness. Work quickly and keep the first batch warm while frying the rest.
Can I make this dish ahead of time?
Yes! This dish actually tastes better the next day as flavors meld. Store leftovers in an airtight container for up to 4 days. To reheat, add a splash of water or broth, cover, and warm for 2-3 minutes to revive crispiness. For prep ahead, slice the cabbage and onions the night before and store separately.
What’s the best way to serve fried cabbage and kielbasa?
This hearty dish pairs perfectly with mashed potatoes, crusty bread, or a simple green salad. For extra richness, serve with a dollop of sour cream or a side of pickled vegetables. It’s also great as a standalone main dish—just add a slice of rye bread for a Polish-inspired meal.
Why did my cabbage turn out mushy instead of crispy?
Mushy cabbage usually means moisture wasn’t fully removed or the heat was too low. Always pat leaves dry and use medium-high heat for quick cooking. Another common mistake? Overcooking—cabbage should only take 2-3 minutes per side. If your pan isn’t heavy enough (like cast iron), it may not distribute heat evenly, leading to uneven cooking.