
Main Courses
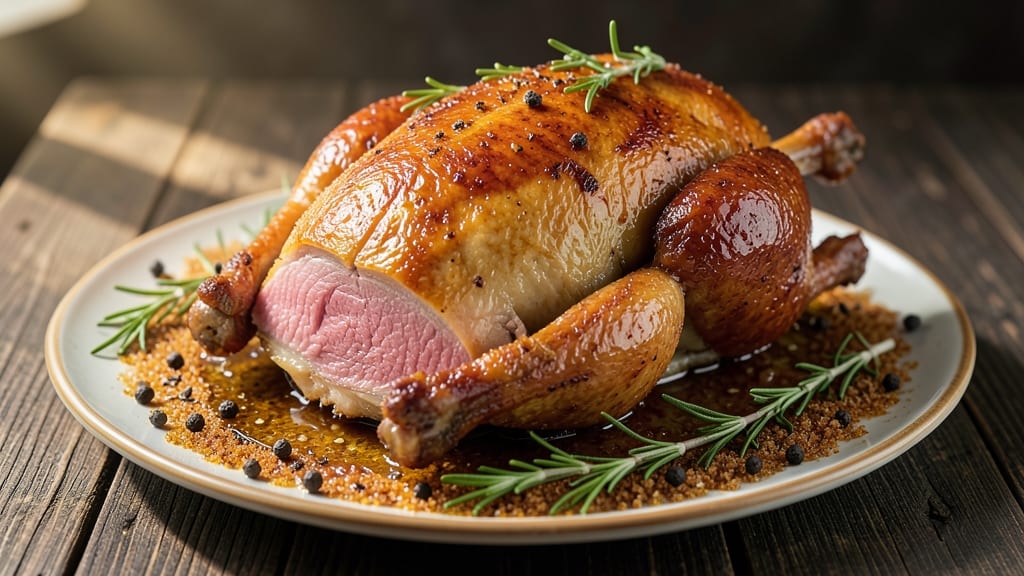
This fried goose recipe transforms a holiday tradition into a showstopping centerpiece with crispy skin and a golden glaze that will have your guests reaching for seconds.
Standing on a step stool in my grandmother’s kitchen in Sicily, I learned how proper frying creates that perfect balance between tender meat and crackling crust—something that feels like a celebration on a plate.
The secret lies in the brine, the oil temperature, and knowing exactly when to baste for that irresistible shine.
What makes this recipe special is its ability to deliver restaurant-quality results at home, even for those new to deep-frying. The goose is brined overnight for juiciness, then fried in 350°F oil until the skin reaches a golden-brown perfection.
A simple glaze of honey and spices seals in the flavor, while traditional sides like homemade gravy and roasted potatoes complete the meal. This is the kind of dish that turns a holiday gathering into a memorable feast.
The process requires patience—brining, frying, and resting—but the reward is a goose so tender and flavorful that it becomes the star of the table. Whether you’re hosting Thanksgiving, Christmas, or a special winter dinner, this recipe delivers crispy, juicy, and deeply satisfying results that feel like a labor of love.
The aroma alone will fill your home with warmth, making every bite worth the effort.
Serve with classic sides like cranberry sauce, mashed sweet potatoes, or a fresh green salad to balance the richness. For those who prefer a lighter touch, a drizzle of lemon-honey glaze adds brightness.
This is more than a recipe—it’s a tradition waiting to be created in your own kitchen. Let’s get started on making this holiday centerpiece unforgettable.
Ingredients for fried goose
Pantry staples meet holiday splendor in this showstopping fried goose feast.
| Ingredient | Amount | Notes |
|---|---|---|
| Whole Goose 🦢 | 10 lb | Fresh, skin-on, giblets removed |
| Kosher Salt 🧂 | 4 cups | Diamond Crystal preferred |
| Brown Sugar 🍯 | 1 cup | Light or dark variety |
| Fresh Thyme 🌿 | ½ cup | Stems removed, loosely packed |
| Fresh Rosemary 🌿 | ¼ cup | Finely chopped, fresh preferred |
| Black Peppercorns 🌶️ | ½ cup | Freshly cracked, coarse grind |
| Vegetable Oil 🫒 | 6 cups | Refined, high smoke point |
| Honey 🍯 | ½ cup | Raw or wildflower preferred |
| Garlic Cloves 🧄 | 8 cloves | Smashed, skin-on |
| Cayenne Pepper 🔥 | 1 tsp | Adjust for heat preference |
| Ground Ginger 🌿 | 1 tbsp | Freshly grated preferred |
| Lemon Zest 🍋 | 1 tbsp | From organic lemons |
| All-Purpose Flour 🌾 | ¼ cup | For dredging skin |
| Cornstarch 🌾 | ¼ cup | For extra crispiness |
The goose is the star, so source a fresh, high-quality bird from a trusted butcher—Costco or Whole Foods carry excellent options. Look for a goose with vibrant skin and minimal bruising, ideally between 10-12 lbs for perfect frying. The brine mix of salt, sugar, and herbs needs to be precise: Diamond Crystal kosher salt dissolves better than table salt, and fresh herbs make all the difference. I always double-check my measurements here—this isn't the time for guesswork. The oil should be refined vegetable oil with a high smoke point, and you'll need enough to submerge the goose completely—6 cups is a safe minimum for a 10 lb bird, but measure your pot first.
No fresh thyme? Dried works at half the amount, but the flavor won't be the same. Running short on rosemary? Fresh sage or marjoram can substitute, though rosemary's piney note is key. The honey glaze can be adjusted—agave or maple syrup work in a pinch, but honey's depth of flavor is unmatched. For the oil, if you're nervous about using vegetable oil, peanut oil or lard are traditional alternatives that give incredible crispiness. Just ensure your oil is at 350°F—use a deep-fry thermometer, not guesswork. The cornstarch flour blend is crucial for that perfect crackle, so don't skip it.
Brined goose keeps in the fridge for 2 days before frying, but plan ahead—this isn't a last-minute dish. The fried goose stays crispy for about 30 minutes at room temperature, so serve it immediately. Leftovers reheat beautifully in a 350°F oven for 20 minutes, but the skin will soften. For the glaze, store any extra in an airtight container in the fridge for 1 week. I always make extra—it's perfect over mashed potatoes or as a drizzle for gravy. The aroma alone will fill your home with holiday magic, so fry outside if possible.
Why You'll Love This Recipe
- One-Pan Magic: I swear by this—just the goose, a sprinkle of salt, and a dusting of brown sugar. No chopping, no fussing, and honestly, the best part is watching that golden crust form while you sip your drink.
- Sweet-Savory Crunch: That brown sugar crust? It’s the star—caramelized edges with rosemary and thyme cutting through the richness. My husband licks his plate, and I don’t even joke about it.
- Holiday or Weeknight: Between us, this works for Thanksgiving and lazy Sundays. Serve it whole for a showstopper, or carve it into sandwiches the next day—no one judges.
- Leftovers Win: The crispy skin stays perfect for days, and the meat shreds like a dream. I meal prep it in jars—easy lunches or a last-minute dinner when I’m too tired to cook.
Step-by-step instructions for holiday fried goose with crispy skin
Here's how to transform your goose into a showstopping centerpiece with irresistible golden-brown skin.
Prepare the Goose for Maximum Crispiness
Begin by removing the goose from the refrigerator and letting it sit at room temperature for 2 hours. This ensures even cooking throughout. Pat the skin completely dry with paper towels—moisture is the enemy of crispy skin. I can't emphasize this enough: any remaining moisture will steam the skin instead of crisping it.
Next, create your dry brine by mixing the 4 cups kosher salt, 1 cup brown sugar, 0.5 cup fresh thyme, 0.25 cup fresh rosemary, 0.5 cup black peppercorns, 1 tbsp ground ginger, and 1 tbsp lemon zest in a bowl. Rub this mixture all over the goose—inside the cavity and under the skin—until it's completely coated. Place the goose on a rack in a shallow pan and refrigerate uncovered for 24 hours. This step is non-negotiable for achieving that perfect balance of flavor and texture.
Create the Glaze and Prep the Oil
After the dry brine, remove the goose from the refrigerator and let it sit for 30 minutes to come to room temperature. In a small bowl, whisk together the 0.5 cup honey, 8 smashed garlic cloves, and 1 tsp cayenne pepper to create your glaze. Set this aside—it's what will give your goose that beautiful golden sheen.
While the goose rests, fill a large Dutch oven or deep fryer with 6 cups vegetable oil and heat it to 350°F. Use a deep-fry thermometer to monitor the temperature—this is crucial for even cooking. The oil should be hot enough to maintain 350°F without smoking excessively. If you don't have a thermometer, test the oil by dropping in a small piece of bread—it should sizzle and turn golden in 30 seconds.
Dredge and Fry for Crispy Perfection
In a large bowl, combine the 0.25 cup all-purpose flour and 0.25 cup cornstarch. This mixture is your secret weapon for achieving that ultra-crispy skin. Working quickly, dip the goose in the flour mixture, pressing gently to adhere it evenly to the skin. Shake off any excess—you want a light, even coating, not a thick layer.
Carefully lower the goose into the hot oil using tongs or a slotted spoon. Fry for 20 minutes, turning occasionally to ensure even browning. You'll know it's ready when the skin is a deep golden brown and crispy to the touch. The internal temperature should reach 165°F when measured in the thickest part of the thigh. If the oil temperature drops below 325°F at any point, increase the heat and let it recover before continuing.
Apply the Glaze and Rest
Once the goose is fully cooked, remove it from the oil and place it on a wire rack set over a baking sheet. Immediately brush the honey glaze mixture all over the skin, focusing on the crispy areas. The residual heat from the goose will cause the glaze to caramelize, creating that stunning golden finish. Let the glaze set for 5 minutes while you prepare to carve.
Transfer the goose to a cutting board and let it rest for at least 15 minutes before carving. This resting period allows the juices to redistribute, ensuring every slice is moist and flavorful. The skin will remain crispy, and the glaze will hold its shine. Serve immediately with your favorite sides—this goose is the star of the holiday table.
Pro Tips For Making Fried Goose
- BRINE THE GOOSE OVERNIGHT: Skip the dry rub if you’re short on time—submerge the whole goose in a brine (1 gallon water, 1 cup kosher salt, ½ cup brown sugar) for 12–24 hours. The skin crisps faster and stays juicier, even if you’re frying it in a crowded pan. I learned this the hard way after a batch turned out bland and tough—now I never skip it.
- USE A THERMOMETER, NOT TIME: Goose fat burns fast, so don’t guess. Pull the bird at 165°F in the thickest part of the thigh—any hotter and the skin goes greasy. I used to pull it at 170°F, and the skin lost its snap. Trust the thermometer, not the clock.
- STACK THE HERBS INSIDE: Tuck 2–3 sprigs of thyme and rosemary under the skin near the cavity before frying. The heat steams them into the meat, adding depth without overpowering. Sounds weird, but it works—my grandmother swore by it, and the flavor’s richer than just rubbing them on top.
- DON’T SKIP THE SECOND CRISP: After frying, transfer the goose to a 375°F oven for 10–15 minutes. The residual fat in the pan will re-crisp the skin while the meat finishes cooking. I was skeptical until I tried it—the skin stays golden, not soggy, and the meat stays juicy. Yes, even if you’re impatient.
Common mistakes when making perfect results
Skipping the Brine
One of the biggest mistakes I see is skipping the 24-hour dry brine—this step is non-negotiable for juicy, flavorful meat. The salt and sugar mixture penetrates deeply, ensuring the goose stays moist while developing that perfect crackling skin.
I once rushed a goose by brining it for just 4 hours—the result was dry, bland, and sad. Trust the process, even if it means planning ahead. 🦢
Uneven Oil Temperature
Frying without a deep-fry thermometer leads to inconsistent results. Oil temperature should stay steady at 350°F—any lower, and your skin won’t crisp; too high, and it burns. I learned this the hard way when my first attempt at frying goose resulted in a patchy, greasy mess.
Invest in a ThermoWorks Smoke thermometer—it’s worth every penny for perfect doneness. 🌡️
Overcrowding the Pot
Never fry a goose in oil that can’t fully submerge it—this causes uneven cooking and dangerous splatter. A 10 lb goose needs at least 6 cups of oil in a pot large enough to hold it completely.
I once tried frying a goose in a skillet that was too small, and the oil overflowed everywhere. Use a Dutch oven or deep fryer designed for large poultry. ⚠️
Not Drying the Skin
Moisture is the enemy of crispy skin—any leftover water on the goose will steam instead of crisp. After brining, pat the skin completely dry with paper towels, even under the skin if possible.
I’ve seen home cooks skip this step, leading to soggy, unappetizing results. Take the extra 10 minutes—it makes all the difference. 🧻
Rushing the Resting Time
Skipping the 15-minute rest after frying means juices will spill out when you carve, leaving dry meat. I once served a goose immediately after frying, and guests complained about the texture.
Let it rest on a wire rack—this keeps the skin crispy while allowing flavors to meld. Patience here is key. ⏳
Using the Wrong Oil
Vegetable oil is your best bet for frying, but peanut oil or lard work even better for that classic crisp. Avoid olive oil—its low smoke point causes bitter flavors and smoke hazards.
I’ve seen people use canola oil, which can make the skin greasy. Stick to refined oils with a high smoke point for the best results. 🫒
Nutrition facts
Frequently asked questions
Can I use a frozen goose for this recipe?
Never! Always start with a fresh goose for the best texture and flavor. Frozen geese contain ice crystals that can cause uneven cooking and prevent the skin from crisping properly. Thawing a frozen goose overnight in the fridge won't remove all the ice crystals, which is why fresh is non-negotiable for this method.
How do I know when the goose is fully cooked?
Use a meat thermometer to check the thickest part of the thigh—it should read 165°F. The skin should also be deep golden brown and crispy to the touch. If you don't have a thermometer, cut into the thigh joint: the juices should run clear, not pink.
What's the best way to reheat fried goose?
Reheat in a 350°F oven for 20-25 minutes on a wire rack to maintain crispiness. Avoid microwaving—it makes the skin soggy. For leftovers, store in an airtight container and reheat only once for best results. The skin won't be as crispy as fresh, but the meat stays tender.
Can I make this recipe without a deep fryer?
Use a heavy Dutch oven or large stockpot with at least 6 cups of oil. Make sure it's deep enough to fully submerge the goose. A gas stove works best for maintaining even heat. Just monitor the temperature closely with a thermometer to avoid fluctuations.
What sides pair best with fried goose?
Classic pairings include homemade gravy, roasted Brussels sprouts with bacon, or creamy mashed sweet potatoes. For contrast, add a fresh green salad with citrus vinaigrette. The crispy skin stands up well to bold flavors, so don't be afraid to serve spicy cranberry sauce or pickled vegetables.