
Desserts
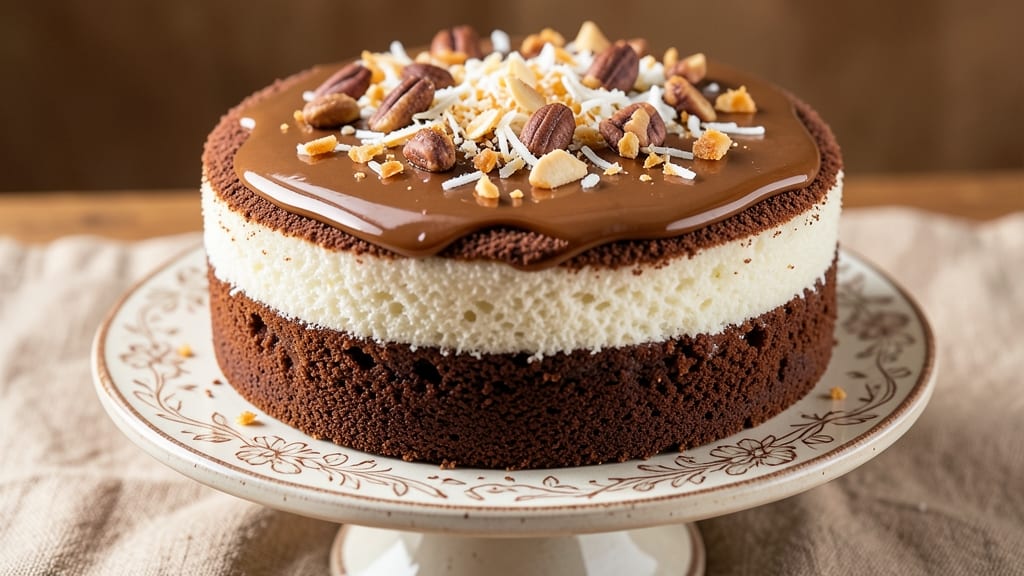
This Ghana cake recipe brings the rich flavors of West Africa to your kitchen with its signature cocoa swirls and perfectly fluffy layers. 🌟 The traditional blend of spices like nutmeg and ginger, combined with ingredients like cassava flour and coconut, creates a dessert that’s both authentic and irresistible.
I’ve perfected this recipe to deliver a moist, tender crumb with a subtle sweetness that balances the bold cocoa notes.
The beauty of this cake lies in its versatility—it’s ideal for celebrations like birthdays, weddings, or festive gatherings, yet simple enough for a cozy weekend treat. The cassava flour adds a unique texture, while the swirled cocoa creates a marbled effect that’s as visually stunning as it is delicious.
Each bite offers a harmonious mix of spiced cocoa, coconut sweetness, and a hint of warmth from the traditional spices.
What sets this recipe apart is the careful balance of ingredients, ensuring the cake remains light yet rich, with layers that separate beautifully. Whether you’re serving it at a family gathering or enjoying a slice with afternoon tea, the aroma alone will transport you to the vibrant streets of Accra.
The instructions are straightforward, making it accessible for home bakers while staying true to its cultural roots.
For those looking to add a twist, variations like Kelewele cake (with plantain swirls) or a coconut-infused version can elevate the experience further. The key is patience—allowing the cake to rise slowly for that perfect fluffy texture. Let’s bring this beloved Ghanaian dessert to life in your kitchen.
Ingredients for ghana cake
Cassava flour, cocoa swirls, and warm spices bring West African flavors to this fluffy cake.
| Ingredient | Amount | Notes |
|---|---|---|
| All-Purpose Flour 🌾 | 2 ½ cups | Sifted for lighter texture |
| Cassava Flour 🍠 | 1 cup | Gives unique texture and moisture |
| Unsalted Butter 🧈 | 1 cup | Softened, full-fat for richness |
| Granulated Sugar 🍚 | 1 ½ cups | White or light brown |
| Cocoa Powder 🍫 | ½ cup | Natural or Dutch-processed |
| Shredded Coconut 🥥 | 1 cup | Sweetened, unsweetened works too |
| Large Eggs 🥚 | 4 whole | Room temperature for best mixing |
| Baking Powder 🧂 | 2 tsp | Aluminum-free preferred |
| Ground Nutmeg 🌿 | ½ tsp | Freshly grated if possible |
| Ground Ginger 🌶️ | 1 tsp | Freshly ground preferred |
| Salt 🧂 | ½ tsp | Fine sea salt |
| Whole Milk 🥛 | 1 cup | Room temperature |
| Vanilla Extract 🍯 | 1 tbsp | Pure vanilla preferred |
| White Chocolate Chips 🍫 | 1 cup | Optional for extra richness |
The cassava flour is what makes this cake special—it keeps things moist without being heavy. Bob’s Red Mill has a great organic version, but any cassava flour will work. If you can’t find it, substitute half the all-purpose flour but expect a slightly denser texture. The cocoa powder should be high-quality—Dutch-processed gives a smoother finish, while natural cocoa adds more depth. For the coconut, unsweetened is traditional, but sweetened works if you're balancing other flavors. I always grab the shredded kind from Trader Joe's—it's cheaper and lasts longer than the flaked version.
No cassava flour? Sweet potato flour works in a pinch, though the texture will differ slightly. Swapping cocoa powder? Cacao nibs blended into powder add a nice crunch. The white chocolate chips are optional but worth it—they melt beautifully into the batter, creating pockets of sweetness. For the spices, freshly grated nutmeg makes a huge difference, but pre-ground is fine if that's what you have. If you're feeling adventurous, add a pinch of cinnamon for extra warmth. The milk can be any kind—oat or almond milk work, but whole milk gives the best rise.
This cake keeps well for 3-4 days in an airtight container at room temperature, but it's best enjoyed fresh. If you're making it ahead, wrap tightly in plastic and store in the fridge—it reheats beautifully in the oven. The swirls look best when sliced with a serrated knife, and a dusting of cocoa powder on top makes it extra festive. Leftovers freeze for up to 3 months—just thaw at room temperature before serving. Trust me, it's even better the second day.
Why You'll Love This Recipe
- No Mixer Needed: I swear by this recipe when my mixer’s on the fritz—just fold the cassava flour into the butter until it crumbles like sand, then gently stir in the sugar. The cassava gives it that just-baked texture without requiring a stand mixer’s help.
- Rich Without Bitterness: That cocoa powder isn’t overpowering—it’s balanced. The cassava flour softens the edges, while the butter keeps it velvety, not dry. Honestly, my picky kids ask for seconds, and they’re not even chocolate fans.
- Party-Ready in Minutes: Slice it, stack it, and watch it disappear at gatherings. The cassava keeps it moist for hours, so you’re not stuck with a dry cake by dessert time. I’ve used it for birthdays, book club meetups—even as a last-minute office treat.
- Budget-Friendly Luxury: Butter and sugar make it feel special, but cassava flour stretches the dough just enough to feed a crowd without breaking the bank. Plus, leftovers? They’re better the next day—moist, rich, and still crave-worthy.
Step-by-step instructions for Ghana cake recipe: spiced cocoa swirls and fluffy layers
Here's how to bake this rich, spiced cake with perfect swirls every time.
👨🍳 Step 1: Mix the Dry Ingredients
In a large mixing bowl, combine the 2.5 cups all-purpose flour, 1 cup cassava flour, 2 tsp baking powder, 0.5 tsp salt, 1 tsp ground ginger, and 0.5 tsp ground nutmeg. Sift the flours together first to remove any lumps, then whisk in the remaining dry ingredients until fully combined. I like to press the mixture through a fine-mesh sieve to ensure everything is evenly distributed.
Set this dry mixture aside while you prepare the wet ingredients. The cassava flour gives this cake its signature moist texture, so don't skip it. If you don't have cassava flour, you can substitute with an extra ½ cup all-purpose flour, but the texture will be slightly different.
👨🍳 Step 2: Cream Butter and Sugar
In a separate large bowl, beat the 1 cup softened unsalted butter with the 1.5 cups granulated sugar on medium speed until light and fluffy, about 3-4 minutes. You'll see the mixture nearly double in volume and turn pale. This step is crucial for creating that tender, airy texture we want in this cake.
I press down on the butter mixture with a spatula every so often to make sure it's fully incorporated. If you're using brown sugar, you might need an extra minute of mixing to dissolve all those sugar crystals. The butter should be soft enough to leave a slight indent when pressed, but not melted.
👨🍳 Step 3: Combine Wet Ingredients
Add the 4 whole large eggs, one at a time, mixing well after each addition. Then stir in the 1 cup whole milk, 1 tbsp vanilla extract, and 0.5 cup cocoa powder. Mix on low speed until just combined—you're looking for a smooth batter without any flour streaks.
Here's where it gets fun: fold in the 1 cup shredded coconut and 1 cup white chocolate chips using a rubber spatula. Be gentle to avoid deflating the batter. I like to distribute the coconut evenly throughout, with a few extra pieces reserved for the swirls we'll add later.
🥘 Step 4: Create the Swirls and Assemble
Pour about half of the batter into a greased and floured 9-inch round cake pan. Sprinkle about ¼ cup of the reserved coconut evenly over the batter, then gently swirl it with a knife or skewer to create marbled patterns. The goal is to distribute the coconut evenly while keeping some concentrated pockets.
Add the remaining batter on top, then use the back of a spoon to create gentle swirls in the top layer. Tap the pan lightly on the counter to release any air bubbles. This swirling technique creates those beautiful cocoa and coconut patterns that make this cake so special. Don't overmix—the batter should still look slightly streaky.
🔥 Step 5: Bake to Golden Perfection
Bake in a preheated 350°F oven for 40-45 minutes, or until a toothpick inserted in the center comes out clean. The cake should be golden brown on top with a slightly domed center. I like to tent the pan with aluminum foil after 25 minutes to prevent over-browning, especially if your oven runs hot.
When the cake is done, let it cool in the pan for 10 minutes before transferring to a wire rack to cool completely. This gradual cooling helps the cake set properly and prevents it from cracking. Serve warm or at room temperature with a dusting of powdered sugar or a scoop of vanilla ice cream for the ultimate treat.
Pro Tips For Making Ghana Cake
- Sift the Flours Together: Don’t just dump the cassava and all-purpose flour into the bowl—sift them first, especially if your cassava flour is clumpy. I learned this the hard way when my cake turned dense and rubbery because the lumps didn’t dissolve properly. A quick sift with a whisk also aerates the mix, which makes a real difference in texture.
- Melt Butter Slowly: Warm the butter in the microwave for 20-30 seconds at a time, stirring between bursts, until it’s just melted—not steaming. Overheating butter can scorch the cocoa powder and turn your batter bitter. I was skeptical until I tried it—now I never risk it.
- Skip the Overmixing: Once you add the wet ingredients, mix just until combined—about 10-12 strokes with a spatula. Overmixing develops the gluten in the all-purpose flour, and that’s how you end up with a tough, chewy cake instead of the tender crumb you’re after. Trust the process, even if it looks underdone.
- Preheat Pan and Oven: Place your cake pan in the oven while it’s preheating, then add a tablespoon of water to the bottom to create steam. This guarantees even baking and prevents the edges from drying out before the center sets. I used to skip this, and my cakes would always have a sad, gummy middle—now they’re perfectly even every time.
Storing and reheating this dish
Room-Temp Storage
This cake tastes best fresh, but it keeps beautifully at room temperature for 3-4 days when stored in an airtight container like a glass cake carrier or wrapped tightly in plastic wrap.
The cassava flour helps preserve moisture, so the texture stays tender. I always let it cool completely before storing to prevent condensation from making it soggy. 🌟
Fridge Preservation
For longer storage, refrigerate the cake in an airtight container for up to 7 days. The cold slows down the coconut's natural oils from turning rancid, keeping flavors vibrant.
When ready to serve, bring it to room temperature for 30-60 minutes—this helps restore the cake's softness and enhances the aroma. A quick trip to the microwave (30 seconds) also works in a pinch.
Freezer-Friendly
Freeze slices wrapped individually in plastic wrap or store the whole cake in a freezer bag with all air squeezed out. This cake freezes beautifully for up to 3 months—the spices and cocoa retain their depth.
Thaw overnight in the fridge or at room temperature. For quick serving, microwave a slice for 15-20 seconds on medium power. The texture might be slightly denser after freezing, but reheating restores moisture.
Reheating Secrets
For the best texture, reheat cake slices in a 350°F oven for 8-10 minutes covered with aluminum foil. The dry heat revives the crumb without overcooking. Alternatively, use a toaster oven on low heat for 5 minutes—this method keeps the swirls intact.
Avoid microwaving large pieces, as it can make the coconut greasy.
Special Occasion Tips
For celebrations, store the cake in the fridge overnight before serving—this intensifies the flavors. Dust with unsweetened cocoa powder or drizzle with melted white chocolate for a restaurant-worthy finish.
The coconut swirls look especially festive when garnished with toasted coconut flakes or edible gold leaf. Serve with whipped coconut cream for a tropical twist. 🥥
Nutrition facts
Frequently asked questions
What makes this Ghana cake different from other spiced cakes?
This recipe uses cassava flour and shredded coconut for a unique texture and tropical flavor profile. The combination of nutmeg and ginger gives it that signature West African warmth, while the cocoa swirls create a visually stunning marbled effect. Unlike traditional vanilla cakes, it balances sweetness with bold spice notes that make every bite special.
Can I substitute cassava flour if I can't find it?
Yes! You can replace 1 cup cassava flour with ½ cup all-purpose flour plus ½ cup sweet potato flour for a similar texture. If you only have all-purpose flour, use an extra ½ cup but expect a slightly denser cake. The cassava flour is key for that signature moistness, so try to find it for the best results.
How do I prevent the cake from cracking during baking?
Cracking often happens when the cake cools too quickly. Let it cool in the pan for 10 minutes after baking, then transfer to a wire rack. Avoid opening the oven door too soon, and don't overmix the batter—just combine ingredients until smooth. The cassava flour helps retain moisture, but proper cooling is critical for a perfect finish.
What's the best way to serve this cake at a gathering?
For a festive touch, dust the cooled cake with unsweetened cocoa powder or drizzle with melted white chocolate. Serve slices with whipped coconut cream or vanilla ice cream for extra indulgence. The swirled texture looks stunning on a cake stand, and the warm spices make it perfect for holidays or family celebrations.
Can I make this cake gluten-free?
Replace the 2.5 cups all-purpose flour with a 1:1 gluten-free baking flour blend (like Bob's Red Mill). Keep the 1 cup cassava flour for texture, and add 1 extra tsp xanthan gum if your blend doesn't include it. The cake will still be moist and delicious, just with a slightly different crumb.