
Desserts
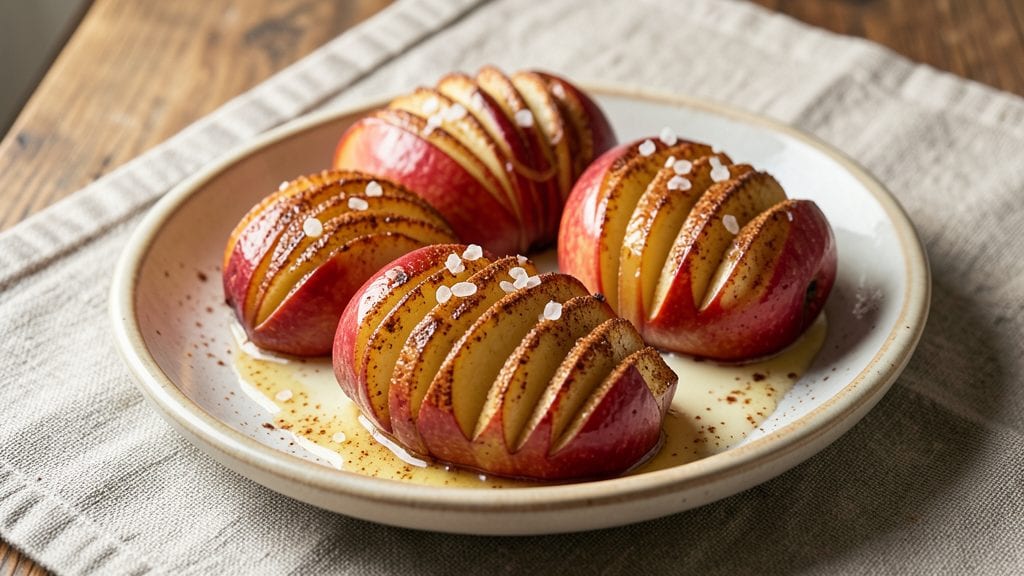
This hasselback apples recipe transforms ordinary apples into a showstopping dessert that requires just five ingredients and 30 minutes of hands-on time. The technique—slicing apples vertically while leaving the bottom intact—creates dramatic, caramelized layers that look as impressive as they taste.
I first tried this method during a fall baking challenge, and it became an instant favorite for its simplicity and restaurant-worthy presentation.
The secret lies in the 425°F oven and proper apple selection—use firm varieties like Honeycrisp or Granny Smith for structure that holds up during baking. While the apples roast, their natural sugars concentrate into a sticky, caramelized glaze that clings to each slice.
A sprinkle of cinnamon or brown sugar halfway through baking intensifies this effect, creating that perfect balance of sweetness and warmth.
What you'll end up with is a dessert that's equal parts elegant and comforting—golden, caramelized apples with crisp edges and tender centers, served warm with a scoop of vanilla ice cream or a drizzle of honey.
The presentation alone makes it perfect for holidays or dinner parties, though it's simple enough for weeknight desserts too. This recipe proves you don't need complicated techniques to create something extraordinary.
For variations, try stuffing the apple slices with oats and nuts before baking, or drizzle with melted butter and maple syrup for extra richness. The possibilities are endless, but the core technique remains foolproof. Let's get started on creating your own caramelized masterpiece.
Ingredients for hasselback apples
Four ingredients transform simple apples into a dessert worthy of fall gatherings.
| Ingredient | Amount | Notes |
|---|---|---|
| Honeycrisp Apples 🍎 | 4 whole | Firm, unblemished, cored |
| Unsalted Butter 🧈 | ½ cup | Cold, cubed for caramelization |
| Granulated Brown Sugar 🍚 | ¼ cup | Light variety preferred |
| Ground Cinnamon 🌿 | 1 tbsp | Freshly ground for aroma |
| Flaky Sea Salt 🧂 | ½ tsp | Maldon or Jacobsen preferred |
Apple selection is non-negotiable here. Honeycrisp delivers the perfect balance of crispness and sweetness, but Granny Smith works beautifully if you prefer tartness. Avoid apples with bruises or soft spots—they won't hold their shape during baking. Most grocery stores carry Honeycrisp in the fall, but specialty markets like Whole Foods often have organic varieties. Look for apples with vibrant skin and firmness when pressed. If you can't find Honeycrisp, Braeburn or Pink Lady are excellent substitutes. The key is firmness: the apple should feel solid to the touch, not yielding at all.
No brown sugar? White sugar plus 1 tsp molasses mimics the caramelized depth. The butter must be cold when cubed—this ensures proper caramelization without over-browning. For a dairy-free option, substitute coconut oil or vegan butter, though texture may differ slightly. The cinnamon should be freshly ground if possible—pre-ground loses potency quickly. If you're using a pre-ground blend, toast the spices in a dry pan for 30 seconds to revive their aroma. Flaky sea salt like Maldon adds a sophisticated finish, but regular kosher salt works in a pinch. Just sprinkle it lightly over the top before serving.
Store any leftovers in an airtight container in the refrigerator for up to 4 days. They reheat beautifully—just 10 seconds in the microwave or 5 minutes at 350°F. For make-ahead convenience, slice the apples and store them in a sealed container with a paper towel to absorb moisture. Bake them straight from the fridge for slightly more even cooking. This dessert is best served warm, so plan accordingly. The caramelized sugars intensify when reheated, making it perfect for second servings.
Why You'll Love This Recipe
- Five-Minute Prep: I swear, the hardest part is peeling those apples—just slice them in half, make a few shallow cuts, and you’re done. No chopping, no fuss, just a knife and a baking sheet.
- Honeycrisp Magic: That crisp-tender apple flesh? It’s the star. The butter and brown sugar caramelize into a sticky, buttery crust while the cinnamon and sea salt cut through the sweetness—like dessert meets comfort food.
- Weeknight or Holiday: Serve it warm with vanilla ice cream when you’re craving something easy, or prep a batch ahead for a potluck. Honestly, it’s the kind of dish that works for both lazy Tuesdays and Thanksgiving sides.
- Leftovers That Don’t Suck: Cool them down, and they’re perfect for breakfast toast the next morning. Or reheat them in the oven for a quick snack—no one will guess they’re not fresh-baked. (Between us, I’ve eaten them cold straight from the fridge.)
Step-by-step instructions for hasselback apples
Master this technique for perfectly caramelized apples with crisp edges and tender centers.
Prepare the Apples for Slicing
Begin by preheating your oven to 375°F for optimal caramelization. Wash the 4 whole Honeycrisp Apples thoroughly and pat them completely dry with paper towels - any moisture will prevent proper browning. Using a sharp chef's knife, carefully slice each apple from top to bottom, stopping about ¼ inch from the base. This prevents the apples from falling apart while allowing the caramelized filling to penetrate deeply.
Arrange the sliced apples upright in a single layer on a parchment-lined baking sheet, leaving about 1 inch between each apple. The vertical slices should fan out naturally. This spacing ensures even heat circulation and prevents the apples from steaming instead of caramelizing. For extra stability, gently press down on the top slices to create a slight fan shape while maintaining the structural integrity of each apple.
Create the Caramelizing Filling
In a small bowl, combine the 0.5 cup Unsalted Butter (cold, cubed), 0.25 cup Granulated Brown Sugar, 1 tbsp Ground Cinnamon, and 0.5 tsp Flaky Sea Salt. Use your fingers to work the mixture until it forms a coarse, crumbly paste with visible butter pieces. This texture is crucial - the cold butter will melt gradually in the oven, creating a rich, glossy caramel rather than a dry crumb topping.
Gently spoon the mixture into the center of each apple, pressing lightly to distribute it between the slices. Be generous but not excessive - the filling should coat each slice without overflowing. The butter will melt and caramelize, while the brown sugar and cinnamon will create that signature sweet-spiced flavor profile. This is where the magic happens, so take your time to ensure even distribution throughout each apple.
Bake to Perfect Caramelization
Place the prepared apples in the preheated oven and bake for 35-40 minutes, rotating the baking sheet halfway through for even browning. You're looking for apples that develop deep golden brown edges with caramelized filling oozing between the slices. The internal temperature should reach 190-195°F when measured at the thickest part - this ensures the apples are tender without being mushy.
During the last 5 minutes of baking, watch closely for the edges to achieve a deep caramel color. If they're browning too quickly, tent the baking sheet with aluminum foil to prevent burning while still allowing the filling to caramelize. The apples are done when they're easily pierced with a paring knife and the filling has thickened into a glossy, syrupy consistency. Remove from the oven and let rest for 5 minutes before serving - this allows the juices to redistribute and the caramel to set slightly.
Serve Warm with Optional Garnishes
Transfer the baked apples to a serving platter, arranging them upright to showcase their beautiful caramelized layers. The filling should have thickened into a rich, glossy caramel with visible butter pools. Serve immediately while warm, as the texture and flavor are at their peak when the apples are piping hot. The contrast between the crisp edges and tender centers creates the perfect textural experience.
For presentation, you may garnish with an additional sprinkle of flaky sea salt or a dusting of ground cinnamon just before serving. The salt enhances the caramel sweetness while the cinnamon adds a final aromatic note. These apples pair beautifully with vanilla ice cream, whipped cream, or even as a warm dessert on their own. The natural sweetness of Honeycrisp apples shines through in this preparation, making it a showstopping dessert that requires minimal effort but delivers maximum impact.
Pro Tips For Making Hasselback Apples
- CUT THIN SLICES: DESCRIPTION: Hasselbacks need precision—aim for ¼-inch slices, no thicker. I learned this the hard way after burning the edges on apples that were too thick; they steam instead of caramelize. Use a sharp knife and cut parallel to the core, keeping the slices even for consistent cooking.
- BUTTER THE SLOTS: DESCRIPTION: Don’t just dot butter on top—spread 1 teaspoon of softened butter into each vertical slice cut. The butter melts into the apple fibers, making them tender and rich. Skip this, and you’ll end up with dry edges and a dull flavor.
- SALT BEFORE BAKING: DESCRIPTION: Sprinkle the flaky sea salt right after scoring, not just on top. The salt dissolves into the apple as it bakes, enhancing sweetness and preventing a bland center. I used to add it at the end—big mistake. Do it early, and the flavor develops evenly.
- COVER HALFWAY: DESCRIPTION: After 20 minutes, tent the pan with foil for 10 minutes to trap steam. This keeps the apples from drying out while the sugar melts into caramel. I was skeptical until I tried it—now it’s non-negotiable for tender, glossy results.
Creative variations of this recipe
Spiced Caramelized Version
Infuse your hasselback apples with warm spices by adding ½ tsp cardamom and ¼ tsp nutmeg to the cinnamon-butter mixture. These spices create an aromatic Middle Eastern-inspired twist that pairs beautifully with warm vanilla ice cream.
For extra depth, I like to toast ¼ cup chopped pecans in a dry pan until golden, then sprinkle them over the apples during the last 5 minutes of baking. 🌶️
Stuffed Apple Variation
Transform your hasselback apples into a hearty dessert by stuffing the slices with a mixture of ¼ cup rolled oats, 2 tbsp chopped walnuts, and 1 tbsp maple syrup. Press this filling between the apple slices before baking.
The oats will crisp slightly while the nuts add crunch. This version works especially well with Braeburn apples for their natural tartness that balances the sweet stuffing. 🍂
Boozy Apple Twist
For adults-only gatherings, add 1 tbsp bourbon or apple brandy to the butter-sugar mixture. The alcohol burns off during baking, leaving behind rich, caramelized notes with subtle depth.
I recommend Woodford Reserve or Applejack for this application. For a non-alcoholic option, substitute with 1 tsp vanilla extract and an extra pinch of cinnamon. 🥃
Chocolate-Dipped Finishing
After baking, let the apples cool slightly, then dip the bottom ½ inch of each apple into melted dark chocolate. Place them on parchment paper and chill for 10 minutes until the chocolate sets.
This creates a stunning presentation with a satisfying contrast between the warm apple and cool chocolate. Use 70% cacao chocolate for balance, or Ghirardelli Squares for convenience. 🍫
Savory Herb Version
Surprise your guests with a savory twist by omitting the sugar and adding 1 tbsp chopped fresh rosemary, 1 tsp Dijon mustard, and 2 tbsp goat cheese to the butter mixture.
Bake as directed, then finish with crumbled feta and a drizzle of honey. This unexpected combination works beautifully as an appetizer or side dish with roasted meats. 🌿
Seasonal Citrus Glaze
Brighten up your hasselback apples with a citrus glaze made from 2 tbsp orange marmalade and 1 tbsp fresh orange juice. After baking, brush this mixture between the apple slices and let it caramelize for 2 minutes under the broiler.
The citrus cuts through the richness while adding vibrant color. For a festive touch, garnish with candied orange peel. 🍊
Nutrition facts
Frequently asked questions
Why do the apple slices need to stay attached at the bottom?
Leaving the bottom intact creates structural support so the apples hold their shape during baking. The vertical slices fan out naturally while the base remains stable, allowing the caramelized filling to penetrate evenly. This technique also makes serving easier—just lift the whole apple from the bottom slice!
Can I use any apple variety for this recipe?
No—firm, crisp apples work best. Honeycrisp or Granny Smith hold their shape perfectly, while softer varieties like McIntosh may fall apart. Avoid apples with bruises or spots—they won’t caramelize evenly. For extra tartness, try Braeburn or Pink Lady.
How do I fix apples that are browning too quickly?
If the edges darken before the filling caramelizes, tent the baking sheet with aluminum foil for the last 5-10 minutes. This traps heat while preventing over-browning. For even cooking, rotate the pan halfway through baking. The internal temperature should reach 190-195°F—use a thermometer to check!
Can I make this ahead of time?
Slice the apples and store them in an airtight container with a paper towel (to absorb moisture) for up to 24 hours before baking. For leftovers, reheat at 350°F for 5 minutes or microwave for 10 seconds. The caramelized filling thickens further when reheated, making it even more decadent!
What’s the best way to serve hasselback apples?
Warm hasselback apples shine with vanilla ice cream, whipped cream, or a drizzle of honey. For a restaurant touch, garnish with flaky sea salt and extra cinnamon. They’re also perfect alongside roasted pork or as a standalone dessert—just arrange them upright on a platter to showcase their caramelized layers!