
Main Courses
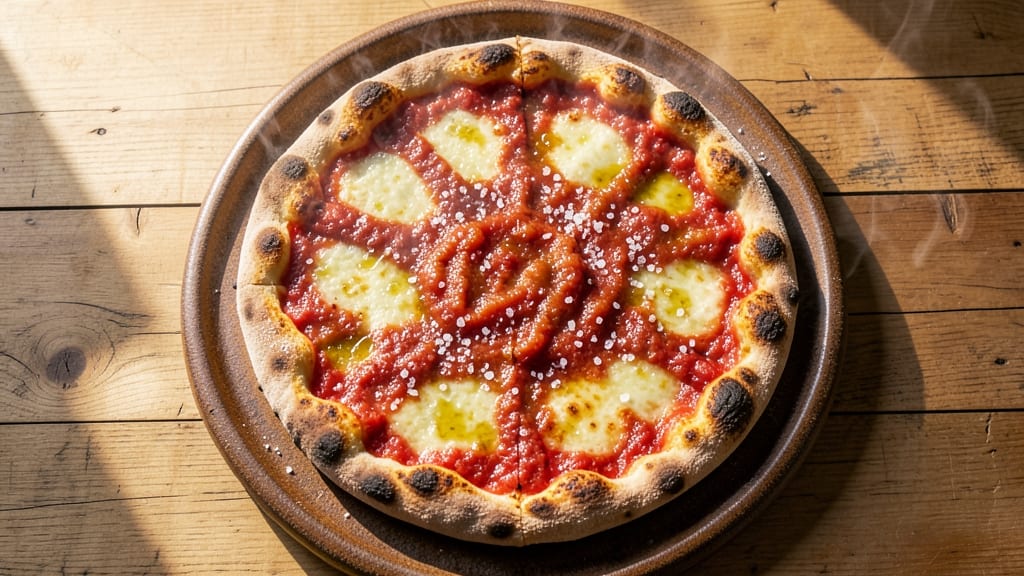
This Italy pizza recipe brings the soul of Naples straight to your kitchen with a stretchy, chewy crust that's impossible to resist. The secret lies in high-hydration dough and a quick, hot bake—just like the pizzerias where Neapolitan pizza was born.
I've perfected this method after years of testing, and the results are always restaurant-quality, even at home.
The dough requires only five ingredients but demands patience—it needs at least 24 hours of fermentation for that signature airy texture. Traditional Neapolitan pizza relies on simple toppings like San Marzano tomatoes, fresh mozzarella, and basil, but this recipe also includes modern variations for flexibility.
The key to success? A screaming-hot oven or pizza stone to achieve that perfect char in under two minutes.
What you'll end up with is a pizza with a crispy, blistered crust and a soft, pillowy center—each slice pulling slightly as you lift it from the pan. The sauce should be tangy but not overpowering, the cheese bubbly and golden, and the toppings perfectly balanced.
This is pizza as it was meant to be eaten: simple, authentic, and utterly satisfying.
Whether you're making a classic Margherita or experimenting with Roman-style toppings, this recipe delivers professional results every time. The dough can be prepped ahead, and the baking method adapts to home ovens or even a grill for that wood-fired flavor. Let's get started on your journey to authentic Italian pizza.
Ingredients for italy pizza
Five core ingredients craft the dough, while fresh toppings elevate this authentic Neapolitan pizza experience.
| Ingredient | Amount | Notes |
|---|---|---|
| King Arthur Bread Flour 🌾 | 3 cups | High-protein for chewy texture |
| Diamond Crystal Kosher Salt 🧂 | 1 ½ tsp | Fine grain preferred for even distribution |
| Active Dry Yeast 🍞 | ¼ tsp | Ensure freshness (test in warm water) |
| Extra-Virgin Olive Oil 🫒 | ½ cup | High-quality for authentic flavor |
| Water 💧 | 1 ½ cups | Room temperature for proper hydration |
| San Marzano Tomato Sauce 🍅 | 1 ½ cups | Canned, crushed by hand |
| Fresh Mozzarella 🧀 | 16 oz | Low-moisture if unavailable |
| Fresh Basil Leaves 🌿 | ½ cup | Packed, stems removed |
| Garlic Cloves 🧄 | 3 cloves | Minced for sauce |
| Parmesan Cheese 🧀 | ½ cup | Freshly grated from block |
| Cornmeal 🌽 | ¼ cup | For dusting pizza peel |
| Semolina Flour 🌾 | ¼ cup | Optional for extra crispiness |
The King Arthur Bread Flour is non-negotiable—its high protein content yields that signature chewy yet airy crust. For yeast, Red Star Platinum or Saf-Instant work best, but always check expiration dates. San Marzano tomatoes from Italian markets or specialty stores like Whole Foods deliver superior sweetness and acidity. If using low-moisture mozzarella, shred it yourself for better melt. The extra-virgin olive oil should have a peppery finish—California Olive Ranch or Colavita are reliable choices. Room-temperature water prevents gluten shock during mixing.
No San Marzano tomatoes? Crushed tomatoes with added sugar and lemon juice can mimic the balance, though the flavor won't be identical. Substituting fresh mozzarella with shredded mozzarella plus ricotta (50/50 mix) improves meltability. For basil, dried oregano at one-third the amount works in a pinch, but fresh is ideal. The garlic can be roasted for a sweeter profile, though traditional mincing works too. If you lack a pizza stone, a baking sheet on the highest oven rack mimics the effect—just preheat it for 30 minutes first.
The dough ferments best in a glass bowl covered with a damp towel for 24 hours at room temperature. Store unused dough in the fridge for up to 72 hours, or freeze portions for 3 months—thaw overnight in the fridge. Toppings should be added within 30 minutes of baking to prevent sogginess. The sauce and cheese can be prepped ahead, but basil should be added post-bake. Leftovers? Reheat in a 400°F oven for 5-7 minutes to restore crispiness.
Why You'll Love This Recipe
- No Yeast Stress: I swear by this dough—just flour, water, oil, and a sprinkle of salt. No yeast headaches, no waiting hours. My kids can help mix it while I prep dinner, and it’s ready faster than takeout.
- Crispy Yet Chewy Magic: That Bread Flour? It’s the secret. The edges get golden and shatteringly crisp, but the inside stays soft enough to fold like a napkin. Honestly, it’s the closest I’ve gotten to Neapolitan at home.
- Weeknight Workhorse: Use it for dinner tonight, pack leftovers for lunch, or freeze half for lazy Mondays. The dough keeps well, and the flavor only gets better reheated. (Yes, even on a Tuesday night.)
- Pocketbook-Friendly Luxury: Four ingredients, zero shortcuts. The kosher salt and extra-virgin olive oil make it taste like a trattoria, but the cost? A fraction. My budget and my taste buds win.
Step-by-step instructions for authentic Neapolitan crust and stretchy dough
Mastering this dough requires patience and precision—every step builds the signature chew and elasticity.
Activate the Yeast and Hydrate the Dough
In a large mixing bowl, combine the 1.5 cups water with the 0.5 cup extra-virgin olive oil and 1.5 teaspoons diamond crystal kosher salt. Stir until the salt fully dissolves—this creates an ideal osmotic environment for yeast activation. Sprinkle the 0.25 teaspoon active dry yeast over the surface and let it sit for 5 minutes until it develops a frothy foam. This confirms the yeast is alive and ready to work.
Next, add the 3 cups king arthur bread flour all at once. Using a wooden spoon or dough whisk, mix vigorously until a shaggy mass forms. The high-protein flour will develop gluten gradually as you work it. Avoid overmixing at this stage—you're simply creating a rough dough structure to begin gluten formation.
Knead by Hand for Optimal Gluten Development
Turn the dough onto a lightly floured surface and knead for 8-10 minutes using a "push-and-fold" technique. Work the dough by pushing it away from you with the heels of your hands, then folding it back toward the center. This method builds gluten more efficiently than punching or slapping. You'll know it's ready when the dough becomes smooth, elastic, and springs back slowly when poked.
Here's where authenticity matters: Neapolitan dough relies on minimal handling. Over-kneading develops tough gluten strands that disrupt the signature chew. Stop when the dough passes the "windowpane test"—stretch a small piece thin enough to see light through without tearing. If it tears immediately, knead another minute.
Bulk Ferment at Controlled Temperature
Lightly oil a large mixing bowl, place the dough inside, and cover tightly with plastic wrap. Let it ferment at 70-72°F for 1-2 hours until it has roughly doubled in volume. This bulk fermentation develops flavor and creates gas bubbles that will give your crust its signature airiness. If your kitchen is cooler than 70°F, extend fermentation time to 3 hours—temperature is critical for proper yeast activity.
During fermentation, perform two "degassing" folds: after 30 minutes and again after 1 hour. To do this, wet your hands, grab one side of the dough, stretch it upward, and fold it over the center. Rotate the bowl and repeat on all four sides. These folds strengthen gluten structure without overworking the dough. The dough should feel slightly tacky but not sticky when ready for shaping.
Shape and Final Proof for Neapolitan Character
Divide the dough into 4 equal portions (about 8 ounces each) and shape into balls by cupping your hands around each piece and gently rolling it on the counter. Let them rest for 15 minutes to relax the gluten. Then, using your fingertips, stretch each ball outward into a 12-inch round, keeping the edges slightly thicker than the center. This creates the classic Neapolitan crust with a thin, crispy edge and a soft, chewy interior.
Place shaped dough on parchment paper dusted with 0.25 cup cornmeal (or 0.25 cup semolina flour for extra crispiness). Cover loosely and proof at 75°F for 45-60 minutes until puffy with visible bubbles. The edges should have spread slightly but maintain definition. Avoid overproofing—the dough should resist gentle indentation but not spring back vigorously.
Assemble and Bake for Perfect Texture
Preheat your pizza oven (or home oven) to its maximum temperature—750°F for authentic results, or 500°F for conventional ovens. On each shaped crust, spread 0.375 cups san marzano tomato sauce (about 0.5 cups total divided), leaving a ½-inch border. Top with 4 ounces fresh mozzarella (about 16 ounces total divided), 0.125 cups fresh basil leaves (about 0.5 cups total chopped), and a sprinkle of 0.125 cups parmesan cheese (about 0.5 cups total grated).
Bake for 90 seconds in a pizza oven or 12-15 minutes in a home oven until the crust is deep golden brown with charred spots and the cheese bubbles vigorously. The edges should puff slightly while maintaining structure. For authentic flavor, finish with minced garlic cloves (from the 3 cloves reserved) and additional fresh basil leaves immediately after baking. Serve while the crust is still hot and crisp.
Pro Tips For Making Italy Pizza
- AUTOLYSE FIRST: DESCRIPTION: Mix the flour and water (no yeast yet) and let it sit for 30–60 minutes before adding the yeast. I learned this the hard way—skipping it makes the dough tougher and harder to stretch. The flour’s enzymes start breaking down the gluten early, so your dough will be silky and forgiving.
- WEIGH THE SALT: DESCRIPTION: Diamond Crystal kosher salt clumps like crazy—use a kitchen scale for accuracy (about 1.5% of flour weight). I used to eyeball it, and my dough either tasted bland or got stuck in the oven. Precision here means consistent flavor and texture every time.
- STRETCH, DON’T ROLL: DESCRIPTION: Resist the urge to roll out the dough—grab and stretch from the center outward with your fingertips. Rolling compresses the gluten, killing that airy, Neapolitan-style bite. It takes practice, but your crust will thank you.
- HYDRATE THE OVEN: DESCRIPTION: Spray the oven floor or pizza stone with olive oil and a splash of water right before baking. The steam mimics a wood-fired oven, giving you that perfect blistered crust. I used to skip this—my pizzas came out dry until I tried it. Works like magic.
Troubleshooting perfect results
Overproofed Dough
If your dough rises too much during proofing, it’ll collapse when baked, losing its structure. This happens when fermentation exceeds 60 minutes at 75°F or when yeast is too active. To fix it, punch down the dough gently and reduce proofing time by 20-30 minutes next time.
Keep your kitchen cool (70°F) and use Saf-Instant yeast for more predictable timing. 🌡️
Soggy Crust
A soggy crust usually means overloaded toppings or undercooked dough. Neapolitan pizza relies on minimal toppings—stick to 4-6 ounces total (sauce + cheese). Bake immediately after adding toppings (within 30 minutes) to prevent moisture from seeping in.
For extra insurance, pre-bake the crust for 60 seconds before adding toppings. 🍕
Uneven Cooking
If your pizza cooks unevenly, your oven isn’t hot enough or the dough isn’t evenly shaped. Preheat your oven (or pizza stone) for at least 1 hour to reach 500°F or higher.
Use a digital thermometer to confirm heat—many home ovens struggle to maintain high temps. Also, stretch dough to ¼-inch thickness for even cooking. ⚡
Dough Sticking
Dough sticks when the surface isn’t properly dusted or the peel isn’t well-oiled. Always use cornmeal or semolina flour on parchment paper, and lightly oil your pizza peel or baking sheet.
For extra release, dust the peel with flour after placing the dough on it. Avoid over-flouring—the dough should stick slightly to itself but not to the surface. 🧂
Pale or Undercooked Center
A pale center means the pizza didn’t bake long enough or the oven wasn’t hot enough. Increase baking time by 1-2 minutes and ensure your oven reaches 500°F (use an oven thermometer).
For home ovens, place a baking tray on the lower rack to reflect heat upward. Rotate the pizza halfway through baking for even browning. 🔥
Cheese Not Melting
Cheese fails to melt when it’s too cold or the pizza isn’t hot enough. Let fresh mozzarella sit at room temperature for 30 minutes before using. If your oven isn’t hot enough, bake the pizza on the upper rack for 1-2 extra minutes.
For extra gooeyness, sprinkle cheese with 1 tsp grated Parmesan before baking—it acts as a melting agent. 🧀
Nutrition facts
Frequently asked questions
Can I make this Neapolitan dough without a stand mixer?
The recipe is designed for hand-kneading using the "push-and-fold" technique. This method develops gluten efficiently without electricity. Just work the dough for 8-10 minutes on a lightly floured surface until it becomes smooth and elastic. The high hydration makes it slightly sticky, but that's normal—it should spring back slowly when poked.
What's the difference between Neapolitan and Roman-style pizza?
Neapolitan pizza features a thin, soft, and slightly charred crust with minimal toppings, while Roman-style has a thicker, crispier base (like focaccia) and often includes heartier toppings. Neapolitan uses San Marzano tomatoes and fresh mozzarella, while Roman pizza might include ricotta or cured meats. The dough hydration differs too—Neapolitan is 65-70% water, Roman around 55-60%.
How do I know when my dough is properly proofed?
The dough should roughly double in size and have visible bubbles when ready. Press gently with a fingertip—it should spring back slowly (not vigorously). For Neapolitan dough, proof at 75°F for 45-60 minutes. If your kitchen is cooler, extend to 90 minutes max. Overproofing (beyond 60 minutes) causes collapse during baking. Use a digital thermometer for accuracy.
Can I make this pizza ahead of time?
Yes! Prepare the dough up to 72 hours ahead and store it in the fridge (covered tightly). For best results, let it sit at room temperature for 1 hour before shaping. The sauce and cheese can be prepped 24 hours ahead, but add fresh basil right before baking. For leftovers, reheat in a 400°F oven for 5-7 minutes to restore crispiness.
What if I don't have a pizza stone or steel?
No problem! Use a preheated baking sheet on the highest oven rack for 30 minutes before baking. For extra crispiness, place a cast-iron skillet on the lower rack during preheating. Avoid glass pans—they don't distribute heat evenly. If using a peel, dust it with cornmeal or semolina flour for easy release.