
Desserts
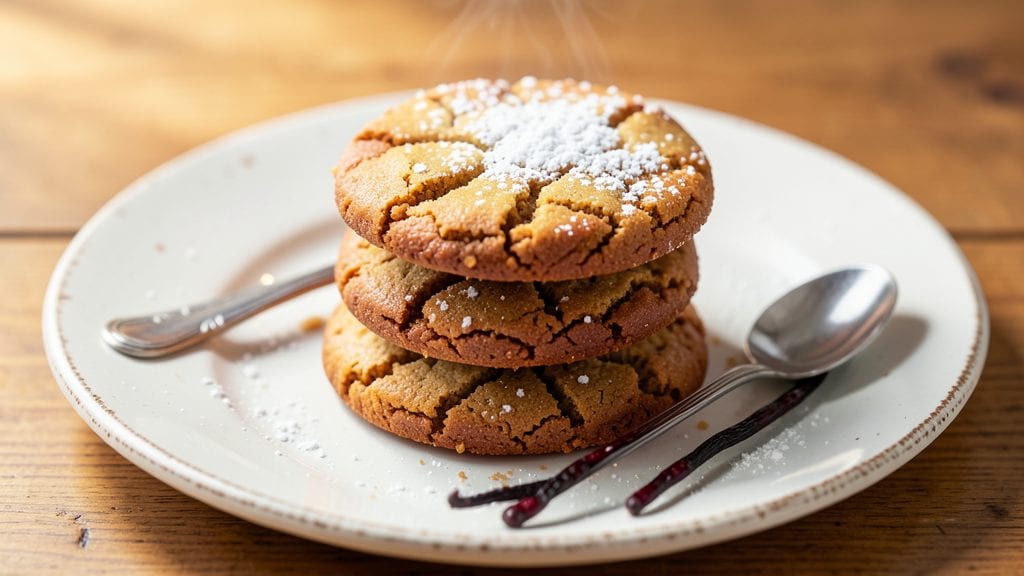
This mochiko cookie recipe delivers the perfect balance of buttery crunch and chewy centers—exactly what makes Japanese-style cookies so irresistible. The secret lies in mochiko flour, a finely milled rice flour that creates that signature tender crumb while maintaining crisp edges.
I’ve baked these countless times, adjusting ratios until I nailed the texture that keeps everyone reaching for seconds.
The beauty of mochiko flour is how it transforms ordinary cookies into something extraordinary—chewy yet sturdy, with a delicate sweetness that lingers. Unlike all-purpose flour, it requires precise measurements and gentle handling to avoid overdevelopment.
But once you master it, the results are worth every effort: golden-brown cookies with a melt-in-your-mouth center and a satisfying crunch.
What sets these apart is the technique: chilling the dough for at least 30 minutes ensures even baking, while baking at 350°F creates that perfect contrast between crispy edges and soft interiors.
The butter adds richness without overpowering the subtle sweetness of the mochiko, making each bite a little slice of comfort.
These cookies pair beautifully with a cup of green tea or milk, and they store well in an airtight container for up to a week. Whether you’re baking for a gathering or treating yourself, this recipe delivers professional-quality results with simple steps. Let’s get started!
Ingredients for mochiko cookie
Mochiko flour transforms ordinary cookies into delicate chews with crisp edges—just five staples make magic.
| Ingredient | Amount | Notes |
|---|---|---|
| Mochiko Flour 🌾 | 1 ½ cups | Finely milled rice flour, essential for texture |
| Unsalted Butter 🧈 | 1 cup | Cold, cubed, full-fat for richness |
| Granulated Sugar 🍚 | ¾ cup | Superfine preferred for smooth texture |
| Light Brown Sugar 🍯 | ¼ cup | Packed, for subtle chewiness |
| Large Eggs 🥚 | 2 whole | Room temperature for even mixing |
| Vanilla Extract 🌸 | 1 tsp | Pure, high-quality vanilla |
| Diamond Crystal Kosher Salt 🧂 | ½ tsp | Fine grain, essential for flavor balance |
| Baking Soda 🍫 | ¼ tsp | Pure, for proper rise |
| Toasted Sesame Seeds 🌰 | 2 tbsp | Optional, for nutty crunch |
| Granulated Sugar 🍚 | ¼ cup | For rolling, extra crunch |
Mochiko flour is the star here—Japanese specialty stores or Amazon carry it, but check the bulk section at Whole Foods first. The brand matters: Mitsukan or Shiratamako are top-tier, but any pure mochiko works. For butter, Plugrá or Land O’Lakes are reliable, but never use margarine. The sugar ratio is key: superfine dissolves better, but if you only have regular, pulse it in a food processor. Toast your sesame seeds in a dry pan for 2 minutes—they’ll add depth of flavor.
No mochiko? Rice flour is the closest substitute, but texture will differ slightly. Short on vanilla? Seeds from a pod work in a pinch, but extract delivers better flavor. The baking soda is non-negotiable—it’s what creates that signature chew. For a nutty twist, swap sesame seeds for crushed peanuts or almonds. Want extra crunch? Add 1 tbsp crushed pistachios to the dough. The dough will be sticky—don’t overwork it, or you’ll develop the gluten and lose that melt-in-your-mouth quality.
Wrapped in parchment, these keep 5 days at room temperature, but they’re best fresh. For longer storage, freeze portions between parchment for up to 3 months. Reheat at 300°F for 5 minutes to restore crispness. I always bake a double batch—they disappear fast. These pair perfectly with matcha green tea or a glass of cold milk, but honestly, they’re great on their own.
Why You'll Love This Recipe
- No-Fail Texture: I swear by this dough—mochiko flour gives it that signature chewy, melt-in-your-mouth magic. No overmixing, no stressing over crumbly messes. Just creamed butter, eggs, and sugar that hold together like a dream.
- Buttery-Sweet Magic: That combo of brown and white sugar? Chef’s kiss. The brown sugar caramelizes just enough to add depth, while the butter keeps it rich but never greasy. Honestly, one bite and you’ll forget store-bought ever existed.
- Party or Snack: These cookies freeze like a champ, so I make a batch when I’m feeling lazy and pull them out for holidays, potlucks, or just because. No one will guess they’re prepped ahead—still warm, still perfect.
- Pantry Staple Power: Mochiko’s cheap, butter’s a staple, and eggs? Always on hand. I’ve made these with expired flour (yes, really) and they still turned out. Budget-friendly, foolproof, and always a win.
Step-by-step instructions for mochiko cookies
Here's how to craft these delicate yet crunchy mochiko cookies with perfect texture every time.
Cream the Butter and Sugars Together
In a stand mixer fitted with the paddle attachment, combine the 1 cup unsalted butter (cold, cubed) with the 0.75 cup granulated sugar and 0.25 cup light brown sugar. Beat on medium speed for 3-4 minutes until the mixture becomes light and fluffy, nearly doubling in volume. The color should shift from pale to a soft, buttery hue.
This creaming process is crucial—it incorporates air into the dough, which creates those signature crackly tops and tender centers. If your butter isn't cold enough, the cookies will spread too much. I always test the butter by pressing my finger into it; if it leaves a slight indent, it's ready. Scrape down the sides of the bowl as needed to ensure even mixing.
Add Eggs, Vanilla, and Dry Ingredients
With the mixer running on low speed, add the 2 whole large eggs one at a time, allowing each to fully incorporate before adding the next. After the eggs are fully combined, add the 1 teaspoon vanilla extract and mix for an additional 30 seconds. This step ensures the eggs are fully emulsified, which prevents dense cookies.
In a separate bowl, whisk together the 1.5 cups mochiko flour, 0.5 teaspoon diamond crystal kosher salt, and 0.25 teaspoon baking soda. Gradually add this dry mixture to the wet ingredients, mixing on low speed just until combined. Avoid overmixing—you should still see small flour streaks. The mochiko flour gives these cookies their signature delicate crumb, so handle it gently to preserve its light texture.
Fold in Sesame Seeds and Chill the Dough
Remove the bowl from the mixer and gently fold in the 2 tablespoons toasted sesame seeds using a silicone spatula. The sesame seeds add a subtle nutty crunch that contrasts beautifully with the chewy centers. Once incorporated, cover the bowl with plastic wrap and refrigerate for at least 1 hour—this step is non-negotiable.
Chilling the dough is what transforms these cookies from good to extraordinary. It firms up the butter, preventing excessive spreading, and allows the flour to fully hydrate. If you're short on time, you can chill the dough for up to 24 hours—this actually enhances the flavor as the ingredients meld together. Use a timer so you don't forget this critical step.
Roll, Shape, and Bake to Golden Perfection
Preheat your oven to 350°F and line two baking sheets with parchment paper. Once the dough is chilled, divide it into 4 equal portions (about 6 ounces each). On a lightly floured surface, roll each portion into a 1-inch thick log, about 8 inches long. Wrap each log tightly in plastic wrap and freeze for 15 minutes to firm up.
Using a sharp knife, cut each log into ½-inch thick rounds. Place the cookies 2 inches apart on the prepared baking sheets. Bake for 12-14 minutes until the edges are golden brown and the centers still look slightly underdone. They'll firm up as they cool. Rotate the baking sheets halfway through for even baking—this is especially important with mochiko flour, which can bake unevenly.
Roll in Sugar and Cool Completely
Immediately after removing the cookies from the oven, let them cool on the baking sheets for 5 minutes. While still warm, transfer them to a wire rack and roll each cookie in the 0.25 cup granulated sugar, pressing gently to adhere. This step adds that signature crunchy exterior that pairs perfectly with the chewy interior.
Allow the cookies to cool completely before serving—this ensures the sugar sets properly and the centers set up fully. If you can't wait, they'll still be delicious but slightly softer. Store in an airtight container at room temperature for up to 5 days, or freeze for up to 3 months. These cookies are best enjoyed at room temperature, so let them sit for 10 minutes before serving for the ultimate texture contrast.
Pro Tips For Making Mochiko Cookie
- CHILL THE DOUGH: Mochiko cookies spread less than wheat-based ones, but they still need time to firm up—skip the fridge if you’re in a rush, but give them at least 30 minutes in the coldest part of your fridge. I learned this the hard way when my first batch flattened into sad pancakes on the tray.
- CREAM BUTTER COLD: Unsalted butter straight from the fridge is your friend here—beat it with the sugars until it’s light but still holds peaks, not soupy. After burning through three batches of greasy, dense cookies, I finally realized: room-temperature butter is the enemy of crisp edges.
- WEIGH THE FLOUR: Mochiko is dense, and scooping it straight from the bag packs it down, adding way more than you need. Use a kitchen scale for precision—1 cup of packed mochiko weighs about 120g, not the 110g you’d expect with all-purpose flour. Trust me, your cookies will thank you.
- BAKE LOW AND SLOW: These cookies need a gentle 325°F (160°C) oven—any hotter and they’ll brown before setting, turning into crispy, uneven lumps. Rotate the tray halfway through, and resist the urge to peek; the edges will look underdone, but they’ll firm up as they cool. (Yes, even if you’re impatient like me.)
Make-ahead tips for this recipe
Dough Prep Ahead
Roll the chilled dough into logs and wrap tightly in plastic wrap. Store them in the fridge for up to 3 days or freeze for 3 months. When ready to bake, simply thaw at room temperature for 30 minutes before cutting.
I always prep a batch on Sunday so I can enjoy fresh cookies all week—just pull them out, slice, and bake whenever cravings strike. 📅
Baked Cookie Storage
Let cookies cool completely before storing in an airtight container with parchment paper between layers. They’ll stay fresh at room temperature for 5 days, though I find they’re best within 2 days for maximum texture contrast.
For longer storage, freeze baked cookies between parchment sheets for up to 3 months. 💫
Reviving Stale Cookies
If your mochiko cookies lose their crispness, revive them by placing on a baking sheet and warming in a 300°F oven for 5-7 minutes. The residual moisture in the dough will reactivate, restoring that satisfying crunch.
I also keep a small batch in the freezer specifically for this purpose—just pop one in when I need a quick treat. ✨
Batch Baking Tips
Double the recipe and bake in batches—never overcrowd the baking sheet, or cookies will spread unevenly. I use a parchment-lined sheet and place cookies 2 inches apart for perfect golden edges.
For large gatherings, bake two sheets simultaneously in separate ovens if possible. The mochiko flour requires precise spacing to avoid merging. 🔥
Freezing Unbaked Dough
For ultimate convenience, freeze the dough logs in a freezer bag with parchment between each. When ready to bake, thaw for 1 hour in the fridge, then proceed as directed.
The cold dough prevents excessive spreading, ensuring those perfect chewy centers. I label my frozen dough with dates—this batch is always the first to disappear! ❄️
Make-Ahead Serving
Arrange cooled cookies on a platter with a dusting of powdered sugar or a sprinkle of flaky sea salt for presentation. Pair with a pot of hot green tea or vanilla ice cream for a showstopping dessert.
I often assemble these the night before parties so I can focus on guests—just pull them out of storage and serve straight from the container. 🍵
Nutrition facts
Frequently asked questions
Why does mochiko flour make cookies chewy instead of crisp?
Mochiko's fine texture and low gluten content create tender, melt-in-your-mouth centers while maintaining crisp edges. The flour's high starch content absorbs moisture differently than wheat flour, preventing overdevelopment. Chilling the dough for at least 1 hour preserves this delicate balance—skipping this step leads to denser cookies.
Can I substitute mochiko with regular flour?
Not ideally—mochiko's unique properties create the signature texture. For a close substitute, mix 1.25 cups rice flour with 0.25 cup all-purpose flour, but expect slightly less chewiness. The dough will be stickier, so handle gently to avoid overworking. For best results, use mochiko if possible.
How do I fix cookies that spread too much?
Over-spreading usually means the butter was too soft or the dough wasn't chilled long enough. Next time, chill the dough for 24 hours and use cold butter (press a finger into it—it should leave a slight indent). Also, bake at 350°F and rotate pans halfway through for even heat distribution.
Should I add baking powder instead of baking soda?
No—this recipe relies on baking soda for proper rise and chewiness. Baking powder contains cornstarch that can alter the texture. For a lighter cookie, you could replace 0.125 tsp of baking soda with baking powder, but test first as it may affect the chew.
What's the best way to store these cookies for maximum freshness?
Store in an airtight container with parchment between layers at room temperature for 5 days. For longer storage, freeze baked cookies (not dough) between parchment sheets for 3 months. To revive stale cookies, warm at 300°F for 5 minutes—the moisture reactivates that perfect crunch.