
Desserts
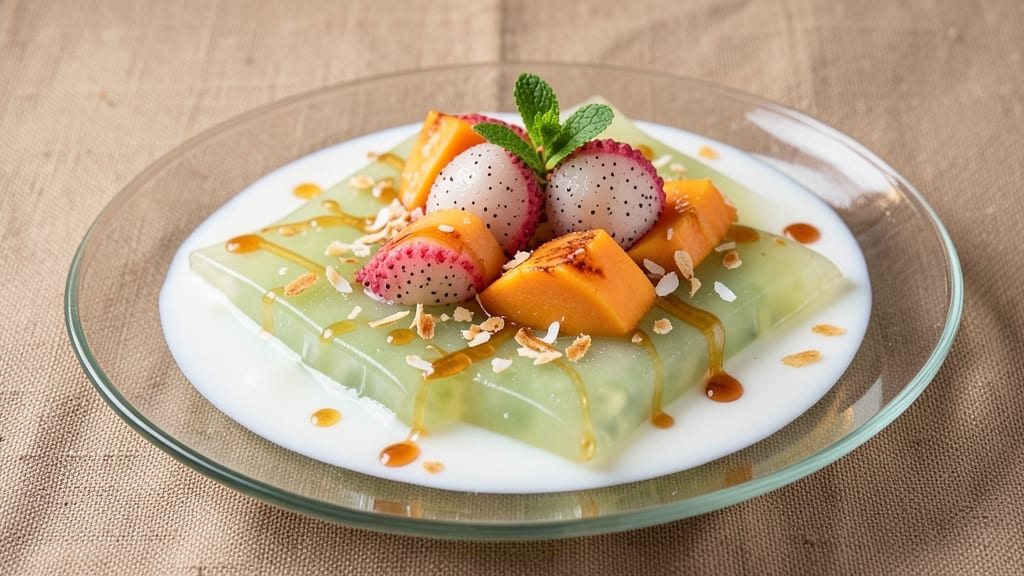
This mung bean sheet jelly recipe transforms simple ingredients into a silky, wobbling dessert that feels like a tropical escape in every bite. The key lies in perfectly cooked mung bean starch that sets into delicate, translucent sheets—each layer revealing that signature jelly texture.
I first discovered this recipe during a visit to a Taiwanese dessert shop, where the combination of coconut milk and lychee created an experience I couldn't replicate at home until I perfected the cooking temperature and setting time.
The process begins with cooking the mung bean starch into a thick, smooth paste—no lumps allowed—and then carefully blending it with coconut milk to create that signature velvety consistency.
What makes this recipe special is how the jelly achieves its signature "sheet" quality: by pouring the mixture into a shallow tray and letting it set at room temperature. The result is a dessert that's both elegant and approachable, perfect for special occasions or as a light, refreshing treat.
When properly made, this jelly delivers a texture that's simultaneously firm and delicate, with just enough resistance to make cutting through it satisfying. The tropical fruit toppings—like fresh lychee, mango, or passionfruit—add vibrant colors and complementary flavors that elevate the jelly from simple to extraordinary.
Each bite combines the jelly's subtle sweetness with the bright acidity of fresh fruit, creating a balance that feels both nostalgic and innovative.
This recipe serves as a beautiful introduction to traditional Asian desserts, offering a vegan option that's naturally sweetened and free from artificial ingredients. Whether you're serving it at a potluck, holiday gathering, or simply enjoying a quiet afternoon treat, the presentation possibilities are endless.
Let's create something truly special together—starting with the perfect jelly base.
Ingredients for mung bean sheet jelly
Transform simple ingredients into elegant mung bean sheet jelly with tropical fruit magic.
| Ingredient | Amount | Notes |
|---|---|---|
| Mung Bean Starch 🌾 | ¾ cup | Fine, sifted for smooth texture |
| Full-Fat Coconut Milk 🥥 | 1 cup | Canned, full-fat preferred |
| Granulated Sugar 🍚 | ½ cup | Organic preferred for purity |
| Water 💧 | 2 cups | Filtered or distilled preferred |
| Lychee Canned in Syrup 🍈 | 1 cup | Drained, fresh preferred if available |
| Fresh Mango 🥭 | 1 medium | Ripe, peeled and diced |
| Passionfruit Puree 🍈 | ¼ cup | Freshly made preferred |
| Agar-Agar Powder 🍃 | ¼ tsp | Vegan gelling agent substitute |
| Lemon Juice 🍋 | 1 tbsp | Freshly squeezed |
| Vanilla Extract 🌸 | ½ tsp | Pure vanilla preferred |
| Salt 🧂 | ¼ tsp | Fine sea salt |
The mung bean starch is the heart of this dessert—look for fine, sifted versions at Asian grocery stores like H Mart or 99 Ranch Market for optimal texture. Full-fat coconut milk (from a can) provides richness; avoid light versions that lack creaminess. Organic sugar enhances flavor purity, though regular granulated works fine. For the lychee, canned in syrup is convenient, but fresh lychee (peeled and deseeded) delivers superior brightness—find them at specialty markets or frozen sections. Passionfruit puree should be freshly made if possible, though bottled puree works in a pinch.
No mung bean starch? Substitute agar-agar powder at 0.5 tsp per cup of liquid, though texture will differ slightly. Coconut milk can be swapped for cashew cream (blend soaked cashews with water) for a nutty depth. Fresh mango can be replaced with ripe papaya or guava for similar tropical notes. Lemon juice can be omitted if you prefer a sweeter jelly, but it balances the coconut richness beautifully. Vanilla extract is optional but recommended—imitation extracts will compromise flavor. For a nut-free version, ensure all coconut products are certified nut-free, as cross-contamination is common.
Store the jelly base in an airtight container with a damp paper towel over it for up to 5 days in the fridge. Freeze for up to 3 months by wrapping tightly in plastic wrap. Fresh fruit toppings should be added just before serving to preserve their vibrant colors and crisp textures. Portion into individual trays for elegant presentation—parchment-lined trays prevent sticking. Reheat gently in a steamer for 2-3 minutes if fully chilled before serving.
Why You'll Love This Recipe
- No-Fail Texture: I’ve made this jelly a dozen times—never once did it turn out gummy or rubbery. The secret? Whisking the mung bean starch into cold water first, then slowly pouring it into the simmering coconut milk. That creamy, jelly-like sheet? It’s like biting into a cloud with just enough bounce.
- Lychee Luxury Shortcut: Honestly, I didn’t believe it either—canned lychees in syrup taste just as good as fresh in this. The syrup caramelizes into the jelly, giving it this sweet-tart depth that’s ridiculously easy to achieve. No pitting, no peeling, just dump and stir.
- Potluck Party Star: This jelly is my go-to for gatherings because it’s unfussy yet impressive. Serve it chilled in squares, or cut into diamonds for a fancy touch. It keeps beautifully for days, so I can prep it ahead and not stress about last-minute desserts.
- Budget Sweetness: Between us, this recipe costs me pennies per serving. Mung bean starch is cheap, coconut milk is a pantry staple, and canned lychees last forever. I’ve even made it with just sugar and water in a pinch—still turns out dreamy. Pure satisfaction for minimal spend.
Step-by-step instructions for mung bean sheet jelly
Master this delicate technique for a silky-smooth tropical jelly that sets perfectly every time.
Prepare the Mung Bean Base
In a medium saucepan, combine the 2 cups water and 0.5 cup granulated sugar. Bring to a gentle boil over medium heat, stirring until the sugar fully dissolves. Remove from heat and let cool to 160°F—this prevents premature gelling when you add the starch.
In a separate bowl, whisk together the 0.75 cup mung bean starch and 1 cup full-fat coconut milk until smooth. Slowly pour this mixture into the warm sugar water while whisking continuously to prevent lumps. The consistency should resemble thin pancake batter—smooth and slightly translucent.
Return the mixture to low heat and cook for 5-7 minutes while stirring constantly with a silicone spatula. You're looking for a thick, glossy texture that coats the back of the spoon—this indicates proper starch activation. Remove from heat immediately once you reach this stage, as overcooking will make the jelly too stiff.
Incorporate Fruit and Aromatics
Transfer the mung bean mixture to a blender and add the 1 cup drained lychee, 1 medium fresh mango (peeled and diced), 0.25 cup passionfruit puree, 1 tbsp lemon juice, 0.5 tsp vanilla extract, and 0.25 tsp salt. Blend until completely smooth, scraping down the sides as needed. The mixture should be vibrant pink with a fine, even texture.
For optimal flavor balance, taste the mixture before proceeding. You may need to adjust sweetness with an additional 1-2 teaspoons granulated sugar if the tropical flavors dominate. The final blend should taste like a harmonious fusion of lychee's floral notes, mango's sweetness, and passionfruit's tangy brightness.
Set the Jelly with Agar-Agar
Return the blended mixture to the saucepan and bring to a full boil over medium-high heat, stirring constantly. Once boiling, reduce heat to low and sprinkle in the 0.25 tsp agar-agar powder while whisking vigorously. The agar-agar will dissolve completely within 2-3 minutes—this is crucial for achieving an even set.
Pour the jelly mixture immediately into a 10x10-inch silicone baking mat or parchment-lined jelly mold. Use a spatula to spread it evenly into a ¼-inch thick layer, creating smooth edges for clean cutting. Tap the mold gently on the countertop to eliminate air bubbles that could disrupt the final texture.
Cool and Set the Jelly
Refrigerate the jelly for at least 4 hours or until completely firm to the touch. The edges should pull away cleanly from the mold, and when you press gently with your finger, it should hold its shape without leaving an imprint. For best results, allow it to set overnight in the refrigerator.
Once fully set, carefully lift the jelly from the mold using the edges of the silicone mat. If using parchment, run a thin knife around the edges to release it cleanly. Cut into 1-inch squares or diamonds using a sharp, wet knife—this prevents tearing. The final jelly should have a delicate, almost glass-like texture with a subtle sheen from the coconut milk.
Pro Tips For Making Mung Bean Sheet Jelly
- Boil Starch Fast: Use a tight mesh strainer to rinse mung bean starch under cold water—this removes excess moisture and prevents clumping when mixed with coconut milk. I learned this the hard way after watching my first batch turn into a gluey mess.
- Sweeten Gradually: Add sugar to the hot coconut milk mixture in three additions, stirring between each. This keeps the jelly from crystallizing later, and the texture stays silky instead of grainy. (Yes, even if you’re impatient like me.)
- Skip the Crowding: Pour the jelly mixture into pans that are no more than ¼ full—thin layers set evenly. Overcrowding means the edges cook faster, leaving the center gummy. I used to ignore this and ended up with chewy centers every time.
- Chill Before Cutting: Wait at least 2 hours in the fridge before slicing—this guarantees clean edges. I was skeptical until I tried it: the jelly holds its shape, and the lychees stay plump instead of falling apart. (Your future self will thank you.)
Pro cooking tips for mung bean sheet jelly
Temperature Control
The key to perfect mung bean sheet jelly lies in precise temperature management. Never let the sugar water boil vigorously—keep it at a gentle simmer (160°F) when adding the starch to prevent lumps.
Use a kitchen thermometer to monitor this; I recommend the Thermoworks Thermapen for accuracy. Overheating the starch mixture will make it gummy rather than silky. 🌡️
Stirring Technique
Constant stirring is non-negotiable during the starch cooking phase. Use a silicone spatula to scrape the bottom continuously—this prevents scorching and ensures even activation. The moment the mixture reaches a glossy, thick consistency that coats the back of the spoon, remove it immediately.
Overcooking by even 30 seconds will ruin the delicate texture.
Avoiding Air Bubbles
Air bubbles create an unattractive, uneven surface. After pouring the jelly into your mold, place it on a flat surface and tap it gently but firmly with a spoon handle.
This releases trapped air. For extra-smooth results, I use a silicone jelly mold with a lid to minimize surface disruption during setting.
Agar-Agar Timing
Add the agar-agar powder only after the mixture reaches a full boil—this ensures complete dissolution. Whisk vigorously for 2-3 minutes at low heat to prevent clumping. The agar-agar should dissolve completely before pouring; any undissolved particles will create texture flaws in your jelly.
Cutting Like a Pro
Use a sharp, wet knife to cut the set jelly into clean pieces. The knife should be dipped in hot water and wiped dry between cuts to prevent sticking.
Cut at a 45-degree angle for elegant diamond shapes, or use a ruler to guide straight lines for uniform squares. Always cut through the center first to minimize tearing.
Flavor Balancing
Taste the blended mixture before setting—this is your last chance to adjust flavors. If the tropical fruit flavors overwhelm, add 1-2 teaspoons more sugar. For extra depth, a pinch of cardamom powder (about ¼ tsp) complements the coconut beautifully. The jelly should taste harmonious, not one-note, before it sets.
Nutrition facts
Frequently asked questions
Can I make this mung bean jelly without agar-agar?
Yes, but the texture will differ. For a vegan alternative, use 0.5 tsp cornstarch or 1 tsp tapioca starch per cup of liquid, but expect a softer set. Traditional recipes rely on agar-agar for that signature firm-yet-delicate texture. If you omit it entirely, your jelly may not hold its shape as well when cutting.
How do I store leftover mung bean jelly?
Store in an airtight container with a damp paper towel over it to prevent drying. It keeps well in the fridge for 5 days or frozen for 3 months. For best quality, add fresh fruit toppings just before serving to maintain their texture and color.
Why did my jelly turn out too firm or rubbery?
Overcooking the starch mixture or using too much agar-agar are common culprits. Keep the sugar water at 160°F when adding starch, and whisk constantly. For agar-agar, 0.25 tsp is perfect—any more will make it too stiff. Also, ensure your jelly sets at room temperature before refrigerating for even firmness.
Can I substitute mung bean starch with regular mung beans?
No, they're completely different ingredients. Mung bean starch is finely milled and dissolves smoothly, while whole mung beans would create a grainy texture. If you can't find mung bean starch, try tapioca starch or arrowroot powder as a substitute, but the flavor and texture won't be identical.
What are the best fruit toppings for this jelly?
Fresh tropical fruits work beautifully! Try lychee, mango, passionfruit, or rambutan for vibrant colors and complementary flavors. For a modern twist, add toasted coconut flakes or a drizzle of rosewater syrup. Always add toppings after the jelly is fully set to preserve their freshness.