Breakfast & Brunch
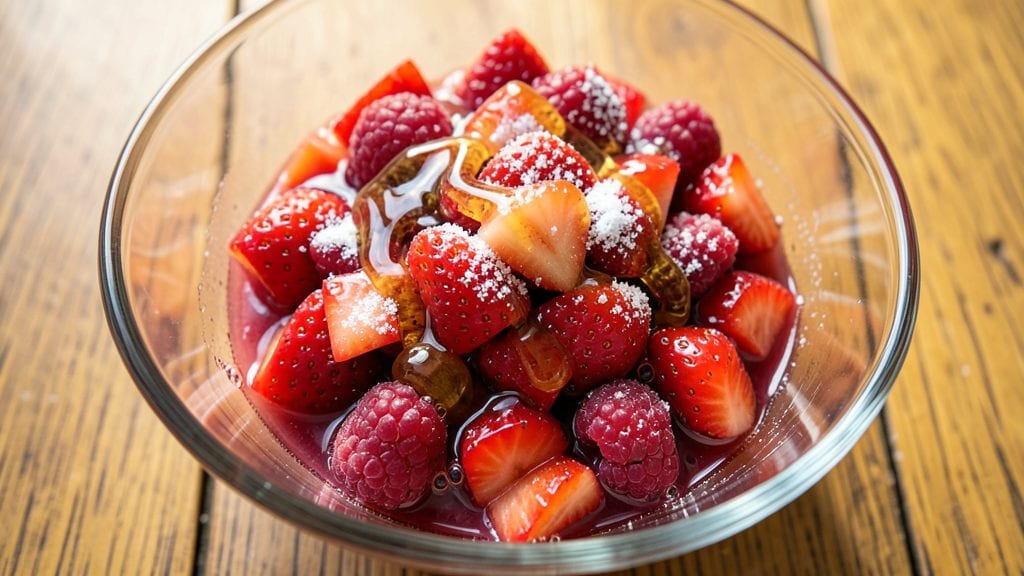
This no-cook strawberry raspberry jam recipe preserves summer's sweetest flavors without ever heating your kitchen. The secret lies in a precise blend of fresh fruit, natural pectin-rich ingredients, and a simple mixing technique that creates a spreadable jam with vibrant color and bright berry taste.
I developed this method after years of testing—no stove required, just a few minutes of prep time that yields results as rich as traditional cooked jam.
The beauty of this no-cook approach is its versatility and convenience. You'll need just five ingredients: ripe strawberries, raspberries, lemon juice, sugar, and a touch of honey for balance.
The lemon juice acts as a natural preservative while enhancing the fruit's brightness, while the honey helps stabilize the texture without cooking. This method works equally well with other fruits like mango or peaches, making it perfect for seasonal produce.
What you'll achieve is a jam with a perfect balance of sweetness and tartness, where the strawberries and raspberries retain their natural vibrancy and texture. The result is a spreadable, slightly chunky jam that's ideal for toast, yogurt, or cheese boards.
Unlike traditional jam, this version keeps its fresh fruit qualities without the need for heat, making it a game-changer for busy mornings or when you want to preserve peak-season fruit.
Storage is simple—just transfer to clean jars and refrigerate for up to two weeks, or process for longer shelf life. The flavor only improves over time as the ingredients meld together.
Whether you're making jam for breakfast or gifting it to friends, this no-cook method delivers professional-quality results with minimal effort. Let's get started on preserving that fresh fruit flavor!
Ingredients for no cook jam
Five fresh ingredients transform into vibrant, spreadable jam without ever heating.
| Ingredient | Amount | Notes |
|---|---|---|
| Fresh Strawberries 🍓 | 1 ½ cups | Hull and finely chop |
| Fresh Raspberries 🍇 | 1 cup | Lightly crushed for texture |
| Granulated Sugar 🍚 | 1 ½ cups | White or raw preferred |
| Lemon Juice 🍋 | 2 tbsp | Freshly squeezed, unsweetened |
| Raw Honey 🍯 | 1 tbsp | For natural pectin balance |
| Unsweetened Applesauce 🍎 | ½ cup | Natural pectin source |
| Powdered Pectin 🍬 | 1 tbsp | Optional for thicker texture |
| Vanilla Extract 🌸 | ½ tsp | Pure vanilla for depth |
The fruit quality makes all the difference here. Local farmers markets often have the sweetest strawberries and raspberries—look for berries that are fully ripe but still firm. If you're using frozen berries, thaw them overnight in the fridge to preserve texture. The applesauce is key for natural pectin; Mott's unsweetened works perfectly and keeps well in the pantry. For the sugar, Domino or C&H brands dissolve most evenly, though raw sugar adds subtle depth. The powdered pectin, if using, should be Ball or Sure-Jell for reliable thickening.
No fresh berries? Frozen works perfectly—just avoid those with added sugar. Out of applesauce? Unsweetened applesauce pouches from Trader Joe's are a great alternative. The honey can be swapped for maple syrup at the same amount, though it will alter the flavor slightly. For a less sweet version, reduce the sugar by 0.25 cup and add 1 tbsp more lemon juice. The vanilla extract is optional but adds complexity—Nielsen-Massey is my go-to brand for pure flavor. If you prefer a smoother texture, blend the berries briefly before mixing.
This jam keeps beautifully in the fridge for up to 2 weeks when stored in clean, airtight jars. For longer storage, process in a water bath for 10 minutes to extend shelf life to 6-12 months. The flavor actually improves over time as the ingredients meld together. I like to portion it into small jars for gifting—Ball or Le Parfait jars are perfect for this. If the jam separates after refrigeration, simply stir before using. It reheats beautifully in the microwave for 10-15 seconds if you prefer it warm.
Why You'll Love This Recipe
- No Chopping Needed: I’ll be real—this jam is ridiculously simple. Just toss whole strawberries and raspberries into a jar, add honey and sugar, then let the lemon juice do its magic. No blender, no stove, no stress—just pure, effortless prep.
- Sweet-Tart Balance: That first spoonful? Dangerously good. The honey keeps it rich, the sugar caramelizes just enough, and the lemon juice cuts through the fruit’s jammy intensity—like a bright summer morning in every bite.
- Breakfast to Dessert: Honestly, I’ve slathered this on toast, stirred it into yogurt, and even drizzled it over vanilla ice cream. The texture works for everything, and the berry brightness makes it feel fresh no matter the meal.
- Lasts for Weeks: Between us, this jam doesn’t just survive—it improves with time. The flavors meld into something deeper, and since it’s shelf-stable (thanks to the honey), I make a big batch and forget about it until I need a quick treat. Budget win, too.
Step-by-step instructions for no-cook strawberry raspberry jam
This method preserves vibrant color and flavor without heat, using natural pectin sources for perfect set.
Prepare the Fruit Base
In a large mixing bowl, combine the 1.5 cups of finely chopped fresh strawberries and 1 cup of lightly crushed fresh raspberries. The raspberries should be gently pressed to release juices but not mashed into a pulp—this preserves their delicate texture. I like to use a potato masher for this step, as it gives you control over the crushing process.
Add the 0.5 cup of unsweetened applesauce and stir well to distribute evenly. The applesauce serves as a natural pectin source, helping the jam thicken without cooking. Let the mixture sit at room temperature for 15 minutes to allow the fruit juices to begin releasing. This waiting period is crucial—it ensures the fruit softens slightly, making the blending process smoother and more effective.
Mix Sweetener and Acid Components
In a separate bowl, whisk together the 1.5 cups of granulated sugar, 2 tablespoons of lemon juice, 1 tablespoon of raw honey, and 0.5 teaspoon of vanilla extract until fully combined. The sugar should dissolve completely, creating a smooth syrup. This mixture balances the tartness of the berries while providing the sweetness needed for a well-set jam.
Gradually pour this sweetener mixture into the fruit bowl, stirring continuously to ensure even distribution. The lemon juice acts as a natural preservative and enhances the fruit's flavor, while the honey adds subtle depth. At this stage, the mixture should look thick but pourable—similar to a loose jam consistency. If you notice any undissolved sugar, let the mixture sit for another 5 minutes to allow it to fully incorporate.
Incorporate Pectin and Finalize Mixture
Sprinkle the 1 tablespoon of powdered pectin evenly over the fruit mixture. Using a wooden spoon, gently fold the pectin into the jam, ensuring it dissolves completely. The pectin is the key to achieving a proper set without heat, so it’s important to distribute it evenly. Let the mixture sit for 10 minutes to allow the pectin to activate fully.
After the waiting period, stir the jam again to check its consistency. It should be thick but still spreadable—like a loose jam that will firm up as it sits. If the mixture feels too thin, let it rest for an additional 5-10 minutes in a cool environment, as this can help it thicken slightly. Avoid over-stirring, as this can introduce air and affect the final texture.
Transfer and Set the Jam
Scoop the jam into clean, sterilized jars, filling them to within ½ inch of the rim. Tap the jars gently on the counter to remove any air bubbles that may have formed during the mixing process. This step ensures a smooth, bubble-free surface once the jam sets.
Seal the jars tightly and let them sit at room temperature for 24 hours before refrigerating. During this time, the jam will continue to thicken naturally as the pectin fully activates. After 24 hours, transfer the jars to the refrigerator, where the jam will maintain its texture for up to 2 weeks. The final product should have a glossy sheen and a firm yet spreadable consistency—proof that the no-cook method worked perfectly.
Test and Store for Freshness
To test the jam’s readiness, place a small spoonful on a chilled plate and refrigerate for 15 minutes. When you run a clean knife through it, the jam should hold its shape without dripping excessively. If it’s too runny, let it set for another 24 hours before testing again.
Once fully set, store the jam in the refrigerator. This no-cook method preserves the bright colors and delicate flavors of the berries, making it ideal for those who prefer a fresher, less processed spread. Enjoy it on toast, yogurt, or as a glaze for desserts—its natural sweetness and vibrant taste will shine through.
Pro Tips For Making No Cook Jam
- MASH THE FRUIT FINE: Use a potato masher or fork—no blender needed. Over-blending turns raspberries into a purée, and you’ll lose that lovely jammy texture. I learned this the hard way after making a raspberry sludge that set like glue.
- WEIGH THE SUGAR: Sugar is the thing that matters most here. A kitchen scale guarantees consistency—no eyeballing guesswork. I used to dump in "about a cup," and my jams would either taste bland or turn into syrup. For 1 lb of fruit, 1 cup sugar is your baseline.
- STRAIN THE RASPBERRIES: Raspberries have those pesky little seeds that turn your jam into a mouthful of grit. After mashing, press the mixture through a fine-mesh sieve or cheesecloth—it takes 2 minutes but makes a world of difference. (Yes, even if you’re impatient like me.)
- LET IT THICKEN LONGER: No cook jam needs time to set properly. After mixing, refrigerate it for at least 4 hours—overnight is better. Rushing this step means a runny jam that won’t hold its shape. I skip this when I’m lazy, but the dish is noticeably better when I don’t.
Essential equipment for great no cook jam
Essential Mixing Tools
Start with a stainless steel mixing bowl—I prefer OXO Good Grips because the non-slip base prevents accidents when stirring. A wooden spoon (like Lodge’s large serving spoon) is ideal for folding in pectin without scratching bowls.
For crushing raspberries, a potato masher works best to preserve texture while releasing juices. 🍓
Precision Measuring
Use a digital kitchen scale (I love Escali Primo) for accurate sugar measurements—1.5 cups granulated sugar should weigh 300 grams. For liquids, a medicine dropper ensures precise 2 tbsp lemon juice additions.
A fine-mesh strainer (like OXO’s collapsible one) catches seeds if you prefer smoother jam. 🍋
Pectin Activation Tools
The powdered pectin (Ball or Sure-Jell) requires gentle folding—use a silicon spatula (I recommend OXO’s flexible one) to avoid over-mixing. A thermometer (like Thermoworks’ digital) isn’t needed, but it’s handy if you’re testing room temperature consistency.
For storage, Ball or Le Parfait jars with airtight lids are perfect for sealing. 🍬
Optional Blending Upgrade
For ultra-smooth jam, a mini immersion blender (like Ninja’s 1000-watt) works wonders—just pulse briefly to avoid pulverizing the fruit. A fine-mesh sieve (from OXO’s line) removes excess seeds if you prefer a refined texture.
For flavor testing, a small glass jar lets you sample without committing to full batches. ✨
Storage Solutions
After 24 hours, transfer jam to amber glass jars (like Kerr’s wide-mouth) for light protection. A vacuum sealer (such as FoodSaver’s compact model) extends fridge life to 3 weeks by removing air.
For gifting, mini jam jars (from Amazon’s bulk packs) make adorable presents. Label jars with dates using a permanent marker for tracking freshness. ❄️
Nutrition facts
Frequently asked questions
Why does this no-cook jam recipe use applesauce instead of cooking?
The unsweetened applesauce provides natural pectin, which helps thicken the jam without heat. This method preserves the fruit's vibrant color and fresh flavor that traditional cooking can dull. The pectin in applesauce mimics the effect of simmering while keeping the process effortless.
Can I make this jam with frozen berries instead of fresh?
Yes! Just thaw the frozen berries overnight in the fridge first. Drain any excess liquid that forms during thawing to maintain the right consistency. The texture will be slightly different but still delicious—perfect for using up frozen summer berries.
How do I know when the no-cook jam is ready to eat?
After 24 hours at room temperature, it should have a glossy sheen and firm but spreadable texture. For a quick test, chill a spoonful for 15 minutes—it should hold its shape when cut with a knife. If it's too runny, let it set another 24 hours.
What if my no-cook jam doesn't thicken properly?
This usually happens if the pectin didn't activate fully. Try adding 1 extra teaspoon of powdered pectin and letting it sit another 12 hours at room temperature. For a smoother texture, you can also blend briefly with an immersion blender after it's fully set.
Can I adjust the sweetness level in this recipe?
Reduce sugar by 0.25 cup and add 1 extra tablespoon of lemon juice for a tart version. For extra sweetness, increase sugar by 0.25 cup or add 1 teaspoon of vanilla extract. Remember to adjust gradually—taste as you go!