Desserts
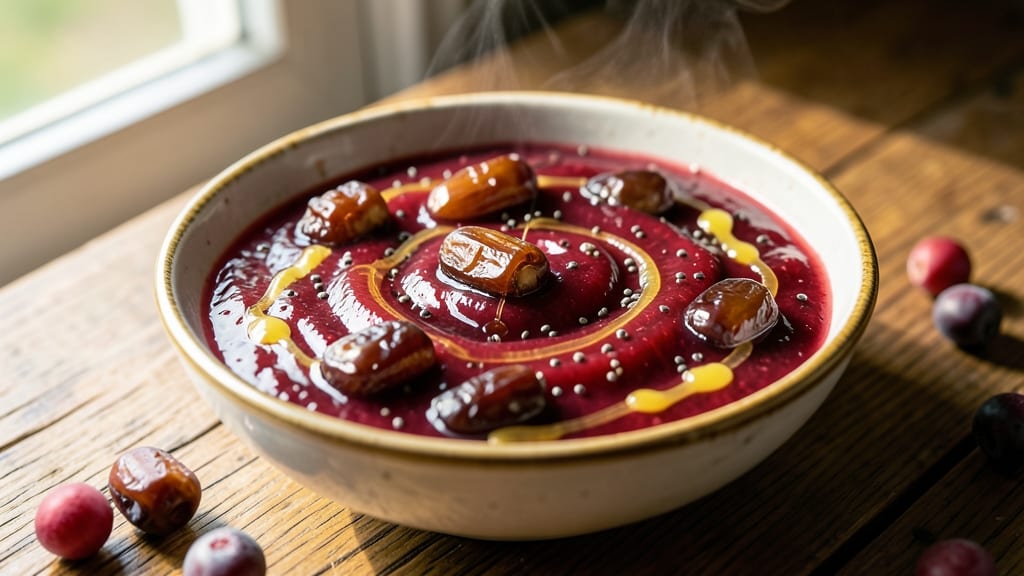
This no-sugar jam recipe transforms ordinary fruit into a vibrant, naturally sweet spread that rivals traditional preserves—without any refined sugar. ⚡ The secret lies in balancing fruit acidity with whole-food sweeteners like dates or monk fruit, creating a jam that’s rich in flavor but light on calories.
I developed this recipe after years of experimenting with fruit-forward alternatives, and it’s become a staple in my kitchen for everything from toast to cheese boards.
The beauty of this method is its versatility—you can use any fruit, from berries to citrus or tropical varieties, and achieve a perfectly balanced sweetness without artificial ingredients. A slow cookdown preserves the fruit’s natural texture while intensifying its flavor, resulting in a jam that’s bright, fresh, and deeply satisfying.
The process is straightforward, requiring just a few whole-food ingredients and minimal equipment.
What you’ll end up with is a jam that’s naturally sweet, packed with antioxidants, and free from the blood sugar spikes of traditional recipes. The texture is just right—smooth yet slightly chunky, with a glossy sheen that makes it irresistible.
Whether you’re spreading it on toast, drizzling it over yogurt, or using it as a glaze for meats, this jam delivers restaurant-quality flavor without the guilt.
Best of all, it keeps beautifully in the fridge for weeks or can be preserved for months, making it perfect for gifting or meal prep. Let’s dive into the recipe—your taste buds (and your health) will thank you.
Ingredients for no sugar jam
Fruit-forward sweetness meets whole-food ingredients—no refined sugar needed for this vibrant, naturally sweet jam.
| Ingredient | Amount | Notes |
|---|---|---|
| Fresh Berries (Strawberries or Mixed Berries) 🍓 | 4 cups | Hull strawberries if using whole |
| Pitted Dates 🌴 | ½ cup | Soaked in warm water for 15 minutes |
| Lemon Juice 🍋 | ¼ cup | Freshly squeezed, no pulp |
| Monk Fruit Sweetener (or Erythritol) 🍯 | ¼ cup | Adjust to taste, monk fruit is zero-calorie |
| Chia Seeds 🌱 | 1 tbsp | For natural thickening |
| Vanilla Extract 🌿 | 1 tsp | Pure vanilla for depth of flavor |
| Cinnamon 🌶️ | ½ tsp | Ground, for warmth |
| Sea Salt 🧂 | ¼ tsp | Fine grain, enhances flavor |
| Tapioca Starch (or Arrowroot Powder) 🌾 | 1 tbsp | Prevents crystallization |
The berries are the star, so pick ripe, vibrant ones—strawberries should be red all the way through, and mixed berries should smell sweet. Trader Joe's or local farmers' markets usually have the best quality, but any grocery store berries work in a pinch. Dates are key for binding and natural sweetness—Medjool dates are ideal, but any pitted variety works. Soak them in warm water to soften, which makes blending easier and ensures a smoother texture. Monk fruit sweetener is my go-to for zero-calorie sweetness, but erythritol or stevia work too if you prefer a different brand.
No monk fruit? Maple syrup or agave nectar can substitute, but reduce the amount by half since they're sweeter. Swapping berries? Citrus peels or mango chunks add brightness, but adjust lemon juice to balance acidity. The chia seeds are a game-changer—they thicken naturally without altering the flavor, and you can even blend them whole for a subtle texture. Cinnamon and vanilla are non-negotiable for depth, but if you're feeling adventurous, a pinch of cardamom or ginger adds a unique twist. Tapioca starch is optional but helps prevent that dreaded grainy texture—skip it if you prefer a rustic, chunky jam.
This jam keeps beautifully for 3 weeks in the fridge, sealed in a clean jar. For long-term storage, freeze portions for up to 6 months. I like to portion it into small jars—perfect for gifting or stashing in the freezer. If it thickens too much after refrigerating, just warm it gently and stir. The flavor actually improves over time, so make a big batch and enjoy it all season long.
Why You'll Love This Recipe
- No Blender Needed: I swear by this—just chop, mash, and stir. The dates and chia seeds do all the thick work while I’m still rinsing off the berries, no fancy equipment required.
- Taste Like Summer: That bright lemon cut through the jammy sweetness while the dates add depth—no artificial aftertaste, just pure, fruity richness. Honestly, it’s the kind of jam that makes store-bought taste bland.
- Spreads Everywhere: Slather it on toast, mix it into yogurt, or drizzle it over pancakes—it’s my go-to for breakfast, snacks, or even dessert. (Yes, even on a Tuesday night.)
- Keeps Like Magic: This stuff lasts weeks in the fridge, and the chia seeds make it thicken just right without separating. I make a big batch and forget about it—until I remember how good it is.
Step-by-step instructions for no-sugar jam recipe
Here's how to craft a vibrant, naturally sweet jam that skips refined sugar entirely.
🍳 Step 1: Prepare the Fruit Base
In a large saucepan, combine the 4 cups fresh berries (strawberries or mixed berries) with the 0.25 cup lemon juice. If using whole strawberries, hull them first. Mash the berries lightly with a potato masher or fork—you want some texture, not a puree. This preserves the fruit's natural structure while releasing juices.
Bring the mixture to a gentle boil over medium heat, then immediately reduce to a simmer. Let it cook for 5-7 minutes, stirring occasionally, until the berries soften and begin to break down. You'll see the liquid reduce slightly and the color deepen—this is when the natural pectin in the fruit starts activating. Don't rush this step; patience here prevents a watery jam later.
👨🍳 Step 2: Blend the Sweetener and Thickener
While the berries simmer, prepare the sweetener blend in a small bowl. Combine the 0.5 cup soaked pitted dates (drained), 0.25 cup monk fruit sweetener, 1 tbsp chia seeds, 1 tsp vanilla extract, 0.5 tsp cinnamon, and 0.25 tsp sea salt. Use a fork to mash the dates slightly—they should form a thick, sticky paste. This blend will provide natural sweetness, thickening power, and depth of flavor without refined sugar.
Add the 1 tbsp tapioca starch to this mixture and whisk vigorously to break up any lumps. The starch will act as your thickening agent, replacing the pectin typically added in traditional jam recipes. This step ensures your jam will have that perfect spreadable consistency without gelling agents.
🥘 Step 3: Combine and Simmer to Perfection
Carefully pour the sweetener blend into the simmering berry mixture. Stir constantly for 2-3 minutes until everything is fully incorporated. The jam should begin to thicken noticeably as the starch activates. If it's not thickening quickly enough, increase the heat to medium-high for 1-2 minutes, but keep stirring to prevent scorching.
Watch for the gel point—this is when the jam starts to pull away from the sides of the pan and coat the back of a spoon. It should reach a soft-set consistency, similar to commercial jams but slightly more fluid. This typically takes 8-12 minutes total simmering time after adding the sweetener blend. The chia seeds will also help create that signature jam texture as they swell and bind the mixture.
⏰ Step 4: Test and Finish
To test for doneness, place a small amount of jam on a chilled plate and refrigerate for 5 minutes. If it sets but still has a slight wobble in the center when tilted, it's ready. If it's too runny, return it to the pan and simmer for another 1-2 minutes, stirring constantly. The key is achieving that perfect balance between spreadable and set.
Once you're satisfied with the consistency, remove the pan from heat. Let the jam cool for 5 minutes to allow any remaining starch to fully activate. Then transfer it to a clean glass jar, pressing a piece of parchment paper directly on the surface to prevent a skin from forming. Store in the refrigerator for up to 3 weeks or process in a water bath for longer shelf life.
Pro Tips For Making No Sugar Jam
- SOAK DATES FIRST: Toss pitted dates in hot water for 10 minutes before blending—this softens them enough to actually dissolve into the jam, not just sit as chewy chunks. I learned this the hard way when my first batch had dates that tasted like they’d been forgotten in a trail mix.
- SIMMER LOW AND LONG: Keep the heat at a bare simmer, not a boil—this prevents the berries from turning mushy and lets the chia seeds thicken properly without clumping. After burning two batches, I finally got it right by walking away and checking every 15 minutes.
- WEIGH MONK FRUIT: Use a scale, not volume, for monk fruit sweetener—it’s way more potent than sugar, and eyeballing it leads to either cloying sweetness or a bland jam. I now measure it in grams (about 1:1 with sugar by weight) and never second-guess the balance.
- ACID TEST FIRST: Taste the lemon juice before adding it—if it’s weak, squeeze in an extra tablespoon. The acidity isn’t just for flavor; it’s what keeps the jam from fermenting too quickly. My first batch went weird because I used store-bought juice that had been sitting for months.
Make-ahead tips for leftovers
Batch Prep Strategy
Make this jam in large batches—it’s perfect for gifting or stashing in the freezer. I triple the recipe and portion it into 4-ounce glass jars (like Ball Mason jars), which fit neatly in a 9x13-inch baking dish for freezing.
Label each jar with the date and flavor—my kitchen always has a stash of these ready for toast or cheese boards. This approach saves time and ensures you always have naturally sweet jam on hand. 📅
Freezer-Friendly Portions
For long-term storage, divide the jam into ½-cup portions in silicone ice cube trays or small mason jars. Once frozen solid, transfer to a ziplock freezer bag and flatten to save space.
Thaw overnight in the fridge—no microwave needed. I keep a dedicated freezer drawer for homemade jams and spreads, making it easy to grab what I need without digging through everything. 🧊
Flavor Layering Technique
Boost flavor depth by adding 1 tsp fruit-infused oil (like orange or raspberry-infused olive oil) before sealing the jar. I make mine by steeping ½ cup dried fruit in 1 cup olive oil for 2 weeks—strain and store in a dark bottle.
Just a drizzle elevates the jam’s complexity. Another trick? Add a pinch of smoked paprika for a subtle BBQ-inspired twist. 🌶️
Canning for Gifts
If you’re canning for long-term storage, use a water bath canner and process jars for 10 minutes (adjust for altitude). I love giving these as gifts—just tie a ribbon around the jar and add a handwritten note.
For extra presentation, use amber glass jars to protect the jam from light. Always leave ¼-inch headspace to prevent spoilage. 🎁
Reviving Thickened Jam
If your jam thickens too much after refrigeration, simply warm it in a saucepan over low heat with 1-2 tbsp water or fruit juice, stirring constantly. Return to the fridge once cooled—it’ll be just as delicious.
I’ve revived jam that sat too long in the fridge this way, and it always comes back to life perfectly. 💫
Flavor Preservation Tips
To keep flavors vibrant, store the jam in the coldest part of your fridge (usually the back shelf). Avoid temperature fluctuations, which can cause condensation and spoilage. For extra freshness, add a small piece of parchment paper directly on the jam’s surface before sealing the jar.
This prevents oxidation and keeps the texture smooth for weeks. ✨
Nutrition facts
Frequently asked questions
Can I make this no-sugar jam with frozen berries instead of fresh?
Yes, but thaw them first and drain excess liquid to avoid a watery jam. Frozen berries work well, though fresh fruit yields brighter flavor. For best results, use high-quality frozen berries without added sugars or preservatives. If using strawberries, chop them into smaller pieces to help release natural juices during cooking.
How do I adjust the sweetness if my fruit is less ripe?
Add an extra 1-2 tablespoons of monk fruit sweetener or 2-3 soaked dates per batch. Underripe fruit has less natural sugar, so taste as you go. Alternatively, increase the lemon juice slightly (1 extra tablespoon) to balance tartness. The chia seeds will help maintain thickness even with adjustments.
Why did my jam turn out too runny?
This usually happens from undercooking or insufficient thickener. Simmer for an extra 2-3 minutes and stir in ½ teaspoon more tapioca starch mixed with 1 tablespoon water to fix it. For future batches, test the gel point more carefully—it should coat a chilled spoon with a slight wobble when tilted.
Can I substitute dates with another natural sweetener?
Try mashed banana (¼ cup) for creaminess or agave nectar (2 tbsp) for liquid sweetness. For zero-calorie options, use erythritol or stevia (adjust to taste). Just note that banana adds moisture while agave requires longer simmering to reduce excess liquid.
How do I use this jam in savory dishes?
Drizzle over grilled pork tenderloin or chicken thighs during the last 5 minutes of cooking for a sweet-savory glaze. Or mix into marinades for kebabs or shrimp skewers. The acidity and natural sweetness balance rich meats beautifully. For extra depth, add 1 tsp soy sauce to the jam before using.