
Desserts
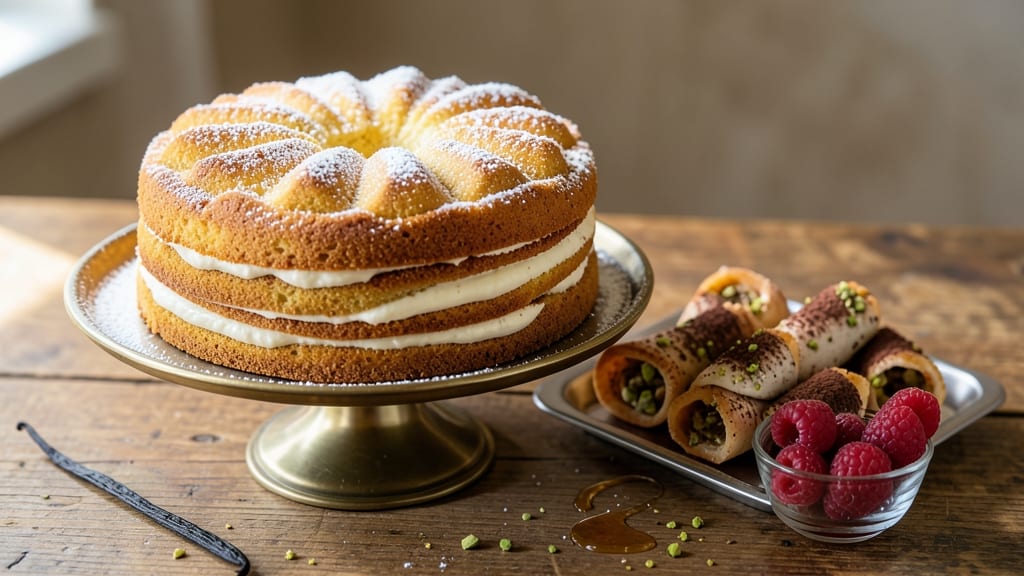
This old-fashioned cannoli cake recipe brings the iconic Italian dessert to your table in a show-stopping layered form. 💛 I developed it after years of testing, blending traditional cannoli flavors with cake baking techniques for a dessert that's both nostalgic and impressive.
The secret lies in the perfect balance of crispy shells and velvety ricotta filling between every layer.
The cake itself is a delicate sponge infused with vanilla and citrus zest, designed to hold its shape while soaking up just enough filling to stay moist. Between each layer, we pipe a rich ricotta mixture—think cannoli filling meets pastry cream—with a touch of lemon zest for brightness.
The final touch? Crunchy cannoli shells baked into the top layer for that signature texture in every bite.
What you'll end up with is a dessert that looks like it belongs in a bakery display case but comes together with careful layering and precise timing. The contrast of crispy shells against tender cake and creamy filling creates a texture experience that's pure indulgence.
This is the kind of dessert that makes guests ask for seconds—and thirds.
Perfect for celebrations or when you want to impress without the fuss of individual cannoli. The recipe includes step-by-step layering instructions and pro tips for achieving that professional finish. Let's get baking!
Ingredients for old fashioned cannoli cake
Twelve ingredients, three layers—this cake delivers all the nostalgic cannoli magic without the fuss.
| Ingredient | Amount | Notes |
|---|---|---|
| All-Purpose Flour 🌾 | 3 cups | Sifted for light texture |
| Granulated Sugar 🍚 | 2 cups | Divided for cake and shells |
| Unsalted Butter 🧈 | 1 ½ cups | Room temperature, full-fat |
| Large Eggs 🥚 | 8 whole | Room temperature, separated |
| Whole Milk 🥛 | 1 cup | Room temperature |
| Pure Vanilla Extract 🌿 | 2 tsp | High-quality, pure |
| Lemon Zest 🍋 | 1 tbsp | From 1 large lemon |
| Baking Powder 🍞 | 1 ½ tsp | Fine, not instant |
| Fine Sea Salt 🧂 | ½ tsp | Kosher preferred |
| Whole Milk Ricotta Cheese 🧀 | 32 oz | Part-skim works too |
| Powdered Sugar 🍚 | 1 ½ cups | Sifted for smooth filling |
| Heavy Cream 🥛 | 1 ½ cups | Cold, heavy whipping |
| Cannoli Shells 🍪 | 24 whole | Store-bought or homemade |
| Pistachios 🌰 | ½ cup | Shells removed, chopped |
| Orange Zest 🍊 | 1 tsp | From 1 large orange |
The ricotta is non-negotiable here. Whole milk ricotta gives that signature creaminess—part-skim works but lacks richness. I grab mine from Trader Joe's in the refrigerated section, or Whole Foods if you want to splurge on organic. Look for tubs with no watery separation at the bottom (that's a bad sign). The pistachios? Shells removed saves time, but if you're feeling fancy, toast and chop them yourself. The zest matters too—bright lemon and orange make all the difference. Grab a microplane for those fine, fragrant strips. And the butter? Full-fat, room temp—none of that low-fat nonsense.
No ricotta? Cottage cheese blended smooth gets you close, though it's not the same. Running low on pistachios? Almonds or hazelnuts work in a pinch, but pistachios are the classic choice. The vanilla extract should be real—imitation stuff won't cut it. For the cake layers, sifted flour prevents dense texture, so don't skip that step. The eggs? Room temperature ensures they whip up properly for the filling. Pro tip: beat the egg whites to stiff peaks before folding into the ricotta—that's what makes it light and airy. And if you're short on time, store-bought cannoli shells work perfectly for the crunchy topping.
This cake keeps beautifully—3 days in the fridge covered loosely with plastic, or 2 months frozen between layers of parchment. The ricotta filling is best made a day ahead (it thickens nicely). For serving, dust with powdered sugar right before cutting—that's when it looks like a bakery masterpiece. Leftovers? Reheat in 10-second bursts in the microwave to keep the layers tender. And if you're making this for a crowd, double the batter—it bakes up even better in a 9x13 pan.
Why You'll Love This Recipe
- No Mixer Needed: I swear by this recipe because it’s all about the creaming method—just butter, sugar, and eggs, beaten by hand until light and fluffy. No electric mixer, no fuss, and honestly? The result is that perfect, airy texture that makes it worth the elbow grease.
- Buttery Vanilla Hug: That rich, old-school vanilla flavor? It’s not overpowering—just warm, comforting, and just sweet enough. The butter and milk create this tender crumb that practically melts in your mouth, like a hug from your grandma’s kitchen.
- Bakes Like a Dream: One bowl, one pan, and about 45 minutes in the oven. No layers of frosting to mess with, no tricky piping—just a simple, sturdy cake that stays moist for days. (Yes, even on a Tuesday night when you’re exhausted.)
- Budget-Friendly Classic: Flour, sugar, butter, eggs, milk—that’s it. No specialty ingredients, no markup. I’ve made this for potlucks, birthday cakes, and even my kid’s school bake sale, and it’s always the one people ask for seconds of.
Step-by-step instructions for old fashioned cannoli cake
This cake brings Italian tradition to your kitchen with layers of tender sponge and rich ricotta filling.
👨🍳 Step 1: Prepare the Ricotta Filling
In a large mixing bowl, combine the 32 oz whole milk ricotta cheese with the 1.5 cups powdered sugar and 2 tsp pure vanilla extract. Use a hand mixer on medium speed to beat until completely smooth and creamy—this should take about 2-3 minutes. The mixture should look like thick whipped cream with no lumps.
I like to press the ricotta through a fine-mesh sieve first if it's particularly grainy. This ensures your filling will be silky smooth. Add the 1 tsp orange zest and mix briefly to distribute the citrus flavor evenly. Cover and refrigerate while you prepare the cake layers—this keeps it cool and ready for assembly.
👨🍳 Step 2: Make the Cake Batter
Preheat your oven to 350°F and grease three 9-inch round cake pans (or line with parchment circles). In a separate large bowl, whisk together the 3 cups all-purpose flour, 1.5 tsp baking powder, and 0.5 tsp fine sea salt. Set aside.
In a stand mixer fitted with the paddle attachment, cream the 1.5 cups unsalted butter and 1 cup granulated sugar on medium speed for 3-4 minutes until light and fluffy. Add the 8 whole large eggs one at a time, mixing well after each addition. Scrape down the sides of the bowl as needed. The batter should be pale and nearly tripled in volume.
🥘 Step 3: Combine and Bake the Layers
With the mixer running on low speed, add the 1 cup whole milk and 1 tbsp lemon zest to the butter mixture. Gradually add the dry ingredients in three parts, mixing just until combined after each addition—don't overmix. Divide the batter evenly among the prepared pans.
Bake for 25-30 minutes or until a toothpick inserted in the center comes out clean. Let the cakes cool in the pans for 10 minutes, then transfer to a wire rack to cool completely. Here's the thing—these cakes should be tender but not dense. If the top browns too quickly, tent with foil after 15 minutes.
🍳 Step 4: Assemble the Cannoli Cake
Once completely cool, level the tops of the cakes if needed. Place one cake layer on a serving plate. Spread about ⅓ of the ricotta filling evenly over the top, leaving a ½-inch border around the edges. Add 12 cannoli shells, pressing them gently into the filling so they stand upright.
Repeat with the second cake layer, another ⅓ of the filling, and the remaining 12 cannoli shells. Top with the final cake layer and spread the remaining filling over the top. Dust with the remaining ½ cup granulated sugar and sprinkle the 0.5 cup chopped pistachios evenly over the top. Chill for at least 2 hours before serving.
⏰ Step 5: Serve and Enjoy
Slice the cake with a sharp serrated knife for clean pieces that showcase the ricotta filling and cannoli shells. The texture contrast is what makes this dessert special—tender cake, creamy ricotta, and the satisfying crunch of the shells with each bite.
For best results, serve at room temperature. The flavors develop even more after chilling, and the cannoli shells will be perfectly crisp. This cake keeps well in the refrigerator for up to 3 days, covered tightly. Bring it to room temperature before serving for the best texture.
Pro Tips For Making Old Fashioned Cannoli Cake
- Whisk Eggs Like Mad: Beat those eggs until they’re pale, thick, and ribbon-like—at least 3 minutes with a hand mixer. I learned this the hard way: under-whipped eggs make a cake that’s dense and sad. (Yes, even if you’re impatient like me.)
- Use Room-Temp Butter: Take the butter out of the fridge an hour before mixing—soft but not melted. Cold butter creates pockets of air, and your cake will end up with weird, greasy spots. Trust me, your future self will notice the difference.
- Sift the Flour Twice: Skip the sifting, and you’re asking for a cake with a coarse, uneven crumb. Give that flour a good shake through a fine-mesh sieve before measuring, then sift it again into the bowl. It’s a little extra work, but the texture is worth it.
- Don’t Overmix the Batter: Mix just until the flour disappears—no streaks, no fighting. Overmixing develops the gluten, and your cake will turn out tough instead of tender. Stop when it looks like a smooth, slightly lumpy pudding. (I know, it’s weirdly satisfying to keep going.)
Common mistakes when making this recipe
Overmixing the Batter
I’ve seen this happen more times than I can count—especially when you’re nervous about getting the cake layers just right. Overmixing develops the gluten in the flour, turning your delicate sponge into a dense brick.
The moment your batter looks smooth and uniform, stop mixing. For the cake layers, mix just until the dry ingredients are barely incorporated. 💡
Skipping the Chill Time
The ricotta filling needs time to set properly between layers, and the cake needs to firm up slightly. If you slice too soon, you’ll end up with a messy, runny disaster.
I’ve learned this the hard way—once, I served a cake that was still too soft, and the filling oozed out like a sad puddle. Always chill for at least 2 hours before cutting.
Uneven Filling Distribution
This is where most home bakers stumble. If you don’t spread the ricotta filling evenly, you’ll end up with some slices that are dry and others that are drowning in filling.
Use a spatula or offset cake spreader to smooth it out, and leave that ½-inch border around the edges. Trust me, it makes all the difference.
Using Low-Quality Ricotta
Not all ricotta is created equal. If you grab the first tub from the store without checking, you might end up with a filling that’s grainy or watery. Look for whole milk ricotta with no separation at the bottom.
I always reach for Trader Joe’s or Whole Foods brands—they’re consistent and creamy. If your ricotta is too thick, add a splash of heavy cream to loosen it up.
Ignoring the Shells
The cannoli shells are what give this cake its signature crunch, so don’t treat them as an afterthought. Press them gently but firmly into the filling so they stay upright. If you’re using store-bought shells, check for any that might be cracked or broken—those will fall apart when you slice.
And if you’re feeling ambitious, bake your own shells for extra authenticity. 🌟
Overbaking the Cake Layers
Tender cake is key here—overbaking dries it out, and you’ll end up with a crumbly mess. Pull the cakes out when a toothpick comes out clean, even if the edges look slightly underdone.
They’ll continue cooking as they cool. If the tops brown too quickly, tent them with foil after 15 minutes to prevent overbrowning.
Nutrition facts
Frequently asked questions
Can I make this cannoli cake without cannoli shells?
The shells add that signature crunch, but you can substitute with crushed pistachios or amaretti cookies for texture. For a traditional look, try piping extra ricotta filling in swirls or adding a layer of crumbled ladyfingers between cake layers. The flavor will still shine through!
How do I store leftovers?
Keep the cake in an airtight container in the fridge for up to 3 days. For longer storage, freeze between layers of parchment for 2 months. Always bring to room temperature before serving to preserve the creamy texture. Microwave in 10-second bursts if needed.
Can I make this cake in a different pan size?
Yes! For a single 9x13-inch pan, bake one layer at 350°F for 30-35 minutes. Adjust filling amounts proportionally—use ⅔ of the ricotta spread evenly, then top with shells and remaining filling. The chilling time stays the same for proper setting.
What's the secret to perfect ricotta filling?
Three things: whole milk ricotta (never part-skim), sifting through a mesh strainer for smoothness, and chilling overnight before assembly. The citrus zest brightens flavors, while powdered sugar balances richness. Beat it until completely smooth—no lumps allowed!
Can I make this gluten-free?
Swap the all-purpose flour for a 1:1 gluten-free baking blend (like Bob's Red Mill) and use gluten-free vanilla extract. Add ½ tsp xanthan gum to help bind the layers. The ricotta filling remains the same—just ensure your shells are gluten-free if using them.