Main Courses
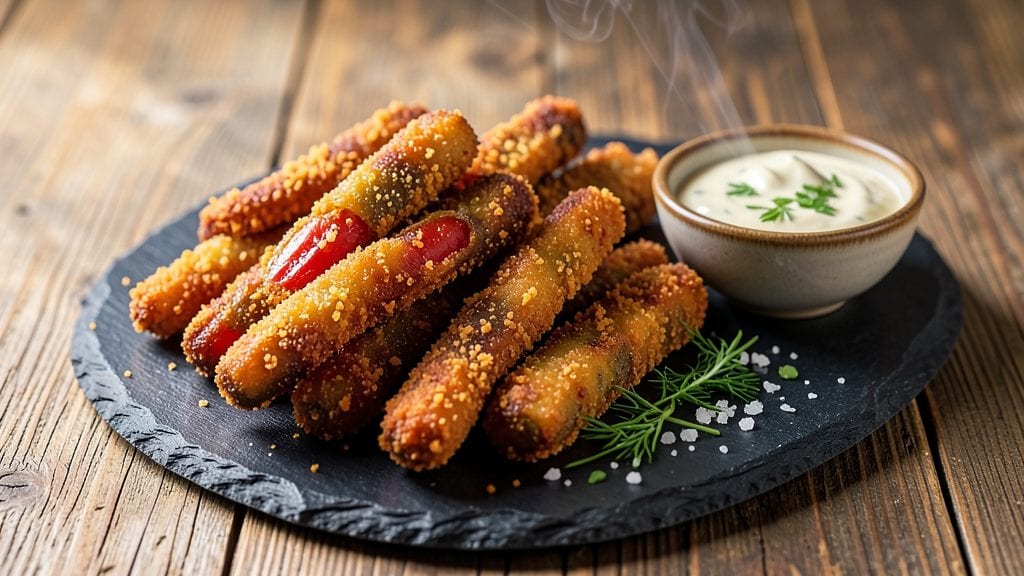
Recreating Hooters fried pickles at home delivers that signature crispy cornmeal crunch that makes them irresistible. After years of testing different breading techniques, I've perfected a method that ensures golden, shatteringly crispy pickles every time—just like the restaurant version.
The secret lies in the right balance of cornmeal and flour, paired with a double-fry for maximum crunch.
This recipe transforms simple dill pickle spears into a crowd-pleasing appetizer that's perfect for game days, parties, or when you're craving something tangy and crispy. The process is straightforward: bread the pickles, fry them twice for extra crunch, and serve immediately with your favorite dipping sauce.
I've tested this with both ranch and cocktail sauce, and both work beautifully.
What you'll end up with is a platter of golden-brown, crispy pickles that stay crunchy even after dipping. The cornmeal coating creates that signature texture, while the tangy pickles provide the perfect balance.
This version is foolproof—no fancy equipment needed, just a deep fryer or heavy pot for frying. Serve warm for the best experience.
For those with dietary restrictions, I've included a gluten-free breading option that delivers the same crispy results. The key is using a gluten-free flour blend that mimics the texture of traditional breading.
Whether you're hosting a gathering or just treating yourself, these fried pickles are sure to become a favorite. Let's get started!
Ingredients for hooters fried pickles
These simple ingredients transform ordinary pickles into crispy, restaurant-style bites everyone will love.
| Ingredient | Amount | Notes |
|---|---|---|
| Dill Pickle Spears 🥒 | 24 whole | Fresh, firm spears preferred |
| All-Purpose Flour 🌾 | 1 ½ cups | For breading consistency |
| Yellow Cornmeal 🌽 | 1 cup | Fine grind for texture |
| Ground Black Pepper 🌶️ | 1 tbsp | Freshly ground for bite |
| Garlic Powder 🧄 | 1 tbsp | Enhances tangy flavor |
| Onion Powder 🧅 | 1 tbsp | Adds depth to crunch |
| Paprika 🌶️ | 1 tsp | Smoked variety preferred |
| Salt 🧂 | 1 tsp | Kosher or sea salt |
| Vegetable Oil 🫒 | 3 cups | High smoke point preferred |
| Ranch Dressing Mix 🥛 | 1 package | For dipping sauce |
| Buttermilk 🥛 | ½ cup | For gluten-free option |
| Gluten-Free Flour Blend 🌾 | 1 ½ cups | For dietary adaptation |
The pickles are the star, so grab fresh, firm dill spears—none of that sad, mushy stuff from the back of the shelf. Trader Joe's and WalmartBob's Red Mill fine-ground cornmeal is my go-to—it's the secret to that perfect texture. If you can't find it, regular cornmeal works, but you might need to toast it lightly first. The spices? Basic stuff, but freshly ground black pepper makes all the difference—don't use the pre-ground kind from the canister.
No cornmeal? Panko breadcrumbs at double the amount work in a pinch, but the texture won't be quite the same. Short on ranch? Mix mayo, sour cream, and seasoning—easy peasy. For the gluten-free version, Bob's Red Mill 1:1 blend is perfect, but any good GF flour works. The buttermilk is key—it helps the gluten-free breading stick better. Pro tip: Pat the pickles dry before breading, or they'll turn soggy. And for heaven's sake, don't skip the double-fry—it's what makes them stay crispy!
Keep the breading mix in an airtight container for up to 1 week—it's great for quick snacks. The fried pickles are best served immediately, but if you need to reheat, 350°F oven for 5 minutes works. Store leftovers in the fridge for 2 days max—they lose crispiness fast. For parties, make a big batch and keep them warm in a 200°F oven with a rack over a baking sheet to stay crispy. Trust me, they disappear fast!
Why You'll Love This Recipe
- Here’s what sold me: the cornmeal gives that addictive crunch while the flour keeps it tender inside. Toss in garlic powder and black pepper, and suddenly your pickles taste like they’ve been hanging out with a smoky campfire. (Yes, even on a Tuesday night.)
- No-Fuss Setup: I swear, you don’t need a degree in frying to nail this. Just flour, cornmeal, and a quick dip—no fancy techniques, no stress. The spears come pre-cut, so all you’re doing is coating and frying. That’s it.
- Crunchy-Creamy Magic: Here’s what sold me: the cornmeal gives that addictive crunch while the flour keeps it tender inside. Toss in garlic powder and black pepper, and suddenly your pickles taste like they’ve been hanging out with a smoky campfire. (Yes, even on a Tuesday night.)
- Game for Any Gathering: Between us, these disappear at parties—no one can resist grabbing another. They’re my go-to for Super Bowl snacks, tailgates, or just when I need something to elevate a simple burger night. Serve ‘em with ranch, and you’ve got a full-on crowd-pleaser.
Step-by-step instructions for crispy cornmeal-crusted pickles
Here's how to achieve that legendary Hooters-style crunch—golden, shatteringly crispy, and perfectly tangy every time.
Prepare the Pickles for Double Breading
Pat the 24 whole dill pickle spears completely dry with paper towels. This step is non-negotiable—any moisture will prevent that perfect crispy crust. Arrange them on a wire rack set over a baking sheet to ensure they dry evenly. For extra crispiness, I like to let them air-dry for 15 minutes while I prepare the seasonings.
In a shallow bowl, whisk together the 1.5 cups all-purpose flour, 1 cup yellow cornmeal, 1 tablespoon garlic powder, 1 tablespoon onion powder, 1 teaspoon paprika, 1 teaspoon salt, and 1 tablespoon ground black pepper. This dry mix is the secret to that signature crunchy texture. The cornmeal creates that signature gritty bite while the flour helps bind everything together.
Create the Buttermilk Dip for Extra Crispiness
In another shallow bowl, stir together the 0.5 cup buttermilk and, if making gluten-free, 1.5 cups gluten-free flour blend. For regular pickles, you can skip the gluten-free flour here. This buttermilk dip is what creates that irresistible crispy shell. The acid in the buttermilk helps tenderize the pickles slightly while the starch helps create that golden crust.
If you're making both regular and gluten-free versions, use separate bowls to avoid cross-contamination. The gluten-free flour blend will give you a slightly different texture but still incredibly crispy results. Let the buttermilk mixture sit for 5 minutes while you heat the oil—this gives the buttermilk time to penetrate the spears.
Heat the Oil to the Perfect Temperature
Fill a deep fryer or heavy pot with 3 cups vegetable oil and heat to 350°F. Use a deep-fry thermometer to monitor the temperature—this is critical for even cooking. If the oil gets too hot, the pickles will burn on the outside before they cook through. If it's too cool, they'll absorb oil and become greasy instead of crispy.
Test the oil by dropping in a small piece of bread. It should sizzle immediately and float to the surface within 30 seconds. This confirms your oil is ready. Keep the oil at 350°F throughout frying—fluctuations will ruin the texture. Have your fryer set up near your prep station so you can work efficiently.
Fry the Pickles in Two Stages for Maximum Crunch
Working in batches of 6-8 spears, dip each pickle first into the buttermilk mixture, letting excess drip off, then into the flour mixture, pressing gently to adhere. The double-dredging creates that thick, flavorful crust. Fry for 2-3 minutes until golden brown. You'll know they're ready when they float to the surface and maintain their shape—no more sinking like a rock.
Remove the pickles with a slotted spoon and drain on a wire rack lined with paper towels. The rack allows air circulation so they stay crispy, not soggy. Immediately return the oil to 350°F for the next batch. Don't let the oil cool between batches—temperature consistency is key to that perfect crunch.
Serve Immediately With Ranch Dip
Prepare the ranch dip by mixing 1 package ranch dressing mix with 1/3 cup water (or as directed on the package) until smooth. The dip should be thick enough to coat the back of a spoon but still flow easily. Serve the hot, crispy pickles immediately with the ranch for dipping—this is when they're at their absolute best.
For maximum crispiness, eat them right away. The pickles will stay crispy for about 15 minutes before they start to soften slightly. Arrange them on a platter with extra ranch in the center. Each spear should be golden brown with a shatteringly crisp crust that gives way to the tangy, crunchy pickle inside. This is the moment you've been waiting for—crispy, crunchy perfection!
Pro Tips For Making Hooters Fried Pickles
- PAT THE PICKLES DRY: Skip the soggy coating by blotting each spear with a paper towel before dredging—wet pickles make the flour clump like glue. I learned this the hard way when my first batch turned into a sad, uneven mess.
- COAT IN TWO LAYERS: Dip spears in flour first, then cornmeal—this locks in that crispy, crunchy texture. I used to mix them together, and the cornmeal just floated away like it didn’t belong.
- FRIED IN BATCHES: Crowd the pan, and you’ll steam the pickles instead of fry them. Work in small batches (about 6-8 spears at a time) so the oil stays hot and the coating stays golden.
- SALT THE OIL: Toss in a pinch of salt with the pickles in the oil—it crisps the coating faster and balances the tang. Sounds weird, but it works like a charm.
Make-ahead tips for this dish
Prep Ahead Strategy
You can prep the breading mix up to 3 days ahead and store it in an airtight container.
I like to keep mine in a Mason jar with a tight-sealing lid on the counter—it's ready whenever I am. The cornmeal stays fresh longer this way, and you won't have to measure everything last-minute during a party. Just whisk it together again before using to refresh the spices. 🌽
Pickle Prep Shortcut
Pat your pickles dry and store them uncovered in the fridge for up to 24 hours before frying. This extra drying time helps them stay extra crispy. I often do this the night before game day—it's one less thing to worry about when guests arrive.
Just make sure they're completely dry before breading, or you'll end up with soggy spears. 🥒
Oil Prep for Efficiency
Heat your oil in a heavy pot or deep fryer and keep it at 350°F while you prep the pickles. I use a thermometer with an alert function (like the Thermoworks Smoke) so I don't have to constantly check it.
This keeps your oil ready for immediate frying once the pickles are breaded. Never let the oil cool between batches—it's the fastest way to ruin crispiness. 🔥
Gluten-Free Prep
For the gluten-free version, mix your buttermilk and gluten-free flour blend 1 day ahead and store it in the fridge. The buttermilk mixture thickens slightly overnight, which actually helps it cling better to the pickles.
Just give it a quick stir before using. I've tested this with Bob's Red Mill 1:1 blend, and it works perfectly—no gummy texture here! 🥛
Party Serving Plan
For gatherings, fry the pickles in batches and keep them warm in a 200°F oven on a wire rack over a baking sheet. This keeps them crispy for up to 30 minutes while you finish other dishes.
I also like to set up a DIY dipping station with small bowls of ranch, cocktail sauce, and hot honey—it's always a hit with kids and adults alike. 🍽️
Leftovers Revival
If you have leftovers (unlikely, but possible!), reheat them in a 350°F oven for 5 minutes to restore some crispiness. They won't be as perfect as fresh, but they're still delicious.
Store any extras in an airtight container for up to 2 days in the fridge, but I'd recommend making just enough for immediate serving—these disappear fast! ⏰
Nutrition facts
Frequently asked questions
Can I use regular pickles instead of dill spears?
While dill spears are traditional, you can use any firm pickle variety like bread-and-butter or even banana peppers. Just cut them into 2-inch pieces for even cooking. The key is using fresh, crisp pickles—not that sad, mushy jarred stuff from the back of the shelf.
What's the secret to getting them extra crispy?
The double-fry technique is everything! First fry at 350°F for 2-3 minutes, then return to the oil for another 1-2 minutes to set the crust. Also, pat the pickles bone-dry before breading—any moisture ruins crispiness. A wire rack (not paper towels) for draining keeps them airy and crunchy.
Can I make these without deep-frying?
Yes! For an oven-baked version, toss breaded pickles on a wire rack and bake at 425°F for 10-12 minutes, flipping halfway. They won't be as crispy as fried, but still delicious. Or try an air fryer at 375°F for 6-8 minutes, shaking halfway. The cornmeal coating works in all methods!
How do I keep them crispy when serving?
Serve immediately on a wire rack over a baking sheet to maintain airflow. For parties, keep them warm in a 200°F oven on a rack (not a plate) for up to 30 minutes. Never stack them—they'll turn soggy fast. The cornmeal crust loses crunch after 15 minutes**, so eat them fresh!
What's the best dipping sauce besides ranch?
Try spicy mayo (mix mayo with hot sauce), cocktail sauce (ketchup + horseradish + Worcestershire), or honey mustard. For a smoky twist, serve with chipotle ranch. The tangy pickle flavor pairs perfectly with sweet, spicy, or creamy dips—experiment to find your favorite!