Sauces & Condiments
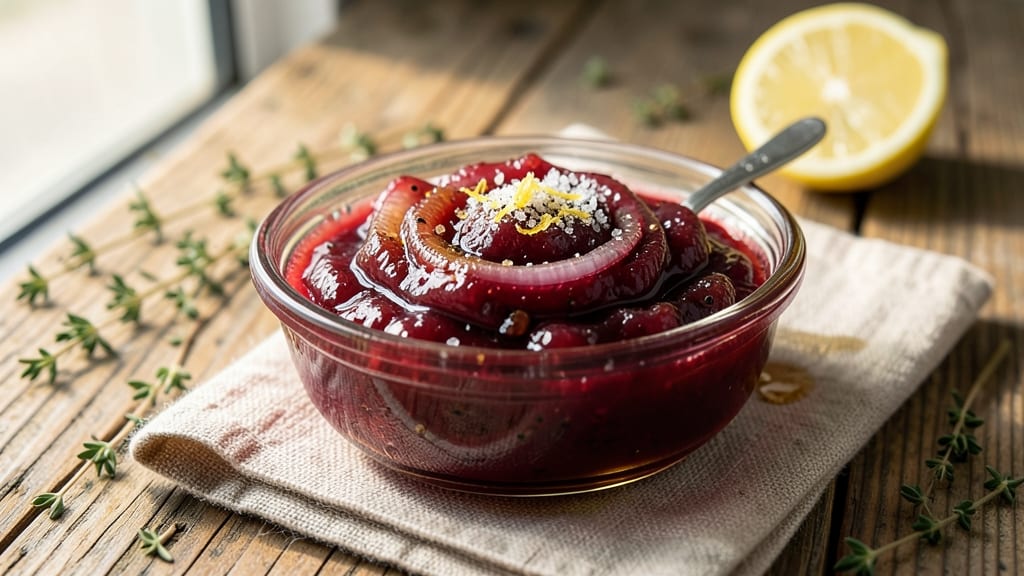
This red onion jam recipe transforms sharp, pungent onions into a sweet-tangy spread that elevates everything from sandwiches to charcuterie boards. The slow caramelization process unlocks deep, complex flavors while balancing sugar and acid for a jam that’s both vibrant and versatile.
I developed this recipe after realizing how often red onions were underutilized in sweet applications—until now.
What sets this red onion jam apart is its shelf-stable quality, thanks to a precise ratio of sugar and vinegar that preserves while enhancing flavor.
The process involves just 15 minutes of active cooking, followed by a cooling period where the colors deepen and the sweetness melds with the onion’s natural tang. Perfect for those who love bold flavors but want a smooth, spreadable texture.
The result is a glossy, ruby-red jam with a perfect balance of sweetness and acidity, where each bite delivers layers of caramelized depth. It pairs beautifully with sharp cheeses, cured meats, or even as a glaze for roasted vegetables.
This isn’t just a condiment—it’s a flavor enhancer that turns ordinary dishes into something extraordinary.
Store it in the fridge for up to 3 months, or can it for long-term preservation. Whether you’re hosting a dinner party or simply want to add a gourmet touch to everyday meals, this red onion jam is a game-changer. Let’s get started on making it.
Ingredients for red onion jam
Sweet-tangy spread with just eight ingredients transforms sharp onions into a vibrant ruby jam.
| Ingredient | Amount | Notes |
|---|---|---|
| Red Onions 🧅 | 2 lbs | Thinly sliced, about 8 cups |
| Granulated Sugar 🍚 | 2 cups | Light or dark brown preferred |
| Apple Cider Vinegar 🍏 | ½ cup | For tangy balance |
| Fresh Lemon Juice 🍋 | ¼ cup | Freshly squeezed |
| Salt 🧂 | 1 tsp | Kosher or sea salt |
| Ground Black Pepper 🌶️ | ½ tsp | Freshly ground preferred |
| Extra-Virgin Olive Oil 🫒 | 1 tbsp | For glossy finish |
| Fresh Thyme Leaves 🌿 | 1 tsp | Optional, for depth |
The red onions are the star—pick firm, dry ones with bright color. Kroger or Trader Joe's usually have the best selection. Thinly slice them (about 1/8-inch thick) for even caramelization. If you're short on time, a mandoline makes this job effortless. Avoid any onions with soft spots or sprouting—those won't caramelize properly. The sugar matters too: light brown sugar gives a deeper caramel flavor, while white sugar keeps it cleaner. I always grab the Domino brand from the bulk section at Costco—it's consistent and affordable.
No apple cider vinegar? White vinegar or balsamic vinegar work in a pinch, though balsamic adds a slightly sweeter note. Short on lemon juice? Lime juice or white wine can substitute at the same amount, though the flavor profile shifts slightly. The thyme is optional but adds a lovely herbal note—fresh thyme from the grocery store's produce section is ideal, but dried works at half the amount. For a smokier jam, add 1/4 tsp smoked paprika with the spices. If you're worried about the jam being too sweet, start with 1.75 cups sugar and adjust to taste after cooking.
This jam keeps beautifully in the fridge for up to 3 months in a sealed jar. For longer storage, sterilize jars and process in a water bath for 15 minutes—can it like you would jam. The color deepens as it sits, so don't be surprised if it goes from ruby to almost purple over time. I like to portion it into small jars for gifts—8-ounce jars are perfect for sharing. The jam thickens as it cools, so give it a stir before serving if it seems too stiff. Trust me, it'll come together beautifully.
Why You'll Love This Recipe
- Pantry Magic: I swear, this jam needs nothing but what’s already in your cupboard. No fancy tools, no last-minute grocery runs—just onions, sugar, and a few minutes of simmering. Honestly, I’ve made it while waiting for dinner to cook, and it still comes out perfect.
- Sweet-Savory Balance: That first bite where the caramelized onions hit with a tangy kick? Chef’s kiss. The vinegar and lemon cut through the sweetness just enough to make it addictive—like a candy with a grown-up twist. I’ll be real: I’ve caught myself eating it straight from the spoon.
- Game for Any Plate: Slather it on toast with goat cheese, drizzle it over grilled chicken, or toss it into a charcuterie board. It’s my go-to for breakfast, lunch, or a fancy-ish dinner when I’m not in the mood to cook. Even my picky teenage nephew asks for it now.
- Lasts for Weeks: One batch feeds me for ages, and it only gets better with time. The flavors deepen as it sits, so I make a big batch and keep it in the fridge—no waste, no stress. Budget-friendly? Absolutely. My wallet and I both approve.
Step-by-step instructions for red onion jam
This sweet-tangy spread comes together with minimal effort but maximum flavor—here's how to make it perfectly every time.
Prepare and Cook the Onions
Begin by thinly slicing the 2 lbs red onions into even strips—about ⅛-inch thick. I use a mandoline for precision, but a sharp chef's knife works too. The goal is to create a uniform texture that will soften evenly during cooking. Transfer the sliced onions to a large, heavy-bottomed pot with a tight-fitting lid.
Add the 1 tablespoon extra-virgin olive oil and stir to coat the onions completely. This prevents sticking and adds a subtle richness to the finished jam. Cook over medium heat, stirring occasionally, until the onions begin to soften and release their moisture—about 5 minutes. Here's the thing: you want them to caramelize slightly but not brown, so keep a close eye on the pot.
Add Sweetener and Acid
Once the onions are tender and translucent, increase the heat to medium-high and add the 2 cups granulated sugar all at once. Stir vigorously to dissolve the sugar completely into the onion mixture. This is where the magic happens—the sugar will begin to break down the onion fibers while creating a syrupy base for the jam.
After the sugar dissolves, pour in the 0.5 cup apple cider vinegar and 0.25 cup fresh lemon juice. The acidity will balance the sweetness and help preserve the jam's vibrant color. Stir well to combine, then reduce the heat to medium-low. The mixture should simmer gently—you'll see small bubbles forming at the edges of the pot, but it shouldn't be a rolling boil.
Simmer Until Thickened
Cover the pot and let the mixture simmer for 45 minutes, stirring occasionally. Here's the critical part: you're looking for the onions to become completely tender and the liquid to reduce significantly. The jam should thicken dramatically, coating the back of a spoon when you lift it out. If it's not thickening enough after 45 minutes, uncover the pot and continue simmering for another 10-15 minutes, stirring frequently.
As it cooks, the onions will darken slightly and develop a deep, caramelized flavor. You'll notice the mixture changes from a loose liquid to a thick, spreadable consistency. This is when you know it's ready—when the jam pulls away from the sides of the pot and leaves a slight sheen on the surface.
Season and Finish
Remove the pot from heat and let the jam cool slightly for 5 minutes. This resting period allows the flavors to meld and prevents burning when you add the final seasonings. Stir in the 1 teaspoon salt, 0.5 teaspoon ground black pepper, and 1 teaspoon fresh thyme leaves. The thyme adds an earthy depth that complements the sweet and tangy flavors beautifully.
Taste the jam and adjust the seasoning if needed. I usually find the sweetness and acidity balance perfectly, but if it needs more tang, add a splash of lemon juice. For extra richness, you could even stir in a teaspoon of honey or maple syrup. Transfer the jam to clean, sterilized jars and let it cool completely before sealing.
Store and Enjoy
The jam will continue to thicken as it cools, so don't be alarmed if it looks slightly runnier right after cooking. Once completely cooled, it should have a glossy finish and a spreadable consistency. Store the jam in the refrigerator for up to 2 weeks, or process the jars in a water bath for long-term storage.
This versatile spread works beautifully on sandwiches, as a glaze for meats, or as a sophisticated topping for cheese boards. The perfect balance of sweet, tangy, and savory flavors makes it a crowd-pleaser that's far more interesting than traditional jam. Serve it warm or cold—either way, it's a showstopper.
Pro Tips For Making Red Onion Jam
- Cook Low and Slow: I learned this the hard way—rushing the simmer turns your jam into a sad, watery mess. Keep it at a gentle bubble, around 200°F (93°C), and let it cook uncovered for at least 45 minutes. The longer it cooks, the deeper the flavor, but don’t walk away; stir every 10 minutes to prevent sticking.
- Slice Thin, Even Strips: Uneven slices mean uneven cooking. Cut your red onions into paper-thin, consistent strips—about 1/8-inch thick—and you’ll avoid mushy bits and undercooked edges. A sharp knife and a steady hand make this easier than it sounds.
- Balance the Vinegar Early: Dumping all the apple cider vinegar at the start can make your jam taste harsh. Add half upfront, then the rest in the final 10 minutes of cooking. This lets the acid mellow out while still brightening the flavor—no more puckering surprise.
- Skip the Crowding: Packing too many onions into the pot forces them to steam instead of caramelize. Work in batches if needed—your jam should have room to breathe. A lightly packed pot means better browning and a jam that actually thickens.
Make-ahead tips for leftovers
Prep Ahead Strategy
Slice the 2 lbs red onions up to 3 days ahead and store them in an airtight container in the fridge. I like to keep them submerged in 1 cup cold water to prevent browning—this also makes slicing easier when you're ready to cook.
The onions will keep their crispness and vibrant color, so you won't lose any quality. 🧅
Sugar Caramelization Shortcut
Dissolve the 2 cups sugar in ¼ cup water before adding it to the onions. This creates a simple syrup that coats the onions more evenly and speeds up the caramelization process.
I heat the sugar and water in a small saucepan until fully dissolved, then pour it into the onions while stirring constantly. This method reduces cooking time by about 10-15 minutes!
Vinegar and Acid Prep
Mix the 0.5 cup apple cider vinegar and 0.25 cup lemon juice in a small bowl before adding them to the pot. This pre-mix ensures even distribution and prevents clumping.
I also like to strain the mixture through a fine-mesh sieve to remove any pulp or seeds, which can make the jam slightly grainy. Store this acid blend in the fridge for up to 1 week if you're prepping multiple batches.
Stovetop vs. Slow Cooker
For hands-off prep, use a 3-4 quart slow cooker on low heat. Add all ingredients except the thyme (add it at the end) and cook for 3-4 hours, stirring occasionally. The slow cooker method is perfect for busy days—just set it and forget it until the jam thickens.
I find the flavors develop slightly differently but still delicious, with a deeper, more mellow sweetness. 💡
Batch Freezing for Gifts
Portion the cooled jam into 4-ounce jars and freeze them flat for up to 3 months. This makes beautiful gifts that thaw quickly in the fridge.
I like to label each jar with the date and a quick note about how to use it—like "Great on cheese boards!" or "Perfect sandwich spread!"—to make them extra thoughtful. The jam keeps its texture well after freezing and thawing, though it may be slightly softer.
Long-Term Storage Tips
For shelf-stable jam, sterilize pint-sized mason jars and process them in a water bath for 15 minutes after filling. The high sugar content naturally preserves the jam, but canning adds an extra layer of safety.
I use a Ball Mason jar lifter to handle the hot jars and always check the seals before storing. Once sealed, these jars last up to 1 year in a cool, dark pantry—ideal for holiday gifting or emergency snacking! ❄️
Nutrition facts
Frequently asked questions
Can I substitute white onions for red onions in this jam?
While you can use white onions, red onions are ideal for their vibrant color and slightly sweeter flavor. White onions will work but may produce a paler jam with a sharper taste. For best results, stick with red onions—it's what gives this spread its signature ruby hue and balanced sweetness.
How do I know when the jam is thick enough?
The jam is ready when it coats the back of a spoon with a slight sheen and pulls away from the sides of the pot. It should also be spreadable but not runny. If it's still too thin after 60 minutes of simmering, uncover the pot and cook for another 5-10 minutes, stirring frequently. The sugar will continue to reduce as it cools, so don't worry if it looks slightly runnier right after cooking.
Can I make this jam without vinegar?
Vinegar is key for both preservation and tangy balance, but you can reduce it to ¼ cup if you prefer less acidity. For a sweeter version, add 1 tablespoon honey or maple syrup to compensate. Without vinegar, the jam may spoil faster—refrigerate within 1 week and use it quickly.
Why did my jam turn out too sweet?
This happens when the onions don't caramelize enough to balance the sugar. Next time, simmer uncovered for the last 10 minutes to evaporate excess liquid. You can also add 1 extra tablespoon of vinegar or lemon juice to cut the sweetness. Taste as you go—adjustments are easier before thickening.
What are the best ways to use red onion jam?
Spread it on toast with goat cheese, drizzle over grilled steak, or use as a glaze for roasted vegetables. It's also perfect on charcuterie boards with sharp cheeses like aged cheddar or blue cheese. For a sweet twist, try it in sandwiches with turkey and avocado. The possibilities are endless—get creative!